The UK’s top 7 house rules revealed – are you sticking to all of them?
We all may fall guilty to forgetting some of these
If you ask a bunch of budding landscape photographers to name the biggest challenge they face, the answer you’re likely to receive is “getting a perfect exposure.” This can be difficult with all forms of outdoor photography, but it’s particularly an issue when shooting landscape scenes with a wide range of tones from bright highlights to deep shadows.
In the quick tutorial below you’ll learn the two tricks a British pro uses to consistently nail exposure so he can concentrate on composition, proper focus, and other critical tasks. And while the topic of this lesson is avoiding blown-out highlights, one of the tips is equally valuable for making sure that the images you shoot are devoid of crushed shadows,
Mike Smith is an experienced landscape photographer who posts weekly lessons on his favorite type of shooting to help others improve their skills. In this episode he explains how to employ two camera settings so you won’t have to worry about exposure again.

According to Smith, “These tools really help you build confidence so you’ll get much better photos with details in your highlights and shadows.” He begins by explaining why his cameras are always configured to display a histogram on the rear screen. He discusses how this oft-ignored visual aid works to eliminate much of the guesswork out of exposing a scene properly.
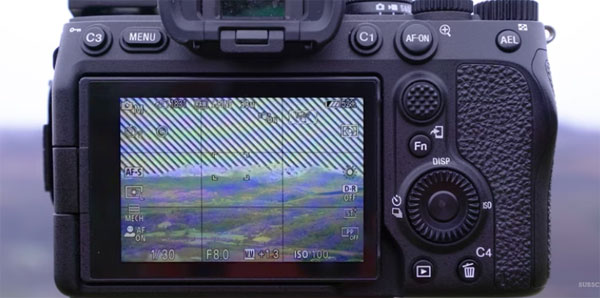
Simply put, the histogram is a graph representing the brightness levels in an image, with completely black pixels on the left, completely white pixels on the right, and everything else in between. Once you understand how to read the histogram, it’s really hard to miss, and Smith provides a few clear examples that make this tool simple to use.
The other helpful tool is one Smith considers “indispensible,“ and it’s a setting known as “zebra stripes.” This one is a graphical representation that overlay stripes on the screen to warn you when highlights are blown out so you can make the adjustments he explains before taking the shot. Some cameras have a blinking white highlight alert (without stripes) that serves the same purpose, and in either case you’ll instantly know when specific areas of a scene are far too bright.
Smith’s popular YouTube channel is a great resource oforstraightforward tips and tricks like this, so be sure to take a look.
We also suggest you check out the editing tutorial we posted earlier, explaining how to use a simple Photoshop tool for landscape photos with perfect color.
(Editor’s Note: You can read ”On the Road” columnist Deborah Sandidge’s other columns here).
Camera technology these days is amazing; it’s practically magic. The problem, though, to my way of thinking and photographing, is that the magic offers a very wide and deep comfort zone—you might call it a zone of automatic decisions, and it’s probably best not to spend a lot of time there, certainly not if you want to create individualistic images.
For my photography—and maybe for yours right now, or for the results you’re hoping to achieve—taking control is essential. I decide aperture, shutter speed, ISO, the parameters of time exposures and multiple exposures—in effect, customizing my camera for the situation and for the result I want. At the beach I know I need a four-second exposure so there’ll be detail in the waves as they recede. To catch incoming waves is a whole different story, one to be told at a shutter speed of 1/15.
Nature is a complex, changing subject that offers a variety of choices, which means there’s a variety of camera-control choices to be made. Letting camera programs or picture controls take over doesn’t often depict the character of nature I’m seeing at a given moment and location. So, here are some photos that required decisions, processes, and controls beyond those that technology would easily and automatically offer.
Repeat As Necessary

I was hoping for a pattern of beautiful clouds in the sunset sky at Florida’s Naples Pier on the Gulf of Mexico, but I got only clear orange light, which was actually an opportunity because the birds in the area were going to stand out against that backdrop. What you’re seeing is the same bird in a multiple exposure that highlights its expressive wing patterns as it crosses the frame, viewed through my 100-400mm zoom lens at 250mm. To make sure nothing would distract from the bird’s tone, I set Darken, an exposure option offered by the camera’s multiple-exposure feature.
Time’s Travel
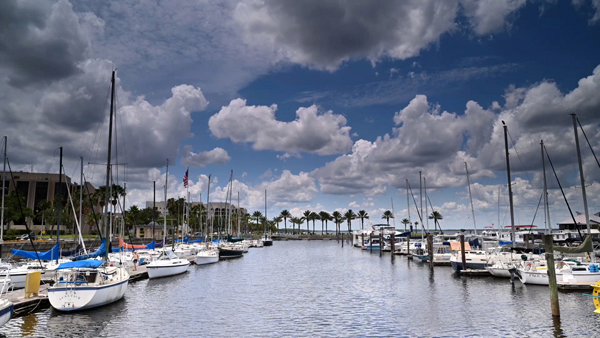
I knew from experience that beautiful cloud structures, like these at Lake Monroe, FL, needed a vast amount of sky to really illustrate their motion in a time-lapse image, and I also knew at what time there’d be the best light,
and how to take control of the camera to capture what I wanted. I chose my 24-70mm lens (at its widest), set the tripod-mounted camera for time-lapse, turned autofocus off, and then stood there for 45 minutes while the camera clicked off a sequence of about 450 images at the two-second intervals I’d chosen. An aperture of f/11 gave me the depth-of-field I wanted,cand 1/160 at ISO 200 took care of the rest.
Mixed Methods

Yes, there is such a thing as a Yellow-Rumped Warbler, and you’re looking at one that’s just landing at my bird-feeder branch in a photo that required a lot of taking control to achieve. These birds will do many good things for the camera, and after photographing a lot of that activity I thought it would be interesting to try a slow-shutter exposure (1/160) along with flash (camera-mounted SB-5000 Speedlight) and my Z9’s Eye AF and rear-synch settings to keep, respectively, the bird’s eyes sharp and its wings in motion. The image also called for a 500mm lens (the bird was about 18 ft. in front of me) and an f/5.6 aperture.
Beyond the Visible

knew it was going to be a little stormy at Tequesta Beach that afternoon, and I wanted to work with the overcast sky, the fairly high tide, and the waves pulling back toward the ocean. But what really caught my attention were the patterns the waves were drawing in the water. I saw those patterns in real time, of course, but I wanted to slow them up, to essentially exaggerate them to effectively see more than my eyes could see, and I knew I could get that with a four-second exposure.
The lens was the 14-24mm at its widest; the aperture was f/16 to get the rocks in the foreground and the targeted pattern ring around the rocks farther out. Every time I go to this beach I analyze what’s there for me and then figure how to interpret it for an expressive image. There’s always a story to tell.
Locked In
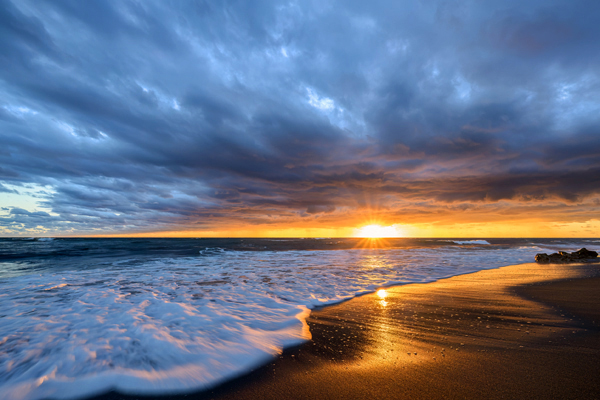
I was back at Tequesta Beach on the day after the four-second photo, this time at sunrise. I still had heavy cloud cover, but what I was most interested in was the washed beach—perfect, no footprints, brilliantly reflecting the moments of sunrise. I wanted some of the incoming surf, and a 1/15 shutter speed slowed it down to give it dimension, while f/11 gave me the sunburst sparkle. I chose the 14-24mm to accentuate the clouds, corner to corner. The rocks at far right served as an anchor, an extra element that I think locks the image together and works so well at the edge of the wave pattern.
Parting Shot
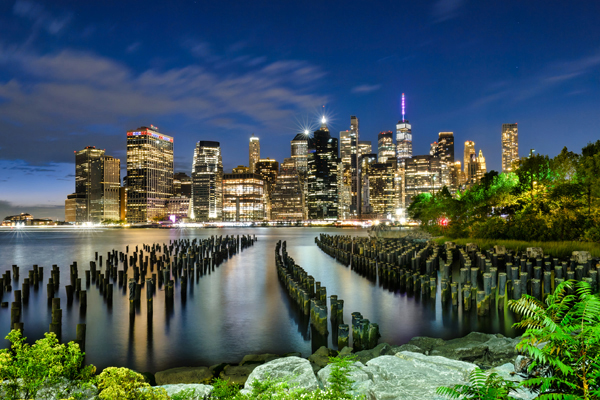
I’d made all the tighter, blue-hour images, but now with the sky clearing behind Manhattan and stars popping out, I thought of including some of the mix of rocks and vegetation near the East River waterline, especially since that section of Brooklyn Bridge Park was so well lit from behind me. I knew 30 seconds would create calm water that would best set off the reflections (I didn’t want to go past 30 because the stars would start to stretch out with trails).
An f/16 aperture gave me the building starbursts for a little sparkle to an image—like the others in this story—that you can’t get by just walking up and pressing the shutter release.
Social Media Note
You can view many more results of Deborah Sandidge’s control of her cameras on Instagram, at https://www.instagram.com/debsandidge/,
Twitter, at https://twitter.com/DebSandidge, and Facebook,
at https://www.facebook.com/debsandidge.

Photo By Katherine Plessner
Today’s Photo of the Day is “Caddo Lake” by Katherine Plessner. Location: Caddo Lake on the Texas/Louisiana border.
“I took this photo while on a tour at Caddo Lake, Texas,” says Plessner. “This lake is known for the huge cypress trees that grow there. The trees and their reflections were amazing subjects to photograph. We were out every morning and evening capturing these beauties in the different light we experienced. When I got home, I had 2,500 photos of trees to sort through!”
Want to get your images in the running for a Photo of the Day feature? Photo of the Day is chosen from various galleries, including Assignments, Galleries and Contests. Assignments have weekly winners that are featured on the website homepage, Facebook, Twitter and Instagram. To get your photos in the running, all you have to do is submit them.
The post Photo Of The Day By Katherine Plessner appeared first on Outdoor Photographer.
