Could the Ooni Volt pizza oven be the best thing since takeaway pizza? We take a first look
What’s so special about Ooni’s newest oven? We take a first look
Many of use would love to pursue a career as a professional photographer, but lack the necessary skills, means, experience and gear to make that dream a reality. But that doesn’t mean we can’t aspire to create pro-quality images.
There’s no secret sauce, other than years of practice, knowledge and dedication, that will enable us to quit our day jobs, but the tutorial below offers a method for giving your images a more professional look with a little help from Lightroom.
Instructor David Johnston is an accomplished landscape pro who says, “My passion s to provide the best tips and tools to level up the success of your photography,” and the amazing Lightroom trick he demonstrates in this episode is a great place to begin.” He insists your photos will look better in minutes and save you tons of time.

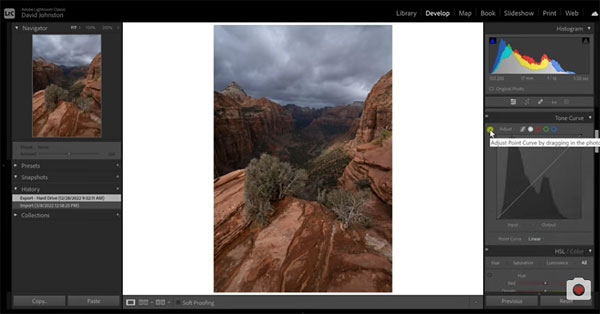
The episode begins with a traditional landscape shot of a rather impressive scene, but the Raw file itself is rather uninspiring. That’s intentional, of course, because Johnston is a very adept photographer and his goal is to demonstrate a dramatic transformation that’s very easy to accomplish.
Johnston opens a Lightroom panel containing a number of Adjust Point tools, that “enable you to make fast edits without even knowing what you’re doing.” That sounds a bit weird until he explains how they work. He begins by selecting an Adjust Point for a Tone Curve and the magic begins.
As you’ll see, you can now hover over any part of the photo and make whatever adjustments you desire. So let’s say you want to bump up the highlights in a specific portion of the image. The task is immediately accomplished with a quick click and drag up. Similarly, if you want to darken the sky, clicking and dragging down will drop the sky tones for a more dramatic look.

As you’ll see, there are a bunch of other adjustments you can make with this surprising technique. For example, darkening a shadow area of the scene is accomplished with a click and another downward drag.
So what exactly is going on under the hood when using this method to adjust tones or colors? Johnston’s response is somewhat along the lines of ”don’t sweat the small stuff; just do it!”
You can find more intriguing shooting and editing tips on Johnston’s YouTube channel, so pay a visit and see what he has to offer. We also suggest you watch an earlier tutorial we posted, explaining how fix poorly exposed photos with a five-minute Lightroom masking technique.
