The unexpected spot for planting vegetables that gardening experts are championing
Vegetable patches don’t have to be restricted to just your back garden
How often have you arrived at a favorite location for a day of landscape photography, only to confront a dull, uninspiring sky? If you’re like most of us, the answer is “more than once or twice.”
So you do the best you can, pack up your gear, and return home to evaluate the images on the computer. Unfortunately, they look just as unremarkable as you expected due to the drab, nearly colorless sky. Thanks to the quick Lightroom tutorial below you’ll know how to transform these rejects into winners the next time Mother Nature doesn’t cooperate.
Photographer Anthony Morganti is an image-editing wizard, and this quick episode demonstrates how he often rehabilitates images like those described above. The easy and effective Photoshop technique takes barely four minutes to explain.
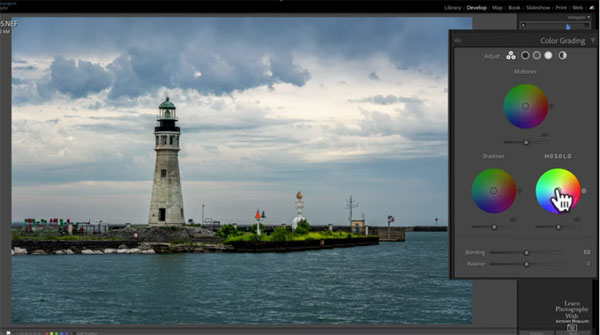
Morganti begins with a seaside photo of a rather pretty scene. As you’ll see, the sky does have a few clouds with some detail, but it’s almost totally devoid of color. Another problem is that the overall tones in the shot are a bit too cool.
The solution involves adding warmer tones to the brightest areas of the sky to offset the coolness of the water. Morganti opens Lightroom’s Basics tab, noting that he’s already made a few adjustments that weren’t sufficient to deliver the impact he desires.
Morganti explains that there are several common methods for warming up the sky, one of which is to simply drag the Temp slider to the right. By doing this, however, you’ll end up adding yellow tones to the entire image. So this isn’t the right solution. After illustrating how using the Color Grading panel provides equally disappointing results, Morganti’s demonstrates a straightforward method for getting the job done to perfection.
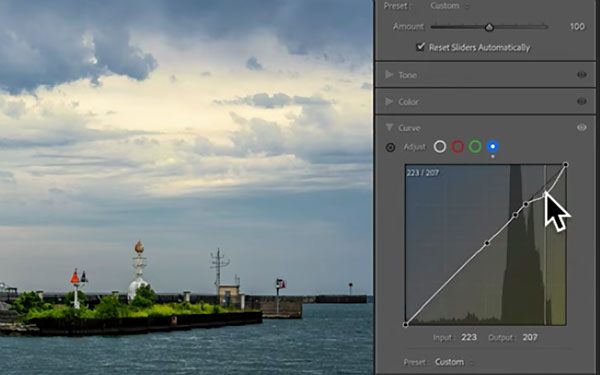
This approach involves creating a mask for the sky, and opening up the Curves panel. Once he selects the blue curve you’ll notice that the left portion of the graph represents blue tones while the right side controls yellows.
Since he only wants to warm up the brightest areas in the sky, which are represented in the upper right of the graph, he creates a couple anchor points and pulls that portion of the graph down. Voila! This quickly does the trick. Now the highlights are a nice and warm, while the blue water and green foliage on the horizon remain unaffected.
If you like this simple and effective trick head over to Morganti’s popular YouTube channel where you’ll find more of the same.
And don’t miss the video tutorial we posted earlier, explaining how to edit photos ten times faster by using a straightforward pro technique.
Blurring the background of a photo is a very effective way to make the main subject of an image really pop off the page. It’s possible to create this effect in the camera or during the editing process, and today’s tutorial involves the latter.
This technique has a variety of applications for giving images a professional touch, like when shooting outdoor portraits with cluttered backgrounds, or landscape scenes full of distracting elements in the distance. This episode from British pro Robin Whalley demonstrates how to get the job done with simple tools in Photoshop.
Whalley is a prolific author, educator and photo-editing specialist who says, “achieving a beautifully blurred background is easier than you may think,” and it takes him barely five minutes to explain the method.
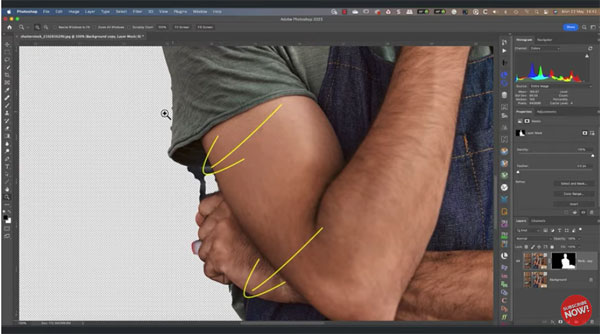
While Whalley uses Photoshop 2023 for this straightforward lesson, the technique works seamlessly with any version of Photoshop that includes the Select Subject feature that you can find within the Select menu atop the screen.
Step one is separating the subject from the rest of image by using the Select Subject tool to create a new Layer Mask. This ensures that only this subject remains visible on the screen—while the background becomes transparent
Whalley then creates a separate layer for the background, Here he uses Photoshop’s Content-Aware Fill feature to automatically remove the main subject. With the main subject out of the way it’s really easy to blur that background with the Gaussian Blur filter. Whalley shows you how to control the intensity of the blur to create exactly the effect you’re after.
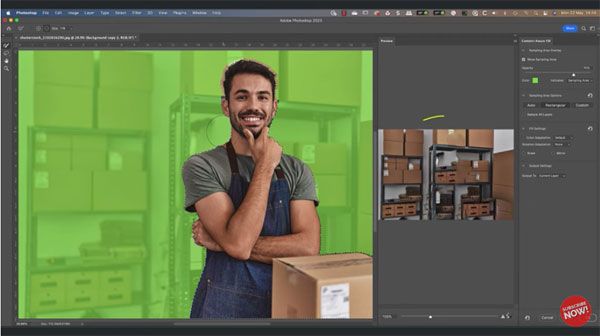
The step-by-step process you’ll learn is simple enough for Photoshop users of all skill levels, and even those with experience will discover how this technique can simplify their workflow.
As Whalley says, “By implementing these techniques you can further enhance the visual impact of your photographsL”. So whether you’re just getting started, or consider yourself a Photoshop wizard, give this a try.
Be sure to take a look at Whalley’s instructional YouTube channel after watching the lesson for more shooting and editing tips and tricks. We also suggest you check out the tutorial we posted earlier from another notable pro, explaining how to shoot unique landscape photos with a telephoto lens. This is an effective in-camera technique for isolating the main subject in a scene.
If you’re thinking about giving wildlife photography a try, our feathered friends provide a great place to start. You don’t have to travel to exotic locations, and all you really need is a telephoto lens, along with the beginner tips you’ll learn in the tutorial below.
One advantage to beginning your wildlife journey with birds is that an abundance of colorful, interesting subjects can often be found in your own backyard. Another option is to visit a nearby park or nature center—preferably in the morning or late afternoon.
And regardless of where you live, the species you’ll encounter varies throughout the year. Instructor Kevin Nordstrom is an accomplished pro, and the helpful techniques he presents in this behind-the-scenes episode are easy enough for anyone to master.
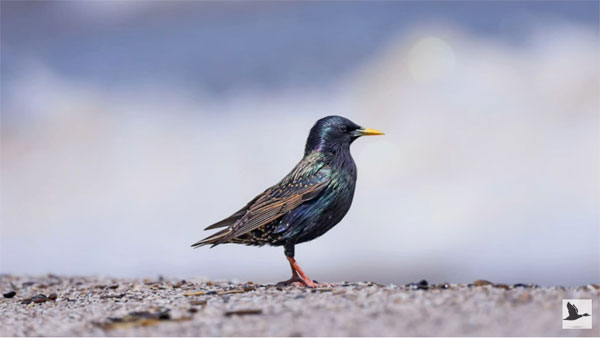
Today you’ll watch Nordstrom photograph marsh birds through the open window of his car. While this may seem odd for a professional, he explains a few benefits of this approach that really make sense. As he says, “What’s really cool about utilizing your vehicle for wildlife photography is that you’re stationary, pretty much hidden, and comfortable”—with all your gear protected from the elements and within reach.
One accessory Nordstrom recommends is a large beanbag that will serve as a very stable support for your camera and lens. Just drape in over the windowsill and you’re ready to go without setting up a bulky tripod on the ground. He also brings along a pair of binoculars to locate and identify the most interesting subjects. It should go without saying that a couple spare batters are essential too.
One of the best things you can do if you plan to shoot at home is to set up a birdfeeder in your yard, keeping it filled with fresh seed. In may take a week or two for local birds to find this “takeout window,” but you’ll soon have a plenty of daily visitors. Adding a simple birdbath for your thirsty subjects will make them feel even more at home.

With the preparations out of the way Nordstrom moves on to technical matters, beginning with focusing techniques for various situations. He also provides great advice on the most appropriate camera settings for different conditions, suggestions for composition, and much more.
As you’ll see, all these variables remain flexible depending upon whether your subjects are stationery or in flight. Some birds tend to be elusive or twitchy, even when at rest; so don’t become frustrated if your first attempts don’t meet expectations. A bit of practice is all that it takes.
After watching this video and taking Nordstrom’s advice to heart, be sure to visit his informative YouTube channel where there is much more to learn. We also recommend watching the tutorial we posted recently from another outdoor pro, explaining how to shoot epic travel and nature photos with a telephoto lens.
