This easy, affordable furniture trick will instantly make a small room look bigger
This Pro Composition Trick Will Transform Your Outdoor Photography (VIDEO)
Today’s lesson from one of our favorite outdoor photographers demonstrates a fun and easy pro trick for adding depth to your outdoor images, and it takes less than six minutes to explain. The technique involves using natural or man-made objects to frame the key subject in a scene.
Instructor Mike Smith is a British pro specializing in landscape photography, who regularly shares behind-the-scenes tutorials that are intended to inspire other to improve their skills. The straightforward method that he demonstrates below is extremely useful when shooting nature scenes, travel photos, and just about any images you shoot outdoors. And it works with whatever gear you own.
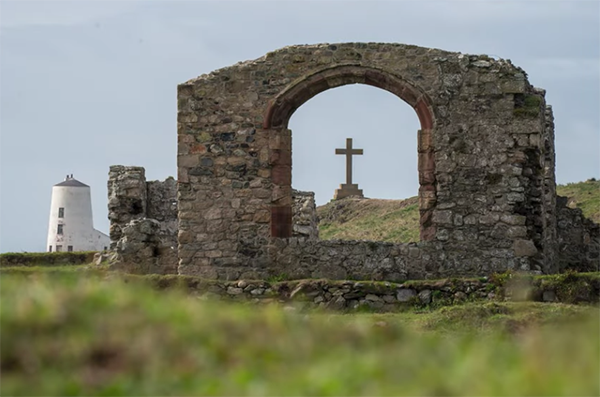
Smith puts it like this: “Framing is a great way to add something to your photographs that others may have missed. It’s where you place a main subject within your photograph with other elements partially or totally surrounding it.” This approach is particularly effective if you can find a relationship between the framing elements and the subject.

Conversely, you can also create compelling images by “juxtaposing two different things that have no relationship to each other.” In either case, the goal is to carefully scrutinize a scene, looking for potential framing objects. These can be anything from an arch, doorway, or old abandoned building, to a void between tree branches.
Smith illustrates how the power of this technique lies in its ability to create depth, “because the thing that you’re shooting through adds another layer to your photograph.” Hence, you a have a subject behind the frame and the background in the distance—resulting in photos with more depth and dimension.
You’ll see how the focal length of your lens, as well as camera-to-subject distance factor into the equation, to heighten or lessen the effect. The aperture you choose is also important because it enables you to control depth of field.

Other less common forms of framing involve using varying degrees of brightness or variations in colors to encircle a subject. A setting sun is also an effective option. Smith explains why he never uses the camera’s optical viewfinder when looking at the sun through a long telephone lens. Instead, he’ll compose on the rear LCD.
Smith also demonstrates the power of what he calls “partial framing” to get the job done. He offers several other possibilities, like photographing a person walking down the middle of a shallow stream that’s bordered by thick foliage on either bank.
The use of these framing techniques simply requires seeing things a bit differently, and when you do good things tend to happen. After watching the video pay a visit to Smith’s popular YouTube channel where you’ll find an abundance of helpful tips and tricks.
And don’t miss the tutorial we posted recently from another accomplished pro, with a beginners guide to shooting eye-popping photos of starlit skies.
When to AVOID Auto White Balance & Use Custom Settings for Photos with Better Color
Many photographers set their camera for Auto White Balance and never modify the setting regardless of the subject at hand. If that sounds like you it may explain why the colors in your photos don’t accurately convey the colors in a scene.
In the tutorial below from the Photo Genius YouTube channel you’ll learn how to easily avoid this problem by selecting a custom White Balance setting instead of always shooting in Auto. By taking this approach your images will look more natural and you’ll be able to capture photos with greater creativity.
Instructor Paul Farris is an Australian pro who has been teaching workshops and posting tutorials for over a decade. He specializes in straightforward tips on common editing tasks, and in today’s episode he demystifies the process of picking the right White Balance settings for different types of photos.

Farris says that “White Balance is a camera feature that’s often overlooked or not used to its full potential.” His emphasis is using White Balance in a creative way, but he begins with a quick primer for those who are unfamiliar with the theory behind this important feature and how it works. In basic terms, this setting enables you to capture images that look like what you see through the viewfinder.
He then delves into the meat of the lesson, which begins with making sure your camera’s Mode dial is off Auto, and that you’re shooting in Manual or one of the semi-automatic modes, like Aperture Priority, Program, or Shutter Priority. Now you’re ready for the White Balance setting that best suits the task.
Some cameras have a dedicated “WB” button while others enable you to change White Balance settings by tapping a “Q” or “i” shortcut button depending upon the brand you own. As you’ll see, the best option to choose has to do with the color temperature of prevailing light—which changes dramatically throughout the day. Another important factor is whether you’re shooting outdoors in bright sun, in the shade, under various levels of cloud cover—or indoors with either flash, window light, or another form of illumination.

Farris admits that Auto White balance may be a good place for beginners to start (despite inconsistent results), because it enables them to concentrate on other basic considerations like composition and focus. But most Shutterbug readers are beyond that point—hence the last six minutes of this 10-minute lesson.
If you’re confident in your basic knowledge feel free to jump to the 4:22 mark of the video, where you learn how custom White Balance Settings come into play. By the time you’re done watching you’ll have a firm understanding of the best setting to use for whatever conditions you confront.
Then take a look at Farris’ instructional YouTube channel where you’ll find a wide variety of straightforward tips and tricks.
We also suggest you watch the tutorial we posted earlier, in which another pro explains why the key to photographing complex landscape scenes is choosing the correct point of focus.
Advertisement
Subscribe to Our Newsletter
Popular Posts
Pages
- 360 Interactive Virtual Tour Sample
- About the Photographer
- Business Portrait Photography
- Concert Photography
- Event Photography
- Fashion Photography
- Food Photography
- Landscape Photography
- Portrait Photography
- Product Photography
- Real Estate Photography
- Sport Photography
- Still Photography
- Street Photography
- Travel Photography
- Videography


