Strictly’s Amanda Abbington shared a snap of her living room – and it sports one of this year’s top trends
The actress offered a glimpse into her cleverly designed space
If you’re wondering if there’s anything new of substance in the updated version of Adobe Camera Raw (ACR), take a listen to image-editing expert Blake Rudis who says this: “There’s an epic color theory tool that I never knew I needed, and now that I have it I’m stoked.”
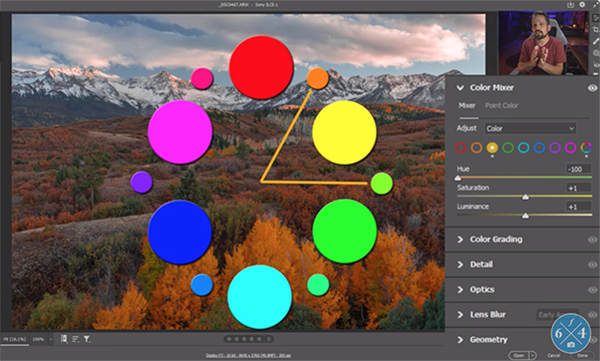
Rudis is the brains behind the f/64 Academy YouTube channel, and he’s not given to hyperbole. So when he get’s so excited about a new image-editing tool it’s time to stop and pay attention. The topic of this eye-opening episode is a color range feature that Rudis says represents “next-level color theory at play.”
The enthusiasm in this 16-minute tutorial is contagious, so prepare for a WOW! moment as you learn how this game-changing feature works. In fact, if you’re like Rudis you just may want to go back to all of your images and redo everything—or at least use it for all of your edits from now on.

Rudis begins with a quick overview of the new features in ACR 16.0, while catching his breath and before revealing his favorite “amazing” new feature. He discusses a new HDR capability, a powerful feature for enhanced bokeh, changes to light and color, and a few other enhancements for improved productivity.
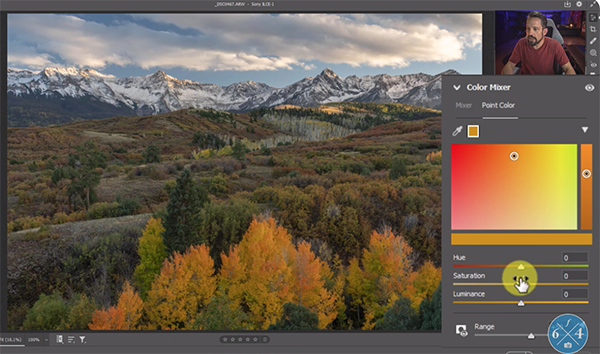
Once he calms down, Rudis is ready for the big reveal; namely, ACR’s new Point Color feature that he now can’t live without. As you’ll see, when compared to the old Color Mixer, this really is a big deal. He pulls up a beautiful autumn landscape photo captured last week just outside Telluride, Colorado and jumps right in.
He begins by using the Sample Point Color tool to select the yellow tones of a tree in the foreground. As you’ll see, the tones aren’t particularly bright, and accentuating colors is Rudis’ goal. He says that in the past he’d brighten up the image by using the Color Mixer and/or Exposure slider.

Now, however, “I don’t need to do that because I can control all of my colors with the new Point Color feature.” You can either do this with sliders or by clicking within a color panel above. We simply can’t match Rudis’ rabid level of enthusiasm, so we’ll skip summarizing the necessary steps and let you enjoy watching him demonstrate the power of this new tool.
Rudis provides a wide variety of image-processing tips on his popular YouTube channel, and we suggest paying a visit after watching this video to see everything else that’s available.
And be sure to check out another helpful tutorial we posted earlier with an easy way to fix converging lines in Photoshop and Adobe Camera Raw for better landscape and cityscape photos.
One characteristic of great landscape photos is an abundance of depth and dimension in the shot. Today we’re featuring a remarkably simple image-editing trick that will help you achieve that goal. Best yet, this method works wonders with whatever software you use.
Instructor Scott Davenport is an experienced shooter who posts weekly tutorials on landscape, seascape, and other types of outdoor photography. In this episode he demonstrates why temporarily converting an image to b&w will greatly improve your basic processing.
By working in monochrome to adjust exposure, black point, and white point you’ll find that your edits are easier to accomplish—including those that will make a big difference in the depth of a shot. Then you can convert the photo back to color and make whatever additional enhancements are required.

Davenport puts it like this: “The distractions of color are temporarily out of the way and you can concentrate on the tones—getting rich deep shadows and crisp highlights.” His demonstration image is of a very compelling scene with a mountain in the foreground and other peaks in the distance. What’s lacking is a clear sense of depth and dimension that differentiates the two important zones in the shot.
The first step is tapping the “v” key—a keyboard shortcut that converts the image to monochrome when working in Lightroom. Then Davenport uses simple sliders to adjust various tonal characteristics like highlights, shadows, whites, and blacks. He also enhances Texture and Clarity, while slightly dropping Dehaze so that the background “retreats.”
Davenport then turns to the Tone Curve and uses the Picker to brighten snow on the left side of the frame without opening up dark areas further back in the scene. Throughout the process you can once again tap the “v” to see how the enhancements affect the color version pf the image.

Davenport repeats the process using ON1 Photo Raw so users of that software see how it works to increase depth and dimension in their photos. The technique there is pretty much the same, although some adjustments are made in reverse.
Regardless of your software of choice the results are impressive, as you’ll see in Davenport’s before/after examples. Bottom line: Flip the photo into b&w and you’ll be surprised by how easy it is to make meaningful changes without the distractions of color to hold you back.
There’s much more to learn on Davenport’s popular YouTube channel, so be sure to pay a visit when you have time. We also suggest watching the tutorial we posted recently from another image-editing expert, explaining how to use Radial Masks in Lightroom for more compelling landscape and nature photographs.
If you’re a landscape photographer who strives to capture great images in the camera, rather than resorting to post-processing, the quick tutorial below is just what you need. In barely 10 minutes you’ll learn what an accomplished pro says are the three lens filters you need, and how to use them.
Instructor Sarah Lyndsay is based in Alberta’s beautiful Canadian Rockies, and she credits the use of these filters for the stunning imagery in her portfolio. She also specializes in long-exposure photography—a genre in which lens filters can be essential.
Lyndsay demonstrates her tips using a popular Haida Magnetic Filter Kit, and she provides a link beneath the video where you can get a 10% discount. But the advice she provides is equally appropriate for employing filters of other brands. Just make sure that you buy high-quality filters so that you don’t degrade the optical quality of your trusted lenses.

Lyndsay’s favorites include a 10-stop ND filter, a six-stop ND, and a circular polarizer; and these three simple tools have always been in her bag for the past 10 years. As she says, “they cover all the bases I need.” So take a look at how she uses them throughout her photographic excursions in the field.
Surprisingly, the popular polarizer is actually the filter Lyndsay uses the least because it’s typically not appropriate for shooting photos with long exposures. But as you’ll see, it’s very valuable for other types of outdoor photography when you want to darken pale blue skies, remove distracting reflections, enhance saturation, and more.
On the other hand, Lyndsay’s neutral density (ND) filters play a big role when she employs slow shutter speeds to capture movement in the clouds, soft flowing water, and other long-exposure subjects.

Blue Hour and Golden Hour are the favorite times of day for just about all landscape photographers, Lyndsay included. You’ll see which of her two ND filters she uses most to when shooting just before sunrise and when the sun is about to drop below the horizon
The lesson also provides solid advice for making the most of 6X and 10X ND filters throughout the day. Along the way you’ll discover a variety of tips for nailing exposure, proper composition, and more. And the stunning images she displays provide all the inspiration you need to give her tips a try the next time you’re out in the field.
After watching the lesson head over to Lyndsay’s instructional YouTube channel where there is much more to learn.
And don’t miss a tutorial we posted earlier from another top pro, explaining how to use focus bracketing and stacking for landscape photographs with optimum sharpness throughout an entire scene.
