John Lewis has broken with tradition with this bold autumnal twist on the classic Christmas tree
Who says a Christmas tree has to be green?
Tilt-shift lenses work wonders to significantly refine an image in a number of important ways. Unfortunately these specialized lenses are extremely costly and beyond the means of many photographers—especially for the limited application they provide.
But here’s the good news: Thanks to Lightroom’s new Lens Blur feature you can mimic some of the effects of a tilt-shift lens, as you’ll see in the tutorial below from the PHLOG Photography YouTube channel. You won’t have to invest in new glass, and the results you achieve are surprisingly realistic.
Instructor Christian Mohrle is a successful German landscape photographer who always has a few tricks up his sleeve, and today he demonstrates how to use Lightroom’s Lens Blur tools for this specific task. We suggest downloading the sample Raw file in the description beneath the video so you can make the changes yourself while watching Mohrle explain the steps.

The Tilt-shift magic comes about halfway through the video, after Mohrle improves the image with a few basic adjustments and a bit of selective masking and color grading. These are important steps, so we encourage you to watch the entire lesson.
The preliminary steps begin with changing the profile to Adobe landscape for more base saturation. Mohrle also adjusts White Balance to maintain a Blue Hour look, slightly raises overall exposure while dropping the highlights, and opens up shadows in the darkest portions of the frame. He also increases texture and drops Clarity.
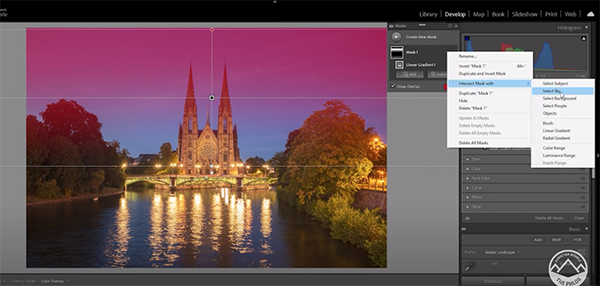
Mohrle then employs some simple masking to further refine the image, primarily focusing on the sky. He uses a large Linear Gradient to get the job done. Here his goal is to bring down exposure in the top portion of the image. Because this adjustment adds a bit too much saturation he opens the Color panel and slightly tones things down.

The next step is opening Lightroom’s Color Mixer for some straightforward color grading. Mohrle uses the sliders to bring up red tones while dropping yellows and oranges. He also slightly increases the blues and applies a bit of split-toning.
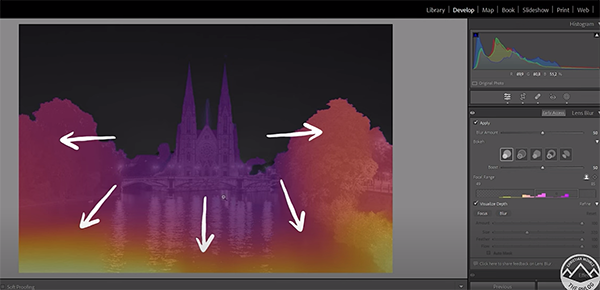
Now you’re at the 6:31 mark of the video where you’re learn how to use Lens Blur to create the natural looking tilt-shift technique. Mohrle explains that this new feature is intended for creating soft, blurry backgrounds, but you’ll see that there’s a lot more than it can do when you manipulate the Depth Map of the image.
Mohrle’s popular YouTube channel contains much more of interest for shooting and editing landscape photographs, so be sure to take a look when you have time.
And don’t miss another helpful editing tutorial we posted recently from another expert, explaining how to use Lightroom to add texture and contrast to Landscape photos without killing image quality.
