Amanda Abbington shows us that anything can become home decor – even a vintage carousel horse
Amanda Abbington knows how to inject personality into her home with eclectic decor – and we’re following suit
Earlier today we posted a tutorial with a foolproof in-camera method for shooting photos with perfect exposure. But what if you want to improve photos you shot in the past that don’t quite hit the mark? The lesson below from the FJR YouTube channel demonstrates how easy this is to do with Lightroom’s powerful Dodge and Burn tools.
This straightforward technique enables you to selectively darken or brighten different areas within an image for balanced tones through the frame. In short, you can open up crushed shadows or retrieve details in overly bright highlights. Instructor Francisco Hernandez explains how to get the job done in barely 11 minutes.
By downloading the demonstration image via a link beneath the video you can follow along, make the adjustments yourself, and then use this simple method to rehabilitate improperly exposed images whether they’re portraits, landscapes, or just about any other photos that need work.

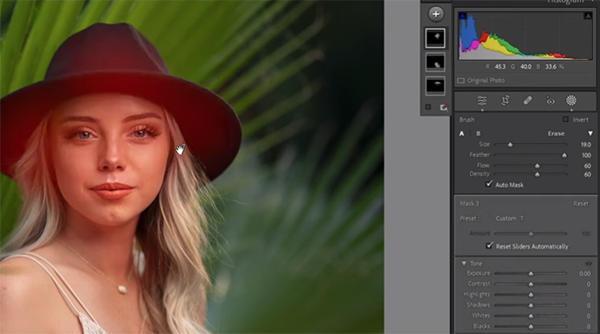
Hernandez pulls up his photo of pretty model Sarah, opens Lightroom’s Develop module, makes a few basic color enhancements, and then explains the Dodge and Burn techniques that dramatically improve the shot.
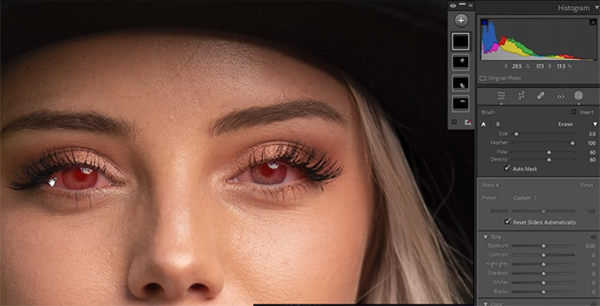
The Dodge and Burn magic occurs within Lightroom’s masking section, and the first step is to click on the Brush icon. Unlike with Photoshop that offers layers, with Lightroom the method relies upon various brushes to mimic the layering process—with different enhancements stacked atop one another.
Hernandez recommends the settings he prefers for Feathering, Flow, and Density. You’ll also see how to choose the proper brush size for the specific task at hand. Once everything is configured properly, it’s easy to paint in whatever Dodge and Burn adjustments are required to even out the exposure.

Hernandez first concentrates on different areas of Sarah’s face and the underside of her black hat that is devoid of detail. He then examines the portrait further, finds a few other areas on her face, body and apparel that can be improved, and quickly refines those.
A long the way Fernandez provides before/after examples of each step in the process so you’ll have a full appreciation of the ease and effectiveness of this streamlined approach to Dodge and Burn. After watching the video take a look at his popular YouTube channel, where you’ll find lessons on other simple editing methods.
And don’t forget to watch the tutorial mentioned above, with another pro’s tricks for shooting perfectly exposed nature and wildlife photos every time.
Nailing exposure is a critical aspect of all genres of photography as you refine your skills, and this can be difficult when shooting outdoors under varied illumination. This is a particularly challenging task when the light is everchanging as clouds pass through a scene, or when subjects in motion move in and out of sunlight and shadow.
Getting the light right without guesswork should become almost second nature so that you can concentrate on composition, selective focus, and other creative aspects of capturing images that grab attention—whether you’re shooting at night or during the day under bright, harsh conditions. If you often struggle with blown-out highlights, crushed shadows, or both, the quick tutorial below is just what you need.
Instructor Simon d’Entremont is an acclaimed pro based in Nova Scotia, specializing in wildlife, nature, and astrophotography. His goal for today’s episode is to help you master exposure so that your images convey just the right mix of brightness values very time. By following his straightforward advice and doing a bit of practice, this goal will quickly become as automatic as tying your shoes.

Be sure to watch until the end of lesson when Simon demonstrates a “bonus tip” known as “Expose to the Right” (ETTR) that enables you to achieve perfect exposure and optimum image quality at the same time. The lesson begins with a quick overview of how a camera’s exposure system works, explaining that by understanding these fundamentals you’ll be able to use Simon’s tips to get the perfect amount of light on the sensor without overthinking the process.
There are two settings key settings for handling the basics; namely shutter speed and aperture—both of which control the number of photons hitting the sensor. With this knowledge under your belt, the “secrets” that follow will make total sense. As he says, “you want to get as much light into your camera because doing so will greatly improve image quality.”
If you’re wondering about ISO, this parameter doesn’t actually change the amount of light entering a camera. Simon suggests that you think of this setting as a “volume knob” that affects brightness in other ways.

So what’s the big trick? It’s nothing more complicated than understanding the histogram on a camera’s rear LCD. This of-ignored option is a graphical representation of pixel brightness in an image—with dark tones on the left, bright tones on the right, and a gradation of everything else in between. By using this essential tool you’ll be able to modify aperture and/or shutter speed to consistently nail exposure in just about every situation you confront.
So watch Simon’s demonstration, activate the histogram in your camera’s Display Settings menu, and exposure problems will be a thing of the past. Once you’re done, head over to his instructional YouTube channel for more helpful tips and tricks.
On a related note, be sure to watch last week’s lesson with several pro tips for shooting eye-popping photos after the sun drops below the horizon.
