How to store an artificial Christmas tree – experts all agree you need to invest in this dedicated storage solution
Keep your artificial Christmas tree looking like new for years to come
Every so often we come across a Lightroom tutorial that reveals a quick trick that you absolutely shouldn’t miss. In this case it’s what one expert calls a “secret Lightroom feature that that can really supercharge your workflow.” Best yet, it takes less than two minutes to explain and can dramatically enhance just about any image you capture.
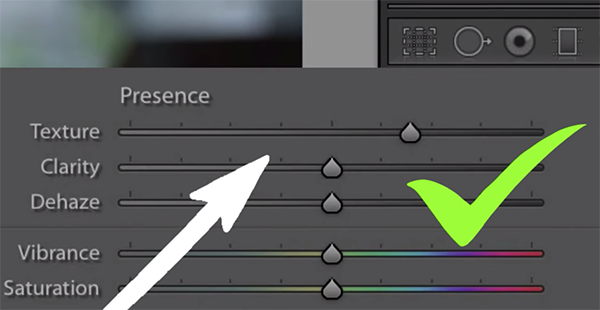
So what is this hidden gem? It’s Lightroom’s simple but powerful Texture tool that many photographers ignore. Today’s unnamed instructor explains how to unlock the power of this easy-to-use tool and make the most of unique capabilities. This oft-ignored technique does everything from enhancing colors and detail, to adjusting tones in an image—thereby enabling you to create breathtaking photos that stand out from the crowd.
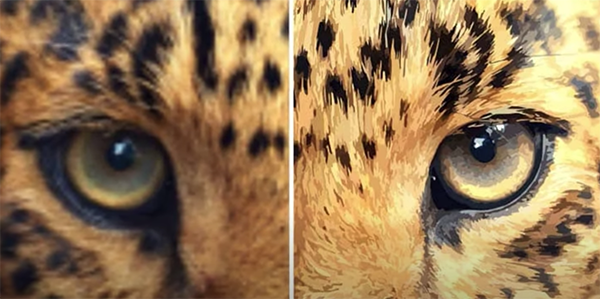
Hidden away inside Lightroom’s Basic panel, the Texture tool can be all things to all photographers. Want to give clouds beautifully defined details? No problem. How about adding bit of skin detail to portraits? It does that too. The Texture tool also works wonders for landscape and wildlife images, simply by dragging the slider.

The best part is that the texture tool, when used properly, achieves all these goals while keeping things looking natural and realistic. Another benefit is that the adjustments you make are non-destructive, meaning you can always refine the effect or revert back to the original image if needed.
This lesson is so brief that we’ll to let the video speak for itself and not be a buzzkill by summarizing things further. The tool is super simple to master and will unlock the full potential of every photo you shoot. And as the instructor insists, “”it will revolutionize your workflow.”
So hit the “Play button,” learn how it works, and then add the Texture tool to your Lightroom bags of tricks. You’ll be very glad you did because the photos you make will look better than ever.

Once you’re done head over to The AI Photo Guy YouTube channel for more enlightening lessons like this one.
And for another helpful Lightroom technique take a look at the tutorial we posted from an equally adept instructor, explaining how to remove ugly color casts that can ruin your photos.
Last week we posted an overview of making nighttime the right time for shooting after the sun drops below the horizon. That tutorial was designed for those new to the technique, and today we’re following up with a deeper dive on one compelling aspect of this style of photography that’s of particular interest to cityscape and street photographers.
Today’s topic is light trail photography, with simple ways to capture the color, movement and energy of vehicles streaking through city streets at night. Not only is this technique available to just about anyone who doesn’t live in a mountain cave, but it’s a sure-fire way to capture captivating images that tell a story of dynamic motion and speed.
This lesson comes to use from the School of Photography YouTube channel, located in the UK—a great source of shooting and editing tips on a wide variety of topics. Instructor Mark Newton is a popular author and photographer who has been teaching the tools of the craft for over 20 years. We’re sure that after watching this 10-minute lesson you’ll be motivated to venture out into the dark and give these tips a try.

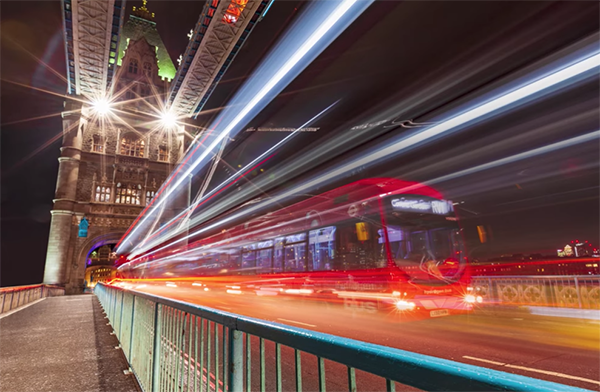
This behind-the-scenes episode takes place at London’s iconic Tower Bridge, as Newton employs light trails to capture stunning photos that differ from most of those we see of this well-recognized landmark. He’s courageously standing on a narrow island in the middle of the busy road as cars, trucks, and London’s double-decker buses stream past in either direction.
Newton mounts his camera atop a low-set tripod and then explains the camera settings he prefers for this interesting technique. He’s shooting in Manal mode with a shutter speed of four seconds and explains how to determine the appropriate ISO and f/stop for a perfect exposure. Then all that’s left is to frame up the shot, wait for a bus to capture the image he envisions, and hope he survives the night without a trip to the hospital.
With his camera on a two-second timer he arrives at an exposure of four seconds, f/11, at ISO 100. This combination yields a one-stop underexposure that’s ideal for the look he has in mind. Your exposure may differ depending upon the density of traffic and the corresponding car lights at the location you choose.

The bottom line is that by following Newton’s guidelines, and experimenting with a few test shots, you’ll be able to capture eye-popping night trail photographs of your own. After watching the video head over to Newton’s instructional YouTube channel where there’s much more to learn.
We also encourage you to check out the primer mentioned above, with several helpful techniques for making nighttime the right time for shooting in the city.
