Dyson’s new AR tool could revolutionise the future of cleaning – and make vacuuming fun
It’s the ultimate IRL cleaning mini-game
Some of the most effective photo processing techniques employ masking to selectively adjust various portions of a scene for optimum exposure, enhanced color, and other key variables that greatly contribute to spectacular images.
Some masking methods are more complicated that others, and today’s tutorial demonstrates one of the easier techniques that image-editing expert Jim Nix calls “Lightroom’s best masking trick.” It’s a straightforward process that takes barely six minutes to demonstrate, and it’s well within reach of all Lightroom users.
Nix pulls up a sublime landscape scene with a calm lake in the foreground. He’s already made some basic enhancements to the image as a whole, like increasing exposure to bring out more shadow detail in the water. Unfortunately, this adjustment also lightened the hills, trees, and reflections retuning across the frame further back, and his goal is to keep these in silhouette for a dramatic effect.

In essence, this illustrates the problem with global adjustments that can often conflict or be counterproductive. And that’s precisely why selective masking is so transformative. By including the Subtract trick you’ll learn today, masking becomes even more precise and powerful. That because you’ll be able to select small areas and target them accurately.
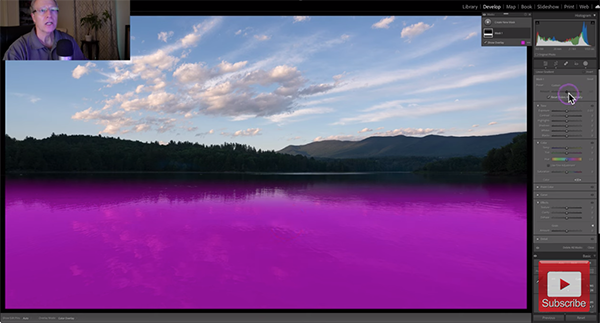
With this more sophisticated approach, Nix places a Linear Gradient over the foreground to open up the foreground without affecting the rest of the frame. He also drops Texture and Clarity to achieve his preference for smooth water. Next comes a Select Sky Mask above the ridgeline that enables him to slightly darken this portion of the scene.
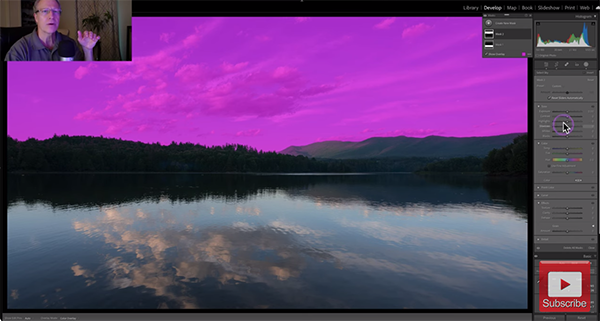
Now it’s time to place the middle of the frame in silhouette, and this is where Nix employs “my little trick.” He does this by adding another Linear Gradient to the top of the image and dragging it down all the way through the middle area he intends to isolate. As you’ll see, the middle of the frame is now selected, but so is the sky which has already been edited for the exposure Nix wants.

The solution is apparent in the Lightroom masking panel where you’ll find the Add and Subtract options. Nix simply uses the latter to eliminate the sky from his selection. And now it’s super easy to create the silhouette effect he wants in the middle of the frame as intended from the get-go.
After watching how easy this is to accomplish you’ll have a new editing trick up your sleeve. Be sure to visit the Jim Nix YouTube channel where there are more great lessons like this one.
And speaking of simple, be sure to check out a tutorial we featured recently from another post-processing expert who demonstrates how to give outdoor photographs realistic depth of field of field with an easy two-minute editing trick.
Whether you process images in Lightroom, Photoshop, or another full-featured editor, it’s difficult not to get carried away by all the capabilities available. But sometimes you’ll achieve much better results by restraining yourself and taking a subtle approach so that you don’t ruin photos by giving them an “over-cooked” look.
In this 10-minute tutorial from Adorama TV, you’ll learn why it often pays off when you avoid making too many adjustments, so that your images retain a realistic appearance. In other words, you can save time and effort while achieving more impressive photos if you follow the old adage that “less can be more.”
Instructor David Bergman is a hardworking New York-based pro who specializes in the unique combination of sports, concert, and celebrity photography. This episode demonstrates how to keep things simple when editing a wide variety of digital and film photographs of a variety of genres. He kicks off the video with this relevant question: “How much photo editing is actually too much?”

This lesson was inspired by a question from one of his fans, and Bergman reveals several self-imposed rules for processing the editorial, fashion and fine art images he captures when both image quality and credibility are top of mind. He also answers the common question, “is it OK to edit sport photographs?”
The meaning of the term “editing” has changed dramatically since Bergman first started out. As he explains, “back in the old days editing was simply the process of culling through images and picking the best of the best.” Fast-forward to today, when we have access to a myriad of sophisticated processing tools, the definition far more expansive.
Now editing adjustments include sharpening, color grading, modifying contrast and exposure—and even removing bland skies and other weak elements and replacing them with others. And, of course, there are also numerous AI features (love them or hate them)” that do most (if not all) of the work automatically while you sit back and merely watch the magic take place.

Bergman is completely up to date, with 30 years of experience, and he’s very passionate about the approach he takes to create photographs that are both compelling and realistic—whether they’re captured on the sidelines at the Super Bowl or shot from the pit at a concert.
You may think that his approach doesn’t apply to you as an amateur, but there are ethical rules for all of us with a camera that should be considered. And ethics notwithstanding, you certainly don’t want to ruin a great image by going overboard with the enhancements you make. There’s much more to learn on the Adorama TV instructional channel, so check out what’s available.
And don’t miss the tutorial we posted recently from another acclaimed pro who explains why exposure blending is his secret sauce for editing landscape and nature photographs for maximum impact.
