This 4-in-1 coffee machine is compatible with pods and ground coffee – and less than £100 on Amazon
This might be the most hardworking and versatile coffee machine yet!
In a never-ending search for the “perfect light,” many photographers ignore the beauty and simplicity of shooting in open shade. Not only does this method provide soft, even illumination, but this straightforward technique avoids the encumbrance of costly and ungainly lighting gear and accessories.
Instructor Mark Wallace summarizes today’s tutorial like this: “Discover the secret to transforming your portrait photography without breaking the bank and say goodbye to expensive equipment—all you need is the magic of open shade.” So pay close attention as he unlocks the power of this “effortless” style of portraiture.
Wallace is an experienced photographer who left the comfort of his home in the U.S. to travel the globe on a motorcycle loaded with a minimum of photo gear. Hence his preference for simplicity and available light. In this episode he demonstrates the shady technique in three locations—each resulting in captivating portraits with a unique look.

Open shade describes a situation with relatively bright illumination that delivers soft light without all the problems of bright sun or shadows falling on a subject. Wallace prefers shooting from a balcony, with the sun on the opposite side of the building, for several reasons. One benefit is that directional light from outside the balcony often bounces off the wall to brighten up the scene.
Another big advantage of this simple approach is that it imbues a scene with specular highlights that create perfect catchlights in a subject’s eyes. Of course, open shade can be found in a variety of other settings, and Wallace explains a variety of techniques for using this beautiful light to advantage.
Wallace provides an overview of his session, and then digs into a variety of game-changing techniques, like positioning the model against a light-gathering white wall. You’ll also see how to use open shade with a window to create portrait photos that are flattering to your subject.

Other effective methods include shooting into the light from a position of open shade. Along the way you’ll pick valuable advice on composition, posing, and modifying your camera angle for portraits with an uncommon look. The lesson concludes with a review of the images captured by Wallace, and he includes captions with all the pertinent gear and exposure settings used to get the shots.
Be sure to visit Wallace’s instructional YouTube channel after watching the video we’re you’ll find more helpful advice on a wide variety of photographic genres.
And don’t miss a tutorial we featured recently from another acclaimed portrait specialist with a unique niche who explains how she captures sensuous boudoir photographs with a dramatic low-key effect.
If you’re an inexperienced Photoshop user and a bit confused by everything the powerful software has to offer, today’s quick tutorial from the Creative Layers YouTube channel is just what you need. In barely six minutes you’ll learn five simple tips and shortcuts that will take your editing skills to the next level.
We suggest jotting down a few notes for future reference because the amazing techniques you’ll learn fly by in a hurry. Tip number one for unlocking the potential of Photoshop involves a super-fast method of changing the color of subjects in a photo—like the eyes of a cat in the sample image.
All you have to do is create a new layer, change the Blending Mode to Color, use a brush to adjust the Flow, choose the appropriate Size and Hardness, and pick the color you want. Then it’s a simple matter to paint over the element you want change (in this case the cat’s eye) and adjust Hue, Saturation, and Brightness until the new color looks perfect.

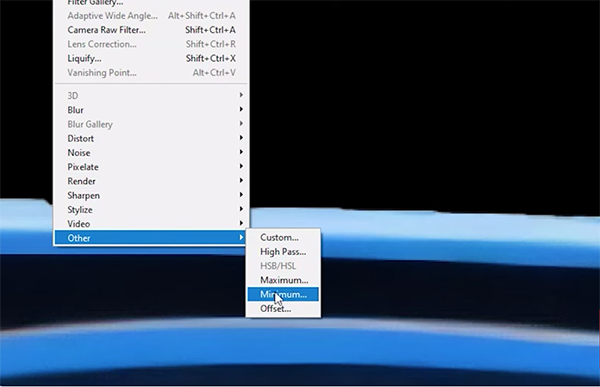
Another helpful trick enables you to fix any rough edges that appear in a photograph. Here you’ll learn how to identify imperfect edges that occurred when using Photoshop’s Object Selection tool. The solution is to click on the Layer Mask, choose Minimum from the Other Filter dropdown menu, and set Radius to one pixel. Then simply increase the Smooth slider after choosing Select and Mask Select.
The next thing you’ll learn is how to select and fix sharp or blurred edges of any object within an image like a bird’s wings in the example. The solution begins by using Photoshop’s Object Selection tool and selecting the element requiring repair. Then click on the Quick Mask icon, choose the Use Masked Area option, and use the Brush or Eraser tool to complete the job as explained.
There are two remaining tips that are just as effective and straightforward as those mentioned above, so be sure to watch the video until the end. If you think all this sounds about as easy as it gets, the unnamed instructor further simplifies all five methods by walking you through the simple steps required.

There are many more beginner image-processing tutorials on the Creative Layers YouTube channel, so pay a visit and explore what’s available.
We also suggest watching the tutorial we posted earlier from another image-editing exert who demonstrates a unique and unfamiliar technique for enhancing b&w photographs by improving dynamic range through the use of color tools.
