Delta brings Keep Climbing mantra to life with Olympic campaign
The campaign highlights how the journey is about enjoying and embracing each moment – big and small – and the unexpected joys and challenges along the way.
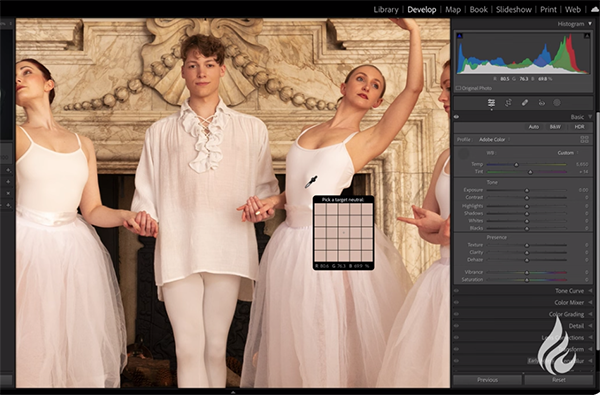
Are you having problems getting the tint right between green and magenta, or between yellow and blue tones? Well, join the club. It’s all about achieving proper White Balance during post processing—a popular and transformative topic of concern to amateurs and pros alike.
We’ve discussed the power of Lightroom’s Color Balance tools in the past, but this tutorial from James Feaver is simpler than most, with a quick and very effect three-step process that anyone can master in less than five minutes. Feaver is a freelance landscape pro who posts twice-weekly videos for beginning Adobe users who want to take advantage of his finely honed image-editing skills.
Here’s the problem Feaver intends to solve now: “A lot of photographers struggle with finding the right White Balance, especially when shooting with the Auto setting, because this can be incredibly challenging.” That is, unless you understand the straightforward method he demonstrates below. By modifying your workflow as Feaver recommends, this is one challenge that you can cross off your list.

There’s even a way to make a “preemptive strike” when shooting in the field if you have a “gray card’ in your bag. This simple accessory is almost foolproof for precisely defining White Balance to achieve correctly neutral tones. It’s admittedly another gadget to carry, but Feaver demonstrates how it will also prove valuable when sitting behind the computer and working with Lightroom’s Eyedropper tool.
The Histogram is another versatile Lightroom tool that Feaver says is underutilized for this particular task. That’s because the Histogram doesn’t just show us the exposure, it also illustrates the mixture of red, green, and blue tones within an image. Therefore, “All you to do to get the White Balance right is to match up the red, green, and blue peaks in the graph using the Tint and Temperature sliders.” It can be as simple as that.
The third trick involves the use of Lightroom’s oft-ignored color Picker tool, and Feaver demonstrates how this one factors into the equation. Keep in mind that “perfect” White Balance may not be what you want if unique effects are what you’re trying to achieve. But Feaver’s advice will help you do this too.

Feaver’s instructional YouTube channel is full of helpful lessons like this one, so be sure to pay a visit.
We also suggest watching the tutorial we posted not tong ago from another post-processing expert who explains how to transform dull midday photographs by adding a spectacular sunset effect in Lightroom.
We’ve all heard horror stories about memory card failure in the field, when the photographer didn’t have a spare in their bag. When this nightmare occurs you lose images you’ve already made, and there’s no way to continue shooting.
The obvious imperative of carrying an extra card solves the first problem but not the second, which is why many high-end cameras feature two card slots so you can automatically back up photos as you shoot. If your camera lacks this capability, watching this video from the Blyth and Karry YouTube channel could be the most helpful four minutes you spend today.
Blyth and Karry are a husband-and-wife team specializing in quick shooting and equipment lessons for photographers of all skill levels. Today’s episode is all about four preventive measures for keeping memory cards healthy and reliable, and what’s more important than that when you’re shooting far from home?

Karry doesn’t promise that you’ll never have a problem if you follow his recommendations, but he describes his four tips like this: “They are generally recognized as best practices for data management.” So pay attention and do everything possible to keep your images safe and accessible.
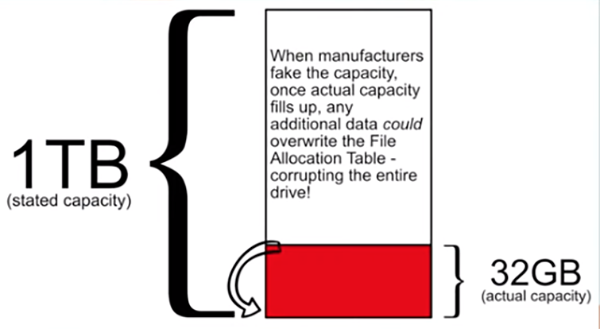
Many photographers have experienced problems with “bargain” third-party batteries, and the same can be true with cheap cards; after all, nothing is a sweet deal if it let’s you down. Thus, tip number one is to never economize by purchasing off-brand cards if you want peace of mind and trustworthy performance.
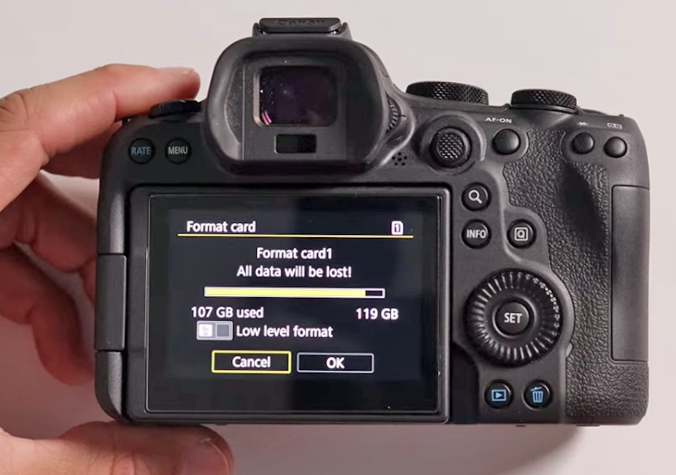
A less obvious safeguard is this: “Format a card with the camera it will be used in before any big shoots.” Karry says this is particularly essential if you move cards from one camera to another because different models use slightly different organizational structures for saving files. These should be compatible with one another, but it’s not worth taking a chance.

We were surprised by Karry’s third warning because it’s is something we’ve done regularly in the past. Bluntly put: “Do not delete individual photos in camera. There is a Delete button on the camera, but don’t do it.” His reasoning is that the three-inch LCD on the back of a camera is insufficient for determining whether an imperfect photo is “salvageable” during post-processing.
In other words, there are times when fixing it rather than deleting it will pay big dividends. Worse yet, you could inadvertently delete a successful photograph by mistake (we plead guilty here too). We’ll let Karry describe his fourth and final suggestion that, when combined with the others, will provide as much card security as possible.
One you’re done watching take a look at the Blyth and Karry YouTube channel where you’ll find more great tips and techniques.
And on a related note, don’t miss the tutorial we posted earlier with another’s pro’s hard-earned advice for protecting your camera, lenses, and accessories from damage.
