Experts reveal how much installing a £20 boiler jacket can save on energy bills this winter
It’s all about making small changes to save money this winter
One big challenge when photographing birds or other types of wildlife involves dealing with subjects that appear in front of busy backgrounds—a situation that tends to happen more often than not. There are ways to remedy this problem in post-processing, but wouldn’t you rather get things right in the camera? This tutorial from Backcountry Gallery explains how it’s done.
Instructor Steve Perry is a highly acclaimed nature shooter with this ambitious goal: “Providing the best wildlife photography tips and techniques on YouTube.” In this four-minute episode he makes another bold claim: “I’ll share an effective technique for improving your backgrounds in just three seconds.”

As crazy as this sounds you’ll likely change your mind after hearing him out and examining the impressive images in the video. The technique is one with which you may be unfamiliar; namely, by managing the angle of the focal plane you can accentuate the subject and deemphasize background clutter than may otherwise spoil a shot.
Perry discusses the science behind what’s known as “the plane of focus,” and he demonstrates how adjusting your angle will make subjects stand out by softening the background in a realistic way. He provides a number of detailed tips that work wonders in the blink of an eye—whether a subject is standing still or in motion.
The lesson flies by in a hurry so we suggest jotting down a few notes. Perry covers a lot of ground from depth-of-field, lens positioning, and subject isolation, to camera angles, eye-level and ground-level photography, and other key considerations.

You’ll also see how sharpness combines with background blur to for spectacular wildlife imagery. After the video concludes be sure to check out Perry’s instructional YouTube channel for more interesting outdoor photography tips and techniques.
Are you interested in editing your images faster without sacrificing the quality of your results? Most photographers would answer in the affirmative, and today’s tutorial demonstrates a pro’s top six tips for streamlining your everyday Lightroom workflow.
Johny J. Spencer is an accomplished nature and wildlife photographer who has been shooting for Australia’s National Park Service for the past 20 years. He’s equally adept behind the computer, and by following his advice you’ll be able to quickly edit your images and get back out in the field with a camera doing what you love most.
Spencer’s first workflow hack begins in Lightroom’s Import tab where he explains the benefits of “building previews in Standard.” Doing this creates a small Jpeg version of the original image that doesn’t take up much space on your drive. Then each time you click through your photos Lightroom doesn’t have to load a higher resolution preview, because the small thumbnail was already created on import.

Moving on to the Develop module, Spencer demonstrates a trick “I use for 99% of my photos.” You’ll see why he also enables a few key settings, one of which is Lens Correction to quickly remove chromatic aberration. He also turns on Profile Corrections for reasons he explains. The only exception is when he’s shooting with an ultra-wide lens and wants to retain the inherent distortion.
The next hack is to create a preset for whatever adjustments you made to a photo and Spencer demonstrates how to do this and select Add Preset on Import. This way you don’t have to start from scratch every time this effect is what you want to accomplish. As he says, “this really speeds things up when you have numerous similar photos that you want to process fast.”
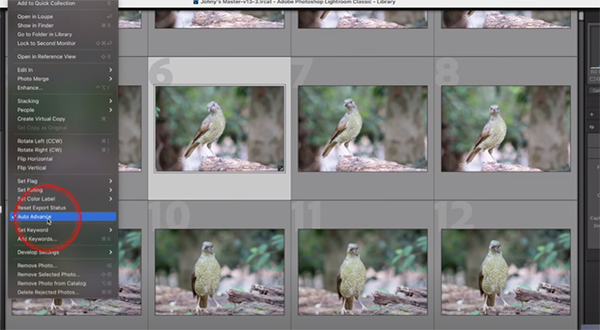
Turning on Auto Advance and using Flags properly is also something that Spencer strongly recommends for culling a bunch of photos and determining which ones you want to keep. Just keep fingers on the “X” and “P” keys and the task is accomplished in a hurry. You can confirm the choices you made with a quick glance at the film strip on the bottom of the screen.

At this point you’re halfway through the video and there are three more hacks to go, so be sure to watch until the end. Then you’ll want to update your Lightroom workflow so that it includes everything you just learned. Bottom line: You’ll work faster and smarter from now on.
Spencer’s instructional YouTube channel includes many more helpful post-processing videos that are just as simple and helpful as this one.
On a related note, don’t miss the tutorial we featured last week with another image-editing expert who demonstrates what he says is the best way to import photographs into Lightroom so you stay organized and don’t waste a lot of time.
Just about all Lightroom users know that the software includes a variety of timesaving presets for creating numerous effects and quickly dupicating specific edits you made in the past. In addition to the built-in presets there are others you can download at nominal cost, and even create some of your own.
What you may not understand is the power of Lightroom’s Adaptive Presets and how to put them to work. This quick tutorial explaining the concept comes from Amateur Photographer TV, the YouTube channel of the world’s longest running photo magazine—published weekly in the UK since 1884.
According to instructor Rod Lawton, “most presets are a one-size-fit-all solution.” In other words, you choose one of these tools and Lightroom applies a bunch of settings that are the same every time for every image. Sometimes these presets do a good job but other times they fail depending upon the specific photo at hand and the look you’re trying to achieve.

Adaptive Presets are a totally different breed because they use Lightroom’s AI-powered masking tools to “automatically select areas, objects, and subjects regardless of the image you load so you don’t get the same result every time.” Lawton demonstrates how this works in barely six minutes.
Lawton says the key to these intelligent Adaptive Presets is that they automatically adjust to a photograph’s unique lighting and color attributes. In his words, “this makes them a perfect tool for enhancing portraits, landscape photos, and more.” Best yet, they work their magic with just one click.
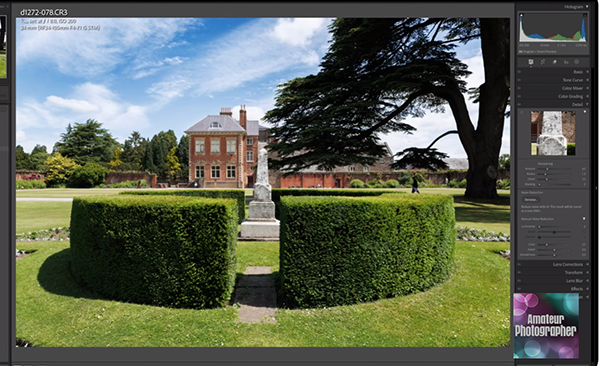
Lawton’s first example is a nice street scene that suffers from a bland sky. He opens the Adaptive Presets panel where there are options for Sunrise, Sunset, Neon Tropics, Storm Clouds, and others. For this particular task, the Blue Drama preset is the one that Lawton selects.. The instant transformation is very impressive, and if you look at the Mask panel you’ll notice the Sky Mask that was applied

You’ll see how Lightroom’s other Adaptive Presets are just as effective for different types of images. Lawton says these AI-based tools are “a gamechanger for photographers who want quick, professional-grade edits with minimal effort.”
Be sure to visit the Amateur Photographer TV YouTube channel where there are many more shooting and photo-editing tips to be found.
We also recommend watching the tutorial we featured recently with another post-processing expert who demonstrates how to modify and refine the colors in your photographs using Lightroom’s powerful Selective Coloring tools.
