How to Restore Quality to Blurry, Pixelated Photos (VIDEO)
So let’s say you mistakenly used incorrect camera settings and your “beautiful” photo is disappointing with a low-res, blurry, pixelated appearance. Before you slap yourself on the forehead and dump the shot in the trash, pay close attention to the eye-opening tutorial below.
Photographer Pejman’s YouTube channel is a great source of basic Photoshop techniques, advanced image manipulation methods, and in-depth portraiture retouching skills.
Today’s quick episode explains how to transform photos full of unsightly artifacts using easy-to-handle upscaling and image-restoration adjustments that take less than four minutes to explain.
Pejman uses a portrait photo to demonstrate the process, but the techniques you’ll learn will work equally well with other types of pixelated images that look as though they were captured with an old 3-megapxel camera. And here’s what’s so interesting: “We’re not adding anything new to the picture; we’re just making the pixels we already have look their best.”

The first step from Photoshop’s menu bar is choosing Edit, Preferences, and Technology Previews from the dropdown menus that appear. It’s important to check the box called Enable Preserve Details Upscale. Then press OK and you’re ready to proceed.
Next click on the Image tab from atop the menu bar and select the Image Size option, change Resolution to 300 pixels, and change Resample to Preserve Details. Then move the Radius Noise slider to a value of 30, and once again press OK.
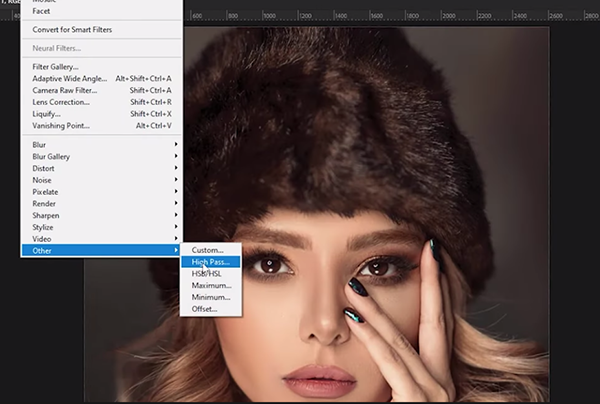
Now zoom in on your photo and marvel at how much better it appears, but there’s still more work to do. The next step takes place in Photoshop’s Layers panel where you’ll activate a background layer by pressing Command or Control “J.” Then go to the Filter tab atop the screen and choose Other followed by High Pass from the ensuing dropdown windows.

Pejman says “the Radius setting here is completely dependent upon your image resolution, but I prefer a value of three for this photo.” He then explains why to temporarily choose black-and-white when zooming in on the shot for further refinements.
At this point you’re almost there, and Pejman walks you through the necessary steps which begin by changing by changing the Blending mode from Normal to Soft Light. Now you can adjust the strength of both Layers until you like what you see before finally merging them into one impressive shot.
There’s much more to learn about gear, post-processing, and capture techniques on Pejman’s instructional YouTube channel, so be sure to pay a visit when you have time to explore.
And don’t miss a recent tutorial we featured with another accomplished pro who demonstrates how to use Photoshop’s Blend If Sliders to transform dull images into spectacular photos that say “WOW.”


