Ornithology experts are urging gardeners to feed blackbirds to help them survive the winter and stop declining numbers
This is everything you need to know about how to feed blackbirds
According to one of our favorite post-processing instructors, “Blend If is one of Photoshop’s best-kept secrets.” This tutorial from the PHLEARN YouTube channel explains how it works and provides three ways to harness this technique to create eye-catching images with a stye of their own.
Aaron Nace is a world-renowned photographer and Photoshop expert with more than a decade of high-level experience. His goal for today’s 15-minute episode is to “help you unleash your inner artist.” As you’ll see, Photoshop’s Blend If capabilities are ideally suited for imbuing images with a unique look or creating surreal artistic effects.
As Nace explains, this powerful method allows you to blend two images seamlessly, with a process that’s easy enough for Photoshop users of all skills. We’re sure that you’ll marvel at the examples he provides for a trio of different looks. The creative opportunities are virtually endless, so we invite you to pull up a chair and jump in.

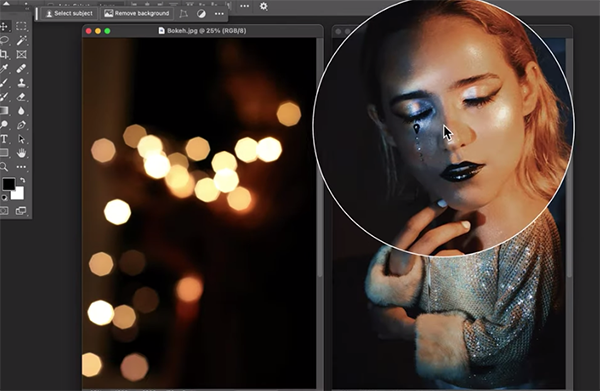
Nace gets started with two photos on the screen; one is a portrait and the other is a “bokeh shot” of out-of-focus highlights. He clicks on Photoshop’s Move tool and drags one image atop the other, then he taps the “F” key for a full-screen view. The next step Is resizing the bokeh image using the Transform tool for a perfect match.
There’s a link in the description beneath the video for downloading his sample images (and a free Photoshop Action) so you can follow along and complete the simple steps for this particular task and the other two projects that follow.
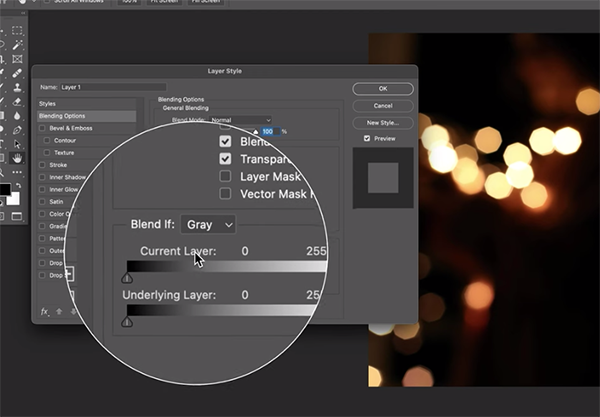
To access Photoshop’s Bend If tools, simply double-click in layer one which brings up the Layer Style panel with the Blend If options at the bottom that enable you to customize the specific effect you have in mind. There’s one slider for adjusting the Current Layer, and another for the Underlying Layer and the changes you make to both are visible in tandem as you move the sliders to make each layer more or less visible.

The rest of the process is best understood by watching Nace work his magic, so we won’t bother summarizing the straightforward process in words. After learning how easy this is to do, you’ll no-doubt think of numerous ways to experiment with this creative technique.
Head over to the PHLEARN YouTube channel once you’re done with the video where you’ll find many more Photoshop tips, trick and techniques.
We also recommend watching a tutorial we featured earlier with another image-editing expert who demonstrates how to create attention-grabbing photo magic with Split-Toning tools in Lightroom and Photoshop.
That fluffy white stuff on the ground may look pretty but it poses some of the more difficult challenges for intrepid outdoor shooters, whether the task is landscapes, wildlife imagery, skiers on the slopes, or environmental portraits. This tutorial from the Light Meets Lens YouTube channel explains everything you need to know in barely eight minute for capturing snow scenes that look like they did in the field.
Instructor Nick Kuhne is a prominent landscape/seascape photographer based in Toronto where multiple feet of snow is a common occurrence during long winters—so he’s the perfect guy for today’s behind-the-scenes episode. As he says, “Snow is particularly difficult to capture because it’s pure white.”
But here’s the problem that you may have discovered in the past: Under different lighting conditions this colorless ground cover can actually appear orange, blue, or dirty gray. That’s because the meter in your camera is calibrated for “average subjects,” i.e. those with a tonal value of 18% gray.

Hence, photos of snow scenes (or portraits of black cats) require a bit of intervention on your part with specific techniques for making the white right.
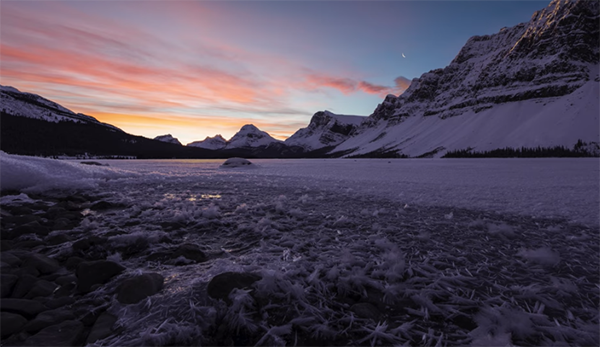
Kuhne is working under frigid temperatures at a lake at Alberta’s beautiful Banff National Park and the goal is pretty simple—configuring the camera to capture the snow-covered landscape without blown highlights, shadows lacking detail, and nary the hint of an ugly color cast anywhere in the scene.
Careful composition and your position relative to the sun are other issues worthy of consideration. Time of day also factors into the equation for nailing exposure and properly balancing color. Kuhne provides a link in the description beneath the video so you can watch his earlier episode where you’ll learn how to edit winter images like never before.

You’ll also be rewarded for visiting the Light Meets Lens YouTube channel where there’s much more to learn.
And don’t miss an earlier tutorial we featured with another experienced pro who demonstrates a simple post-process technique for adding impact to outdoor photographs with a moody and realistic fog effect in Lightroom.
