The bestselling sofa in 2024 – this is the sofa that you and I couldn’t stop thinking about this year
The most popular sofa styles featured on the Ideal Home website in 2024 revealed – are you surprised?
Getting the light right is an essential task whether you’re shooting indoors or out, and sometimes this means adding supplemental light to achieve perfect exposures. One choice is using a flash, but some photographers are intimidated by the techniques and settings that are required.
Another option is an affordable LED light source that’s a real no-brainer because it provides constant illumination that requires no calculations. So you can shoot as though your image is illuminated by natural light.
This enlightening tutorial comes from the folks at Camera Zone, a popular YouTube channel created by pros and enthusiasts that covers every aspect of photography from gear and no-nonsense techniques, to in-depth buying advice for shooters of all skill levels. If you’re trying to decide between flash and LEDs lights, today’s episode will answer all your questions in a hurry.

Our unnamed instructor puts it like this: “In this video we’ll help you figure out which approach is the best choice for you,” and he breaks done the when, why, and how considerations so you’ll understand the best method to choose for different types of situations and what you’re trying to achieve.
Flash units are typically more powerful with a far greater range, which is why they tend to work best with subjects further from the camera. And the intense burst of fight they provide is ideal for stopping action when photographing subjects in motion.
On the other hand, easy-to-use LED lights are a great choice for stationary subjects close to the camera, like with macro photography and environmental portraiture. The instructor notes that “LED lighting technology has come a long way in providing real-time control.”

He demonstrates the pros and cons of each approach while concentrating on ease of use. He also describes the cost considerations that factor into the ultimate decision you make. And you’ll see how the specific task at hand is essential to consider.
The instructional Camera Zone YouTube channel is a great source of how-to video lessons like this one, so be sure to take a look.
And on a related note, don’t miss the tutorial we featured with another adept pro who demonstrates how to take advantage of a camera’s Spot Metering mode to eliminate the guesswork from making perfectly exposed photographs in every situation you confront.
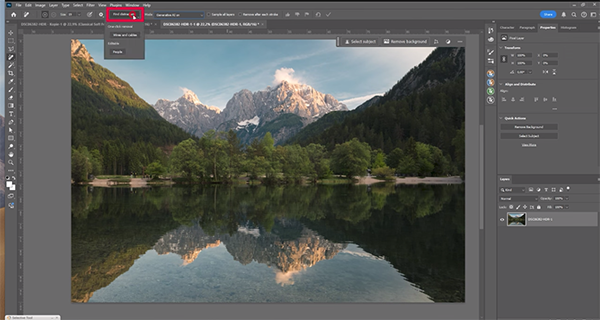
Landscape shooters often confront complicated scenes with distracting elements that can cause confusion and spoil the impact of an image. Removing these unwanted objects during the photo-editing process is often a daunting task—unless you unlock the power of a new Photoshop tool that automatically gets the job done with a single click.
Instructor Christian Mohrle is a highly acclaimed landscape photographer and image editing expert based in Germany near beautiful Lake Constance, and he provide a link beneath the video for downloading today’s sample Raw file so you can follow along and make the changes yourself as they’re explained.
The shot is a beautiful lakeside image with a mountain looming in this distance and eye-catching reflections in the water closer to the camera. There’s only one major problem; namely, people walking on the shore in that distance that detract from the overall cohesion of the shot.

An secondary issue is the uneven tonal balance of the photo, and Mohrle begins here by demonstrating how to quicky resolve this problem with a five-image HDR technique. This involves capturing multiple photo of the same scene, each shot at a slightly different exposure setting and then blending them together to achieve a single image with perfect light values throughout the frame.
Other preliminary steps include a few basic global adjustments to the overall photo that will greatly simplify for following selective adjustments before turning to Photoshop’s 1-cick solution. These include simple masking, thoughtful color grading, and a bit of careful sharpening.
With the image looking as good as possible, it’s now time to employ Photoshop’s new Find Objects tool that automatically rids photos of distracting elements in a single click. Mohrle demonstrates how this works in the context of landscape imagery, but it’s equally effective for all sorts of other outdoor scenes that need a bit of cleanup for optimum results.

So we encourage wildlife shooters, sports photographers, and those who shoot environmental portraits to pay close attention. After the video concludes be sure to visit Mohrle’s PHLOG Photography YouTube channel where you’ll find more instructional videos on a wide range of landscape photography shooting and post-process techniques.
And don’t miss the tutorial we featured earlier from another accomplished pro who demonstrates an enlightening method for processing your photographs faster, not harder, with a straightforward batch-editing technique.
