IKEA’s cult RÅSKOG trolley has had a major update for 2025 – and it shows green is going nowhere this year
This is a storage option you’ll want to show off, not hide away
So you received a gift with a new camera and you’re itching to get out there and make some mind-blowing photos. But hold on for 10 minutes and watch today’s video before you run out the door because it reveals six game-changing tips that will significantly boost your odds of success.
This interesting lesson comes from the Photography Explained YouTube channel—a great source for diagnosing camera problems and learning new shooting and editing techniques. Let’s start with this question: “What’s the biggest photography mistake that no one talks about?”
Our unnamed British instructor has a three-word answer: Not leveraging light. He promises that if you avoid making this mistake, “you’ll knock decades off the time it usually takes photographers to make great photos.” So stick with it because this time-travel worm hole reveals six powerful techniques for leveraging whatever light you confront in the field. There’s also some time-tested advice for shooting in really bad light.

Today’s helpful lesson is illustrated with graphics and inspirational images that reveal how to utilize each the techniques discussed. Topic number one is ignoring the quality of natural light, and here’s an example: “You’re on a mountain with amazing foreground rocks, so you throw down your bag, and set up the tripod. Only then do you realize that the sun is directly overhead and everything looks flat.”
This point is clearly illustrated with a spectacular image that was captured a few minutes after the original lifeless shot. In other words, slow down and be thoughtful and patient. Point number two is misunderstanding light quality. In other words, there’s more to it than bright is good and dark is bad.
Our instructor uses an odd analogy to describe his comment that all light is not created equal: “Understanding light’s quality is like learning the difference between cooking with a microwave and having a gourmet chef prepare you a meal.”

The remaining four tips are equally important and, like the two mentioned above, there are practical tips for solving any of the light-related mistakes you’ve made in the past so you don’t make them in the future. So take a look, and now you’re free to embark on a maiden voyage with your new camera!
The Photography Explained YouTube channel is well-worth exploring, especially if you need some straightforward help for evolving your skills.
And for more great advice, be sure to check out our recent post, explaining why and how pros emphasize negative space to capture dynamic photographs in the urban environment.
Mastering color selection is an essential post-processing skill, whether you’re working on images captured in the field, indoor portraits, or a variety of other artist projects. Today’s step-by-step primer from Obi-Wan Adobe demonstrates the power of two powerful Photoshop tools and illustrates how they’ll enable you to achieve eye-catching results.
Obi is an image-editing expert who summarizes the episode like this: “In this tutorial I’ll show you exactly how to isolate and transform colors in Photoshop for stunning and creative edits.” He does so in less than seven methods with two different methods that are ideal for beginners and more experienced shooters alike.
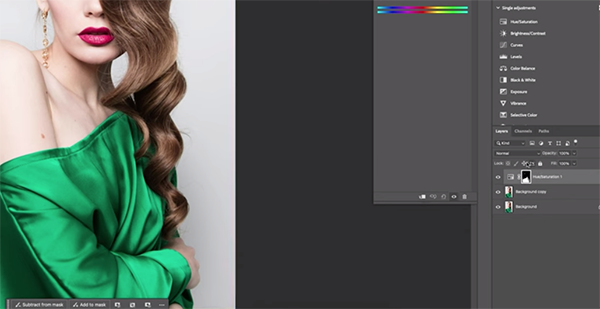
His example is a simple portrait of a model wearing a slinky green dress positioned in front of a plain white background. His goal is to transform the dress into a vibrant red tone to match the lips of his subject. He begins with Photoshop’s Select Color Range tool and illustrates how easy it is to achieve a clean and precise selection of the dress.

The first step is duplicating the layer. He clicks the Select tab atop the screen and chooses the Color Range option from the dropdown menu pops up. When a new dialogue box appears it’s important to enable the “Localized Color Cluste”r setting. Now you use the Eyedropper tool to pick the color of the model’s dress by simply tapping once.
Adjustments are easy to make by sampling slightly different tones within the selected color. The next step involves using Photoshop’s Fuzziness slider to refine the edges of your selection. Once everything looks good just click OK to activate the selection.
At this point it’s easy to transform the color using a Hue/Saturation adjustment layer to tweak the tones and brightness to either create a dramatic effect or subtle enhancements while maintaining a natural look, and Obi walks you through the straightforward process for getting the job done.

By understanding the power of this technique, your creative post-processing potential will be unlocked as well. The Obi-Wan Adobe YouTube channel features more instructional videos like this one, so be sure to take a look.
We also recommend watching an earlier tutorial we posted in which another image-editing expert demonstrates how to use Photoshop’s Gradient tool to create photographs with interesting enhancements and unique special effects.
