This £10 product will keep your pet warm all winter – why thermal pet beds are the winter warmer your pet is missing out on
You’d be barking mad not to grab a thermal pet mat for your beloved pet
You’re may tire of hearing us sing the benefits of selective post-processing techniques instead of taking the quick approach of making global adjustment to an image as a whole. Well, apologies for that, but here’s another great example for you to consider from David’s PNW Adventures.
David is an avid outdoor photographer whose channel includes a broad range of tips on camera techniques, post-processing methods, and trustworthy equipment reviews. This episode is all about a precision sharpening technique that relies upon Lightroom’s Masking slider to target only the areas in a shot that aren’t as sharp as you’d like.

Taking this approach enables you to accentuate the main subject of a scene by letting surrounding areas recede. According to David, “this technique is perfect for enhancing edges and texture without over-sharpening other areas like skies.” In other words, Lightroom’s Masking slider lets you to only increase sharpness where it matters most—while retaining a realistic look.
Despite the power of this transformational method, it takes David barely a minute to explain. So we’ll forego a detailed overview of everything you’ll learn and just provide a brief summary instead. The first step is opening an image and navigating to the Sharpening section within Lightroom’s Develop module.
David then provides keyboard shortcuts that streamline the process of employing Lightroom’s Masking slider in the manner he recommends. Next, he explains how to “visualize sharpening areas” as you proceed. In essence, “the white areas show where sharpening is applied—letting you focus on edges and details while leaving smooth areas untouched.”

After watching the video head over to David’s PNW Adventures YouTube channel where you’ll find more instructional videos that will help you quickly elevate your skills.
We also encourage you to watch our recent tutorial featuring another post-processing expert who demonstrates how to use a “tiny” new-and-overlooked Lightroom feature that makes a “huge” difference in every photograph you edit.
This quick post-processing tutorial demonstrates a quick and effective method for adding impact to lackluster landscape images that appear dull and washed out. The technique is particularly effective for rehabilitating high-key photos intended to convey an ethereal effect.
Today’s eight-minute episode come from our friends at the Picfair YouTube channel—a very helpful resource for shooting tips, basic guides and tutorials produced by notable pros. instructor Murry Livingston is a professional b&w photographer and he explains the concept like this: “Adding midtone contrast is a great way to give your images punch and definition while maintaining their light-and-airy feeling.
You’ll learn when this straightforward technique is most powerful and how to get the job done when editing both color and b&w images. Another important consideration is the difference between doing so with global adjustments or selective enhancements that target specific areas within the frame.

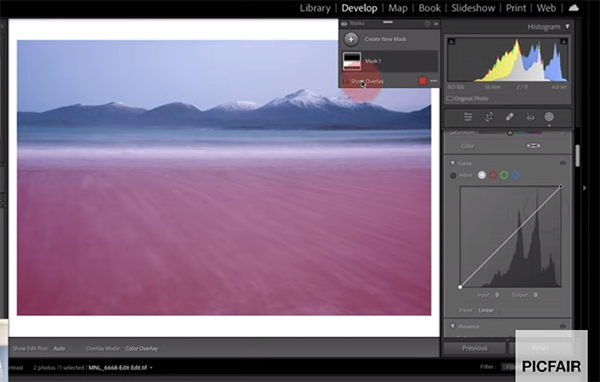
The process begins in Lightroom’s develop module and Livingston walks you through the simple steps of adding punch, opening shadows and increasing highlight detail to the color landscape photo you see above. Livingston navigates to the Masking panel and turns his attention to the flat foreground of the long-exposure shot.
A simple Linear Gradient is placed over the lower half of the photo, and you’ll see why Lightroom’s Curves tool, in tandem with the Histogram, is a perfect combination for quickly boosting midtone contrast with precision. It’s a simple matter of manipulating the curve to “darken the shadow portions and lighten the highlight portions in the photo.”
Livingston then moves on to his specialty of b&w and illustrates a different but equally simple process for enhancing midtone contrast when editing monochrome photos. This example clearly illustrates the different results you can expect when using global adjustments as compared to midtone contrast.

If you’re a Shutterbug regular you can probably guess which approach we prefer. The lesson concludes with a discussion of when you can get away with an easy global approach, and when employing masks to add midtone contrast is definitely the best way to go despite the extra steps that are involved.
There are many more shooting and editing instructional videos on the PIcfair YouTube channel, so be sure to take a look.
And don’t miss the earlier tutorial we featured with another accomplished pro who demonstrates why and how composing with “context” in mind is the secret to capturing outdoor photographs with maximum impact and elevating your visual storytelling skills.
