The 5 cleaning tasks you should tackle when taking a shower, according to cleaning experts — make cleaning the bathroom faster
While you leave your conditioner to do its thing, use those minutes to get ahead on your bathroom cleaning

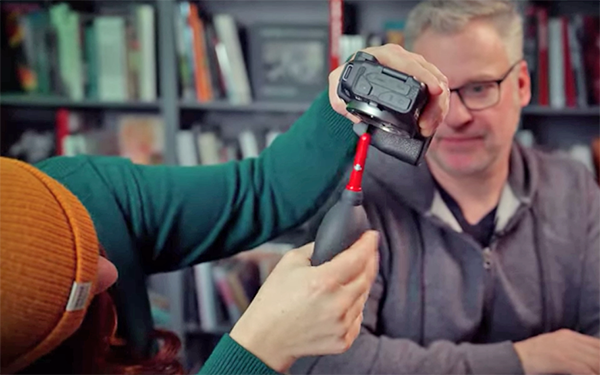
Skillful composition can make or break a photo, no matter how impressive a subject appears, and this fact holds true whether you’re shooting landscapes, environmental portraits, macro imagery, and just about anything else. This quick tutorial reveals several powerful framing techniques employed by several shooters who really know their stuff.
Instructor Mitch Lally is a notable Australian pro whose work has taken him across the globe, “making a living doing what I love.” He typically illustrates his how-to videos with impressive images he’s captured over the years, but today’s video switches things up by using spectacular imagery made by other elite shooters to demonstrate framing methods that considers to be particularly powerful.
It’s an inspirational six-minute clip that you don’t want miss, and everything you’ll learn falls into the category of shooting with intention in a way that will draw viewers into every photo you capture. He says that “one of the big reasons these photographers are able to do this is that they understand why our eyes love contrast so they know where to look.”

In other words, frame up your photos so that the area with most contrast is relevant to what you’re attempting to convey. This is a very effective method for simplifying complicated scenes. Another key consideration is the appropriate use of colors that can be contrasted by hue, like a thoughtful combination of blue on yellow or green on orange. The effective use of color also involves concentrating on complimentary juxtapositions of brightness and saturation.
There’s also a link in the description beneath the video for using the ubiquitous Color Wheel to learn which colors are complimentary and others that are not. He also illustrates the power of “layering darker colors over brighter colors, and then brighter colors over darker colors.” As you’ll see, these basic concepts are equally important when shooting in b&w.
Lally also notes why and how proper balance contributes to great imagery. One example is composing an image with a subject on one side of the frame, and other key elements of equal size or weight in the other side of the scene. In other words, look for complimentary subjects as well as colors.

The lesson proceeds with other powerful compositional tools that are easy to emulate whether you consider yourself a beginner or a more advanced photographer. You don’t need any special gear; rather, it’s all about a different mindset and your willingness to view the world differently that you have in the past.
Lally’s popular YouTube channel offers many more instructional videos that are sure to help elevate your skills.
Be sure not to miss a related tutorial in which another accomplished pro demonstrates how he composes landscape photographs captured with a telephoto lens to make attention-grabbing images with an uncommon look.
Earlier today we featured a post-processing tutorial demonstrating seven pro tips for achieving cleaner, sharper landscape photos. But what if the root of your problem is a dirty senor in your camera? You’ll learn a safe, quick, and straightforward remedy in this 10-minute explainer from the Camera Store TV YouTube channel.
Many photographers are rightfully apprehensive about tackling this important maintenance procedure because we’ve all heard horror stories from folks who didn’t know what they were doing. Feel free to set your nerves aside because you’re about learn a safe and effective method for getting the job done in the next 10 minutes.
This episode is hosted by photographers Dave Paul and Evelyn Drake, with Drake asking pertinent questions and Paul supplying the solutions. They first explore why removing sensor dust can be so daunting, along with a few pitfalls to avoid. Then you’ll learn a “foolproof” step-by-step method for proceeding with confidence.
The discussion includes “essential” tips for proper swab usage, other best practices, and the affordable accessories you need to get started. There’s no reason to experiment with the process until you first determine that a sensor is actually dirty. So how do your do that?
Paul recommends shooting two or three different shots of a bright blue sky and looking for black dots or blotches that appear in the same place of the shots. If so, it’s time to grab your cleaning kit and proceed by following the simple instructions—rather than attempting to remove these ugly distractions during post-processing.
You’ll begin by pulling out a blower brush and giving two or three quick puffs of air while holding the camera upside down so grime falls down on your table rather than up into the camera. It’s also very important to avoid touching the sensor with this tool or anything else—especially your fingers. In some cases with lightly contaminated sensors this is all you have to do.

When dust and dirt is more stubborn or plentiful there are a few more steps required to get the sensor perfectly clean. Rest assured that these are equally easy and effective with the techniques you’ll learn. The good news is that after your maiden voyage the process will be a no-brainer in the future.
The Camera Store TV YouTube channel is a great destination for gear reviews, shooting techniques, and insightful tips on a wide variety of imaging topics.
And don’t forget to watch the tutorial mentioned above so you’ll understand what to do if post-processing is necessary for achieving cleaner results—especially when the problem has nothing to do with the sensor in your camera.
We’ve featured post-processing tutorials for cleaning “dirty” photos, and others explaining various sharpening techniques. This helpful tutorial from the PHLOG Photography YouTube channel does double duty by demonstrating a Lightroom workflow that tackles both tasks in one quick-and-easy edit.
Instructor Christian Mohrle is a notable pro who’s been committed to making great outdoor images since 2009 when he set his sights on becoming the one of the best landscape photographers in Germany. Some would agree that he’s met this goal and has become equally proficient behind the computer.
Today’s 14-minute episode demonstrates seven time-proven editing techniques that anyone can use to create super clean and realistically sharp images with a bit of help from Lightroom. There’s a link neath the video for downloading Mohrle’s sample Raw file so you can follow along and make the changes yourself in real time as the simple steps are explained.
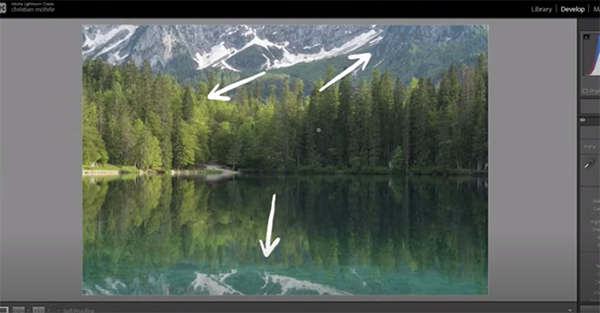
Mohrle begins by expanding Lightroom’s Basic panel where he changed the profile to Adobe Standard. This step has nothing to do with sharpness or “cleanness,” but he says it’s the best starting point for getting the job done. He then explains the concept of sharpness like this: “Sharpness is essentially contrast, meaning that by introducing contrast to this image we can make look sharper and cleaner.”
The next step involves slightly increasing exposure to reveal more details in the darkest portions of his shot, while dropping highlights to accentuate details in the brightest part of the background. These adjustments require refining contrast once again, this time with the Contrast slider, to balance out the tones with precision.
Mohrle then turns his attention to Lightroom’s Presence panel where you’ll find simple sliders for controlling Texture, Clarity, and Dehaze. He demonstrates his approach with these simple tools and explains the difference between Texture and Clarity, and when you should use them both despite the similarities in what they accomplish.

The image now appears significantly more compelling and Mohrle walks you through additional local adjustments that improve the photo further. And this point you’re only halfway through the transformation and the remainder is where the Lightroom magic really occurs.
The transformation proceeds with adjustments to Color Luminance, employing Lens Corrections, and a final bit of cleanup and sharpening. Take a look at Mohrle’s before/after images and you’ll be duly impressed. Then pay a visit to his popular YouTube channel where there’s an abundance of instructional videos of interest to everyone who shoots in the field.
And speaking of the great outdoors, don’t miss the related tutorial we featured with another accomplished pro who demonstrates why and how every landscape shooter should experiment with telephoto lenses to capture unique photographs in the field.


