I saw the stunning new John Lewis x Sanderson homeware collection IRL – these are the pieces I predict with sell out fast
I was lucky enough to see John Lewis’ pattern-filled homeware collection with Sanderson firsthand

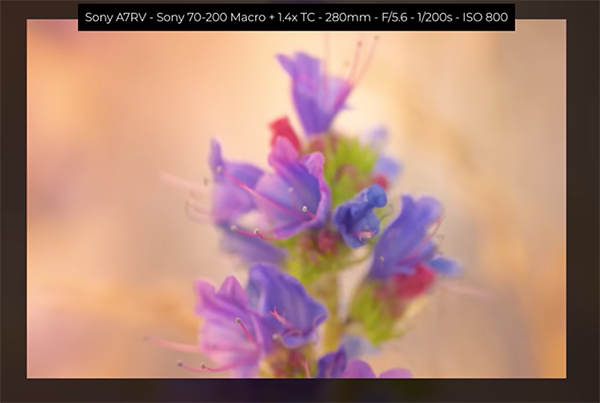
Spring is finally here, although you might not realize it if you live where there’s still snow on the ground. In other parts of the country, however, the first flowers of the season are emerging and beginning to bloom. This means that it’s time to bone up on your floral photography skills.
Instructor Albert Dros is the perfect guy for today’s tutorial and he provides 10 pro tips and techniques in the next 10 minutes. He’s a passionate landscape photographer and educator based in the Netherlands where everyone takes their flowers seriously. So pay close attention and then head outdoors and start practicing today.
This is one of those accessible genres that doesn’t require you to travel far in your search for a suitable subject. Once flowers bloom they can be found at nearby parks, a local nature center, and even along the road or in your own backyard. And you can capture these colorful blossoms with just about any gear you own.
Dros discusses the importance of camera angles, perspective, and the vantage point from which you shoot. He puts it like this, “I’ve said it before and I’ll say it again: get down low and don’t shoot from eye level.” He explains that you won’t achieve effective subject separation by shooting from above. If your camera features a flip screen, this ground level perspective is super easy to employ.
Another tip involves taking advantage of the light by positioning yourself correctly relative to the sun so you can emphasize fine details on a flower’s petals, stem, and leaves. You’ll see how soft light, backlight, and sidelight all provide opportunities for interesting effects, so don’t hesitate to experiment when framing up a shot. The simple umbrella you use to keep dry on rainy days can also be a big help in blocking direct sunlight coming from above.
Dros also discusses his focal length preferences for this style of photography, and he provides a list of his favorite lenses in the description beneath the video. He explains that he often shoots flowers with a telephoto because a long lens enables him to control depth of field by moving further back to create a beautiful blurry background that accentuates the main subject.

At this point we’ve barely scratched the surface of everything you’ll learn for capturing beautiful flower photos that stand out from the crowd. So be sure to watch until the end and maybe jot down a few notes for future reference.
Then take a look at Dros popular YouTube channel that features a wide range of how-to videos for everyone who shoots in the great outdoors.
You may also want to watch a tutorial we featured with another experienced pro who demonstrates five of the most common mistakes made by inexperienced nature and wildlife photographers and how to avoid them.
Adobe’s new Adaptive Color Profile is an amazing AI-based tool that analyses an image and adjusts tones and colors to make them “look just right.” The experts at Adobe put it like this: “The effect is as if the AI has changed exposure, shadows, highlights, Color Mixer, Curves, and other key controls for you.”
Today’s Australian instructor Charles N. provides a step by-step tutorial on how to use the Adaptive Color Profile in Lightroom Classic and says, “it’s a great starting point in your image-editing workflow.” This technique simplifies subsequent adjustments for balancing overall brightness, lightening shadows that are too dark, and refining overly bright highlights.
Charles has more than a decade of experience teaching landscape and wildlife photography, as well as offering expert advice for mastering Lightroom and other post-processing software. In this episode he explains why the new Adaptive Profile goes far beyond one-size-fits-all, and how he employs it with different types of images.

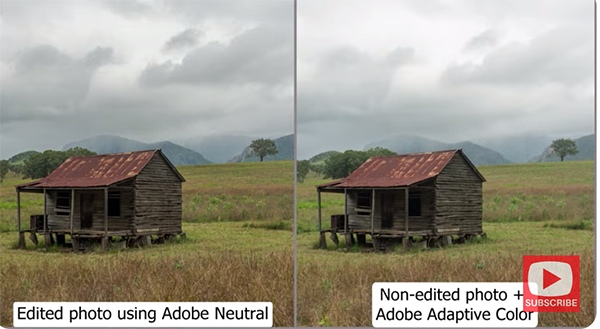
The first example is a pretty landscape image of an interesting old hut in the foreground of a scene with hills looming in the distance. Charles already edited the shot using Lightroom’s familiar Neutral Color Profile to demonstrate what happens when you sit back and watch the Adaptive Color Profile work its magic instead.
It’s important to keep in mind that this technique is only intended for use with Raw files, so don’t try it with Jpegs or TIFFs. This new tool is easy find because it appears at the top of the Profile dropdown menu. There’s a line beneath this option to indicate that it’s different than all the other profiles beneath.
Just click on your photo after choosing Adaptive Color and BOOM, the image is automatically examined and transformed in seconds. Charles then compares the version he spent 10 minutes editing to the AI-based version and they look remarkably similar. As he exclaims, “This is the beauty of the Adaptive Color profile. Sometime it gets it spot on, while other times a bit more work is necessary because nothing is perfect with AI.”
Charles continues the lesson by apply Adaptive Color to a few other landscape and wildlife photos, and the benefits are equally impressive, especially when you consider that this approach only requires a single click. So take a look and see if you agree. Then head over to Charles’ instructional YouTube channel where there’s much more to learn.
And don’t miss the earlier tutorial we featured with another post-processing expert who demonstrates when, why and how to use a straightforward time-blending technique to create landscape photographs with perfectly balanced tones.
One post-processing technique that has surged in popularity among landscape photographers is the so called “Orton Effect.” Sometimes it’s overdone, but when applied correctly you’ll love the creative, dreamy look that you achieve.
What’s different about this tutorial from Lachlan Garutti (AKA Locki Gee) is that he demonstrates how to quickly create an impressive Orton Effect in Lightroom, rather than using the more common Photoshop approach. He explains everything you need to know in less than six minutes, after which you’ll want to update your everyday image-editing workflow accordingly.
Australia-born Garutti is so committed to his craft that he currently resides in a van with his cameras while traveling throughout Europe. He specializes in nature, adventure and travel photography and is very fond of imbuing images with an eye-catching glow. It’s a straightforward five-step process than anyone can master in minutes, and Garutti explains how to save the effect as a preset for future use.

Garutti’s goal is to add an Orton Glow to the highlight areas in today’s demonstration photo. It’s a beautiful alpine scene in the Dolomite mountains that’s nicely composed but the light isn’t quite right. So watch the magical transformation that occurs when he applies a soft, warm, comforting glow.
The first step is somewhat unusual and involves covering the entire image with a single mask. There are a variety of ways to make this selection and Garutti demonstrates why the Brush tool approach is preferable to others for this particular task. He also explains the most appropriate settings which include a Brush size of 100%, lowering the Feather to zero, and cranking up Flow and Density to 100%.
Now it’s time to add a signature glow that makes the Orton Effect so popular. You’ll learn how to set overall exposure, highlights, and contrast. Garutti explains that, “we don’t want to blow out the entirety of the image, we just want them to glow with no clipping in the whites.” By doing this you can achieve a subtle brightness that doesn’t overwhelm the shot.

At this point the image looks pretty great, but there are three more important steps that refine the effect for a spectacular result, so be sure to hang in there until the end. Then pay a visit to Garutti’s instructional YouTube channel where you’ll find more shooting and image-editing lessons.
We also recommend watching a tutorial we featured recently with another Adobe expert who clarifies the difference between Lightroom’s “two most important color-grading tools” and demonstrates when and how one works better than the other.


