Next just launched the best-looking outdoor table lamp of the summer – the iconic Pooky scoon lamp has competition
I couldn’t believe the table lamp was only £25!

Nighttime photography can be a lot of fun because it provides numerous opportunities to capture compelling images in the field or on the street. Familiar scenes that may appear boring during the day are transformed into magical tableaus once the sun drops below the horizon.
But here’s the rub: the same neon signs, streetlamps, and brightly-lit windows that everyone finds so captivating can also make it extremely difficult to determine a balanced exposure. And most of the time this means images that look far darker than what you saw through the viewfinder.
But all is not lost because the following video from French-born Serge Ramelli describes “how to retouch an underexposed photo like a pro.” He’s is a noteworthy cityscape photographer now living in the U.S. whose sought-after images are displayed in over 120 galleries across the globe.
Ramelli summarizes today’s eye-opening episode like this: “I’ll provide step-by-step instructions for transforming a severely underexposed photo into a stunning gallery-worthy image.” Along the way you’ll learn his preferred methods for correcting exposure, perfecting white balance, and mastering dodge and burn.
Ramelli also demonstrates his strategy for applying sharpening and noise reduction to images that are overly dark. He covers all these topics and more in barely nine minutes. The example he uses is a well-composed street slot with a curving cobblestone road that effectively guides you through the glittering village.
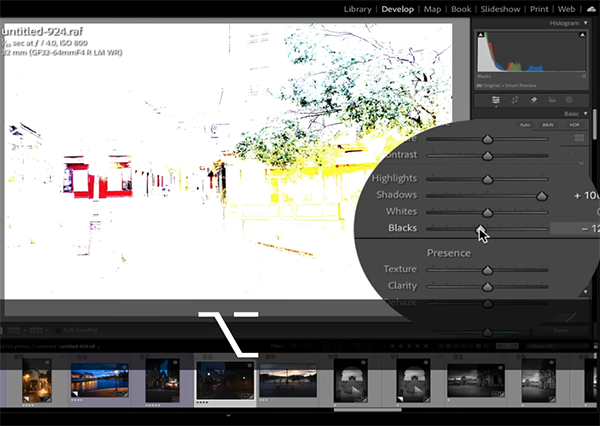
The problem is an exposure mistake that makes all the enticing details difficult or impossible to see—thereby spoiling the unprocessed shot. If you want a one-click solution, simply grab Ramelli’s free Lightroom AI presets using a link beneath the video. The point of this lesson, however, is teaching you how to rehabilitate an image yourself so that you understand the necessary adjustments and enhancements that are involved.

Ramelli begins by adjusting the black points in the photo before boosting the whites to “reveal the photo.” Then he uses simple slides to modify white balance, color intensity, and other key variables in a manner that photographers of all skill levels can handle with ease. A few simple masks for local enhancements also factor into the equation.
A quick glance at Ramelli’s before/after examples confirms the spectacular results you can expect by following his straightforward advice. Be sure to take a close look at his popular YouTube channel and explore the many how-to videos you find.
And don’t miss a tutorial we featured with another post-processing expert who demonstrates a simple-but-obscure masking trick that many photographers overlook that takes barely five minutes to learn. You can use it in Lightroom, Photoshop, and Adobe Camera Raw.
Is image cropping just a technical fix, or a creative tool that can completely transform your photography? According to pro Ejaz Khan, the latter is the correct answer, and he demonstrates why and how in the 10 minute tutorial below.
Khan grew up immersed in filmmaking and developed a love for storytelling that fueled his passion for photography. The goal of his popular how-to videos is to “help you capture stunning photos effortlessly by simplifying complex techniques into actionable steps.” The task of creative cropping isn’t exactly complex, but it’s one sure way to leave viewers craving more.
Today’s episode is all about this using this practical skill to enhance images with an artistic flair. Khan explains the concept like this: “I’ll show you how image cropping is more than just trimming edges, and how it enables you to unlock the full emotion, power, and presence within the frame.” He promises that by following his advice you’ll be able to quickly turn a decent image into one that’s “unforgettable.”

Put another way, with the techniques you’ll learn in the next 10 minutes, “your cropped images don’t just look better, they feel better too.” Bottom line: If you’ve ever looked at one of your images and thought something was missing, there’s a good chance that a lack of thoughtful cropping is the key element you overlooked.
Khan’s straightforward tips are illustrated by a selection of photos that can be greatly improved with different types of crops, and they’re appropriate for a broad range of genres from landscapes, portraits, and action shots, to nature and wildlife imagery. With a bit of practice, these compelling styles will quickly become second nature whether you’re “cropping in the camera” or during post processing.
Khan demonstrates how even small changes to the frame can elicit a big emotional response from viewers, and why it’s helpful to leave space in your crop for flexibility of mood. In other situations the goal is creating photos with a sense of power, and one way to do that is getting in tight which will accentuate a key subject and eliminate distracting elements in the background or surrounding areas. Other times, the goal may be enhancing depth, clarity, and texture.

The overall takeaway is this: “Don’t just frame what you see, use image cropping to shape what your audience feels.” Once you’re done watching, heady over to Khan’s instructional YouTube channel where there are many more tips and tricks for improving your skills.
And don’t miss our recent tutorial with one of our favorite instructors who demonstrates why an understanding of color theory and practical ways to use it is also essential for creating photographs with maximum impact.
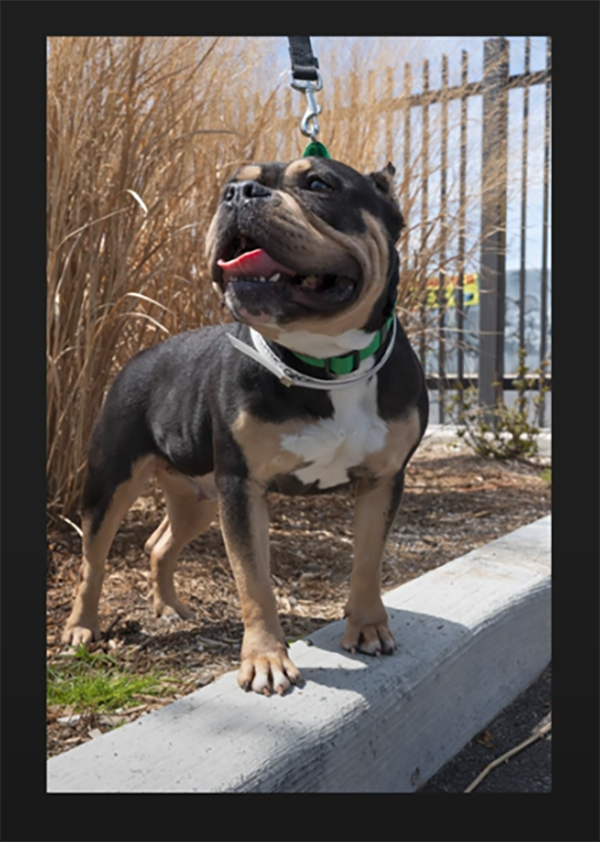
If you’re a proud pet owner let’s forget about your photographic specialty for the next 10 minutes, because we all love capturing memorable images of our furry friends. Today’s tutorial from the B&H Photo Video YouTube channel demonstrates five must-know tips for getting the job done to perfection
In honor of National Adopt a Shelter Pet Day instructor Gabriel Richards took his crew to a new state-of-the-art animal care facility in New York to take portraits of some of their senior and long-term residents to help them get adopted. He demonstrates a variety of helpful methods for getting a pet’s attention, finding flattering poses, what kind of lighting to use, and more.
Richards reveals his foolproof techniques in the context of photographing dogs, but everything you’ll learn will work wonders for cat owners too. There are some special “accessories” you’ll want to have handy for tackling this assignment; namely, your pets favorite treats and a few toys.

Most pets are very motivated by food, and Richards explains why small meat-based treats are the best way to go for capturing a subject’s attention and sustaining their interest when facing the camera. And a cuddly toy will help keep a dog or cat comfortable and calm in this unfamiliar and potentially stressful situation.
An unobtrusive background is also essential whether you’re shooting outdoors or with a makeshift “studio” at home. In either case its “important to keep things simple because, after all, your pet is the star of the show.” Richards chose a simple bright-colored seamless backdrop for his on-location shoot.
You can take the same approach when shooting at home, but even a blank white wall will do just fine. Richards demonstrates how to things clean and simple when shooting outdoors, and one way to do that is by choosing a wide aperture to throw background clutter out of focus.
Richards moves on to several tips for encouraging your pet to strike variety of interesting poses. He provides flattering examples for candid shots, formal portraits with the subject gazing directly into the lens, and photos of action like your pet chasing a ball.
At this point you’re only halfway through the video and as the lesson proceeds you’ll discover valuable gear recommendations, tips for getting the light exactly right, and details on other key considerations. There are several links in the description beneath the video for watching more how-to videos on pet and dog photography.
There’s much more to learn on a wide variety of photo skills on the B&H Photo Video YouTube channel.
And speaking of animal photography techniques, be sure to check out our recent tutorial from a British wildlife expert who demonstrates how to capture perfectly focused bird photos when tree branches obscure your subject.


