IKEA’s new ‘floating’ storage trolley nails classic Scandi-style – I think this clever feature will give it cult status
IKEA’s new design is almost too pretty to be a storage trolley

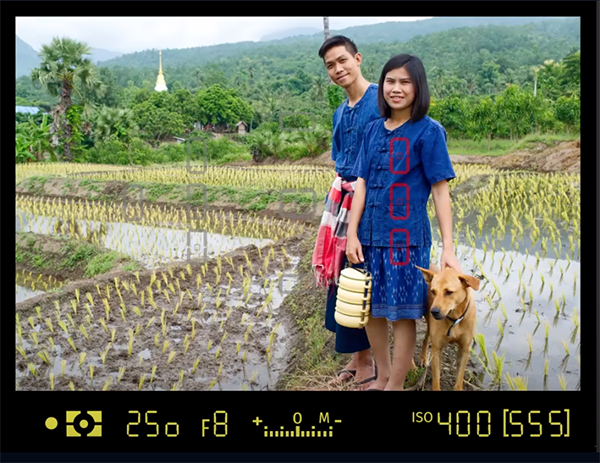
All photographers strive for perfectly sharp photos, and this task can often be difficult depending on the subject at hand and the situation we confronts. Consistently achieving precise focus isn’t about owning a great camera, but rather understanding how autofocus really works and knowing how to use it properly and the best settings to use.
The video below comes to us from the folks at Great Big Photography World, a YouTube channel that caters to shooters of all skill levels by sharing lessons on a wide range of topics from camera basics and composition, to post-processing and more. Our unnamed instructor explains the goal of today’s beginner-friendly episode like this: “I’ll break down everything you need to know about autofocus settings so you can finally capture sharp photos every time.
There’s a specific emphasis on your camera’s Single Point AF mode that our instructor says he personally uses most of the time and recommends to beginners and hobbyists alike. He explains his preference like this: “Unlike multi-point focus where your camera decides where to focus, single-point AF gives you full control over exactly what part of your composition is sharp. And this precision can make or break a photo.”
The video provides a quick walkthrough on when to use single-point AF, configuring the camera appropriately regardless of the brand, and how to practice with both static subjects and those in motion. You’ll also learn how to physically move your focus point within the frame, whether you’re using a rocker switch, control wheel, or a camera’s rear touchscreen LCD.
There are times when multi-point focus may be preferable with certain fast-moving subjects like birds in flight as compared to photographing a person walking past a tree. You’ll also see how to read the small square focus indictors to keep you abreast of what’s going on, “because sometimes you want full control, but other times you just need the camera to help out.”
And that’s why understanding what a camera is trying to do is the first step towards mastering the options. This is the reason our instructor teaches both methods to his students. He admits that single-point AF may feel awkward at first, “but with just a bit of practice it becomes second nature and way more accurate than letting your camera guess.”
Be sure to visit the Great Big Photography World YouTube channel after today’s lesson concludes and explore the many how-to videos available.
If you happen to be a pet owner don’t miss the tutorial we featured recently from another adept pro who demonstrates five simple techniques for capturing pixel-perfect photographs of your beloved furry friends.
Today’s quick tutorial is for those of you who’ve tried photographing on the street and were disappointed that the images you captured looked nothing like the compelling scenes you witnessed through the viewfinder. We’re going to fix that today.
Instructor Hans-Joachim Brucherseifer is very sympathetic and he explains the difficulties like this: “Street photography is a true test of skill and intuition. Often you only get one shot (no second chances), you can’t stage anything, and lighting is always unpredictable. In less than four minutes he provides several of his secrets for overcoming these uncertainties.
Hans is a German pro who says he’s a photographer by day and a magician at night who shoots everything from epic landscapes to imitate portraits. He’s also a popular instructor, and his straightforward imaging tutorials are packed with photo tips, unique techniques, and a whole lot of passion.

Today’s street photography primer covers everything from choosing the right lens, making the most of natural light, and achieving precise focus. Being prepared for the unexpected is also part of the game, as is easing your qualms about approaching strangers to politely request an impromptu portrait.
Hans begins with the latter and says he strives to tells a story with his images by capturing real-life situations, and why this often means photographing people within their personal space. As he says, “this requires technical skill and a deep sense of empathy and respect.” He follows up by revealing two ways to photograph pedestrians you don’t know.
In basic terms, you can either act as a fly on the wall, capturing the scene unnoticed, or “be the hornet on the eye directly.” Hans says his often shoots unaware subjects from behind, before approaching them, presenting the photos on the LCD, and suggesting an environmental portrait or two. Most times couples or individuals will readily agree, especially if you offer to send them copies.
Hans then moves on to gear and the focal lengths he recommends for different scenes and situations. You can view a complete list of the equipment he prefers in the description beneath the video. Once you’re properly armed it’s time to scrutinize the light and understand how to create natural looking exposures with perfectly balanced tones.
The lesson concludes with a discussion of how to use your experience to anticipate the unexpected and a few random final thoughts for improving your photos of the urban landscape. Be sure to check out Hans’ instructional YouTube channel where there’s much more to learn.
And don’t miss the tutorial we featured recently with another accomplished shooter who demonstrates how he employs creative cropping to significantly heighten the impact of every photograph that he shoots indoors or out.

There’s a common misconception in photography that sharper images require more expensive gear. Sure, top-tier lenses and high-res sensors help, but they’re not the only answer—and certainly not the cheapest.
If you’re looking to take tack-sharp landscape photos, don’t be so quick to reach for your credit card. Instead, reach for your tripod, fine-tune your technique, and pay attention to the small stuff. Here are five tried-and-true ways to sharpen your landscape game without spending a dime.
Let’s start with the obvious: motion blur kills sharpness, and the best defense is stability. If you’re already using a tripod, good. But are you using it right? Make sure it’s on solid ground, not teetering on loose rocks or soft soil. Extend the thicker, sturdier legs first, and avoid raising the center column unless absolutely necessary.
Don’t have a tripod? Get creative. Rest your camera on a rock, a backpack, or even wedge it into a tree branch. Use a timer or remote shutter release to avoid jostling the camera when you press the shutter button. Every little vibration counts—especially with long exposures.

Auto ISO is great when you’re chasing fast-moving subjects, but in landscape photography, you’ve got the luxury of time. Switch to manual ISO and keep it as low as possible (ISO 100 or 200) to minimize noise. Noise doesn’t just muddy your images—it smudges the details too, making your shots appear softer than they actually are.
If you’re working in changing light, you can use aperture priority mode with manual ISO and let the shutter speed float. Just keep an eye on it so it doesn’t dip too low and introduce blur. Use your histogram to make sure you’re properly exposed without relying on the camera’s meter alone.

Every lens has a sweet spot—an aperture range where it performs its sharpest. This is usually two to three stops down from wide open, often around f/8 to f/11. Shooting wide open (say, f/2.8) may give you nice bokeh, but not the edge-to-edge clarity landscapes deserve. On the flip side, stop down too far (like f/22), and diffraction softens the image.
So, know your lens. Run a simple test: shoot the same scene at various apertures and zoom in on the details. You’ll start to see where your lens hits its stride. Once you find that aperture sweet spot, make it your go-to for landscapes.

Landscape scenes are deep, layered, and expansive. Where you focus matters. If you’re relying on your camera’s autofocus to figure it out, you’re rolling the dice.
Try this instead: use live view, zoom in on your LCD, and manually focus on a subject roughly a third of the way into the frame. That’s the hyperfocal distance sweet spot that maximizes depth of field. If your camera has focus peaking, turn it on. If you’re using autofocus, use a single point and place it with intention.
Bonus tip: Focus before you switch to vertical orientation. Some cameras struggle with accurate AF when flipped.

For DSLR users, that internal mirror slapping up before each shot can create a tiny vibration—just enough to slightly blur your image. Activate mirror lock-up mode to eliminate this issue. It’ll add a step to your shot, but it’s worth it for tripod work.
For mirrorless users, electronic shutter or first-curtain shutter modes help too. These reduce mechanical vibrations during the shot, especially at slow shutter speeds. Dig into your camera’s menu and set it up. It’s a subtle change that can make a big difference.
This one’s so basic it shouldn’t need saying, but here we are. Smudges, dust, and fingerprints all reduce sharpness and can create unwanted flares and ghosting. Keep a microfiber cloth in your bag, clean your lens regularly, and check your sensor for dust if you shoot mirrorless or frequently change lenses.
The post 5 Easy Tips for Sharper Landscape Photos Without New Gear appeared first on Outdoor Photographer.


