Energy bills to fall by an average £129, say Ofgem – what you need to know about the July energy price cap
How the Juy price cap will work in practise

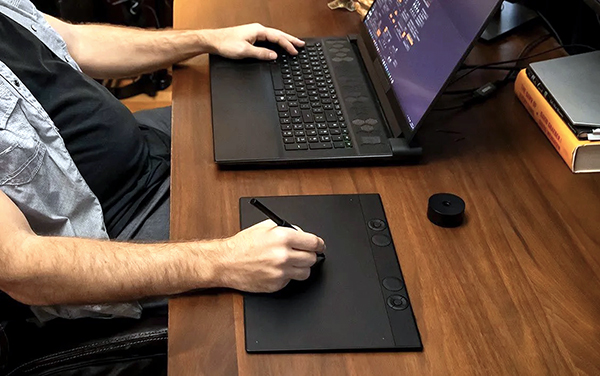
Have you ever thought about owning a graphics tablet? You’re into imaging, so of course you have. The all-new Wacom Intuos Pro 2025 deserves your consideration. It can add precision and amazing control to your sketching, photo editing and graphic creations.

If your photo editing involves more than cropping, exposure correction and other minor tweaks, you can enhance the experience with a graphics tablet. A graphics tablet (or “drawing tablet” as Wacom calls them) is the input tool of choice for legions of famous artists, illustrators and other graphics pros, but they can be equally beneficial to photo editors.
There are two general types: those that display an image that you edit directly, and those that act as a remote connection to the image you are viewing on your computer monitor. The Wacom Intuos Pro is the second type. For information about on-screen editors, check out these two Shutterbug reviews: Revitalize Your Image Editing Now With a Wacom One On-Screen Interactive Graphics Tablet and Wacom One 13 Touch — A New World of Image Editing.
Overview & First Impressions
The Wacom Intuos Pro 2025 is a complete redesign of the 2017 model, and while it’s unproductive to dwell on the differences, everything is better. The layout and construction are substantially more ergonomic and include intuitive dials and ExpressKeys to facilitate workflow. It’s also much thinner — just 4mm at its thinnest point — but the robust magnesium construction make it feel more sturdy.
The Wacom Intuos Pro connects to your Mac or Win PC via Bluetooth or USB (Type A cable and Type C adapter included).
The new Pro Pen 3 is Wacom’s most sensitive and accurate pen and provides clever and simple ways for you to adjust the grip, weight balance and button configuration. It also supports Bluetooth connectivity and is compatible with aftermarket EMR styluses (Lamy, Pilot Dr. Grip and others).
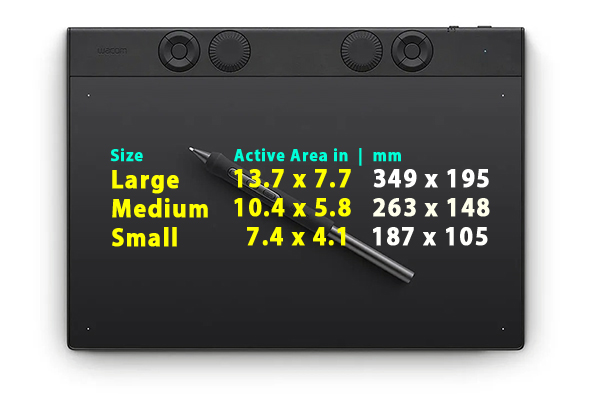
The Wacom Intuos Pro is available in three sizes as follows:
Large (Model PTK 870)
Footprint: 14.8 x 9.9 inches (377 x 253 mm)
Active Area: 13.7 x 7.7 inches (349 x 195 mm)
MSRP: $499.95
Medium (Model PTK 670)
Footprint: 11.4 x 8.1 inches (291 x 206 mm)
Active Area: 10.4 x 5.8 inches (263 x 148 mm)
MSRP: $379.95
Small (Model PTK 470)
Footprint: 8.4 x 6.4 inches (215 x 163 mm)
Active Area: 7.4 x 4.1 inches (187 x 105 mm)
MSRP: $249.95
Key Features of the Wacom Intuos Pro
10 customizable ExpressKeys on L & M models
5 customizable ExpressKeys on S model
Mechanical control dials (2 on L & M, 1 on S)
16:9 aspect ratio
Only 4mm thick at the thinnest point
Easy left or righthand operation
Bluetooth compatibility
Magnesium construction
Optional USB-A or USB-C connectivity

Key Features of the Wacom Pro Pen 3
8192 pressure levels
Tilt support & lag-free tracking
Adjustable balance & button layout
3 programmable pen buttons
Multiple nib options
Battery free
Wacom Intuos Pro Connectivity
Connects via wireless Bluetooth or the included USB-A cable (also includes USB-C adapter). Power users can toggle between USB connection and up to two Bluetooth-paired computers by flipping a switch.

Setup & Operation
Setup is fast and easy. Make your connectivity choice and download the drivers. I went the Bluetooth route for total wireless mobility. I’m not an artist, so I don’t normally use software designed for sketching or drawing. I dove right into Photoshop and had a ball.
I confess that it took me a minute to configure the dials and ExpressKeys. But this is a good thing because it’s a consequence of the superb multiple levels of control options.
I’m also not the most coordinated pooch in the pack so, once again, it took me a minute or two get my sea legs back. After a few practice edits, I felt right at home. I found the Wacom Intuos Pro particularly helpful positioning and editing AI expansions, a key feature of Adobe photo editing products.
The Wacom Pro Pen 3 was comfortable right of the box; nonetheless, I experimented with balancing options before returning to the original configuration. The pen glided over the surface of the tablet smoothly and without skips. The 8000+ pressure levels is crazy — crazy good, that is.
Overall, editing in Photoshop using the Wacom Intuos Pro was an incredible pleasure.
Watch the official Wacom Intuos Pro introductory video on YouTube.
Conclusion
If you’re a graphic artist, illustrator, product/packaging designer or other category of image creator, you likely already own a Wacom tablet, perhaps the older (2017) Intuos model or a high-end Cintiq. If you’re a photographer and/or creator who primarily edits photos, a Wacom Intuos Pro can elevate the experience and help you work with greater precision and control.
Wacom Intuos Pro System Requirements
Windows 10 or later (latest service pack/build) or macOS 13 or later
USB-A or USB-C port
Bluetooth for wireless connection
Internet connection to download drivers and software
What’s In The Box?
Wacom Intuos Pro tablet
Wacom Pro Pen 3 with 2 extra grips, 3 extra button plates and a balance weight
Pen stand with replacement nibs (5 standard, 3 felt, 2 rubber) & nib removal tool
USB C-to-A cable and USB A-to-C adapter
Quick start guide and regulation sheet
Bonus limited-time software included — see website for details and requirements.
Price & Availability
Wacom Intuos Pro tablets can be ordered directly from Wacom today.
Large 13.7 x 7.7 inch (349 x 195 mm) active area has an MSRP of $499.95.
Medium 10.4 x 5.8 inch (263 x 148 mm) active area has an MSRP of $379.95.
Small 7.4 x 4.1 inches (187 x 105 mm) active area has an MSRP of $249.95.
Wacom Intuos Pro tablets are covered by a 2-year Limited Warranty in the US. Exclusions apply; see website for details.
View and purchase other Wacom tablets at Wacom.com. From time to time, refurbished models are available at reduced prices. Wacom also offers certain Educational and Military discounts; naturally, verifiable qualifications must be met and restrictions apply.
Join the Shutterbug Community!
Sign up for an account—it’s easy and FREE. Subscribe to our FREE newsletter (find the sign-up form on our homepage) and bookmark Shutterbug as a Favorite on your browser.
Visit our Gallery section and spend five minutes or less uploading your best shots once a week. You might even become a Shutterbug Photo of the Day photographer!
In the Galleries, you’ll see the incredible work of thousands of photographers from around the world. We encourage you to add your own images to our ever-growing collection. It’s an excellent platform to connect with other photographers and share your knowledge and passion for photography.
(If you’re worried that submitting images to the Photo of the Day gallery might be complicated, it’s not. Check out these short 1-2-3 directions.)
—Jon Sienkiewicz
It’s time for some belated spring cleaning if you waste time struggling with a disorganized Lightroom catalog that’s difficult navigate. If you’ve skipped this one-time housekeeping task because it requires a bit of thought and effort, think about all the frustration you’ll avoid by having all your images at your fingertips in logical folders where they’re easy to find.
Instructor Austin James Jackson says that “most photographers don’t have the best habits when organizing their catalogs and, unfortunately, this is one of the last things they consider when learning to use Lightroom.” His goal for today is to demonstrate how he increases efficiency and speed by doing things right.

We refer to this as a one-and-done process because once you’ve established a clean framework that works best for you, keeping track of future additions to the library will be a piece of cake. The lesson also discusses the implications of working with an external drive, and the benefits of converting image files to the standardized DNG format.
There’s also a few timesaving tricks for importing photographs to a new Lightroom catalog. The entire process is far easier to follow by listening to Jackson with his illustrations on the screen, so we’ll forgo our usual overview and let the expert demonstrate the best way to clean up your act.

Jackson’s instructional YouTube channel is full of shooting techniques for landscape photographers, along with post-processing advice that’s appropriate for beginners and experienced Lightroom users alike.
And be sure to watch the tutorial we featured recently with another popular image-editing instructor who demonstrates how to use Lightroom’s Generative Fill capabilities to clean up his photographs and eliminate unwanted objects and other distracting artifacts.
All cameras feature a selection of Drive Modes, whether your weapon of choice is a DSLR, mirrorless model, or a full-featured compact. Choosing the appropriate setting for the task at hand will simplify a shoot and increase your odds of success.
Instructor Benjamin Jaworskyj is a self-taught German photographer and adventurer whose basic tutorials take you behind the scenes as he demonstrates simple techniques that shooters of all skill levels can employ to elevate their skills. By the time this nine-minute episode concludes you’ll approach the topic with confidence and know when and how to use Single mode, one of the Burst settings, and even one of the two Self-Timer options.
Ben begins with the Single mode which is the setting most photographers use. Simply focus on your subject and capture the shot. This mode works well for landscapes, environmental portraits, and other situations when there’s no movement within the frame.

The Continuous mode, on the other hand, is a better choice when photographing subjects in motion, like birds in flight, wildlife on the ground, and a variety of fast-moving action-sports images. In this case the camera will typically offer of choice of three burst settings—Low, High, and High+. Keep in mind that the nomenclature varies from one camera to another.
Ben explains that when one of the Burst modes is selected, the camera will keep shooting at the chosen rate until you remove your finger from the shutter button or the camera empties its buffer. The speed of the buffering process depends upon the camera in use and whether you’re shooting Jpegs, Raw Files, or Jpeg and Raw.
Another consideration of note is the speed rating of your memory card, and this is super important when shooting at the highest burst rate or when making videos. There are a few other details to keep in mind—just follow Ben’s advice.

The video concludes with an overview of your camera’s Self-Timer settings, because these also fall under the category of drive modes. And there are usually two options: the two-second default and another with a 10-second delay.
Ben’s instructional YouTube channel is a great source of information, especially for beginning photographers who will benefit by learning the basics.
We also suggest watching another straightforward primer we featured recently that demystifies lens focal length and explains why there’s more to this concept than just magnification.


