Chip-cuterie boards are the cutest bird feeding trend taking over social media – how to do it safely, according to wildlife experts
Bird-tok can’t get enough of this cutesy trend

If you’re ready for an impressive burst of color, look no further than this comprehensive tutorial from a very notable British pro who demonstrates his secrets for capturing the ephemeral beauty of wildflowers—subjects that expert Tony Howell refers to as “nature’s tiny masterpieces.”
Howell is a highly acclaimed photographer, author, and educator whose spectacular works has been featured on television, in countless magazines and books, along with calendars, billboards, greeting cards, and elsewhere. His extensive client list includes National Geographic the BBC, Penguin Books, England’s National Trust, and other highly respected outlets.
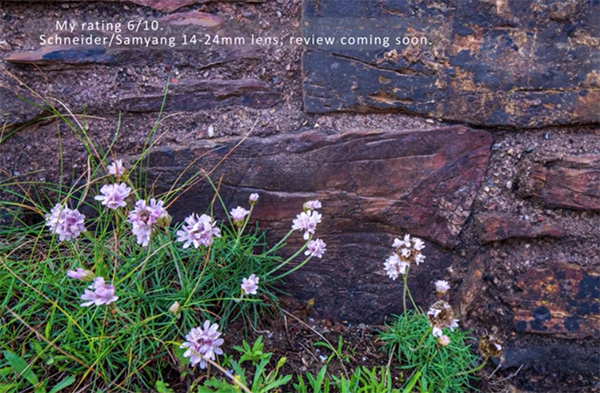
Today’s behind-the-scenes episode take you along for a jaunt to a spectacular location in Cornwall on a headland near the beach that’s full of colorful orchids, delicate poppies and a variety of other blooms. Howell reveals the gear he prefers, his favorite shooting techniques, and the camera settings he recommends. Along the way you’ll learn how his composes wildflower photographs for maximum impact.
His favorite technique is to get his tripod really low and shoot with a long lens like his 100-400mm telephotos zoom. He begins at the long end of the lens at f/5.6 and demonstrates how he often “shoots through things” with a very shallow depth of field so that foreground flowers are out of focus and his sharp subject stands out against a soft, pleasing background.

Howell likes to travel as light as possible and his 100-400mm focuses pretty close, so he opts for a simple set of extension tubes instead of a dedicated macro lens offering 1:1 reproduction at the expense of more reach. You’ll also see how a compact, affordable reflector can really help fill in shadows and control the light falling on the subject.
The foregoing is just a small taste of everything you’ll learn in the next 14 minutes that will get set you on the right path for making breathtaking wildflower photos the next time you head out in the field. You can find a wide assortment of eye-opening how-to videos by visiting Howell’s very interesting YouTube channel.
We also recommend watching the earlier tutorial we shared with a post-processing specialist who demonstrates how to batch-edit multiple photographs in a series with three different techniques in Lightroom and Lightroom Classic.
Photoshop’s Color Channels serve various purposes, and this tutorial from the PHLEARN YouTube channel concentrates on two of the most powerful; namely cutting out objects with soft or intricate edges like clouds or hair by leveraging contrast, and also creating artistic effects that are impossible to achieve with standard adjustments.
Image-editing expert Aaron Nace is a favorite among Shutterbug readers who appreciate his ability to simplify important Photoshop and Lightroom techniques. His interesting examples begin with a precise trick for cutting out clouds from one image and placing them into another photograph with a featureless sky. Then he moves on to creating magical color effects that really grab attention.
The cloud photo Nace selects is a great starting point because it’s full of fluffy white detail. As he says, “I want to grab all this detail but I don’t want any of the surrounding blue areas.” The first step is to click on the Window tab atop the screen and then choose the Channels option from a dropdown menu that appears.
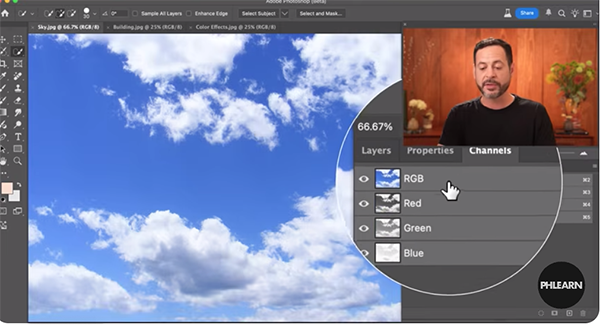
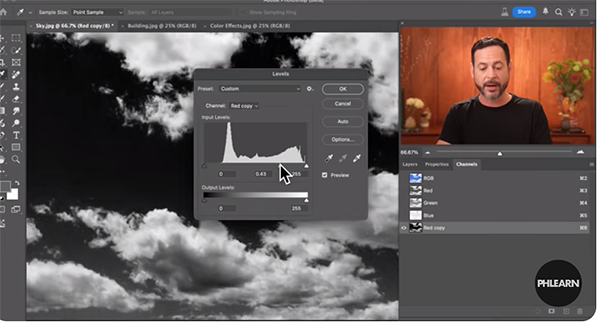
As you’ll see, the subject can then be broken down into various channels like RGB, Red, Green, and Blue. Pay close attention to how your image appears as you select each of the options to reveal the amount of specific colors within your chosen channel. Nace explains that “what we’re looking for here is contrast because we want to make a precise selection.”
The importance of this step can’t be overstated because it determines the accuracy of the cutout you make, and Nace walks your through the straightforward steps. In this case, the Red channel is the one that works best. He then employs Photoshop’s Levels slider to refine and accentuate the result.
It’s important to remember that the light tones are those that will be selected and moved to the second image with the process that comes next.
The second portion of the lesson demonstrates how to take advantage of Color Channels to create the aforementioned interesting effects, that unlike the foregoing aren’t intended to be realistic. In this case it’s all about capturing a viewer’s attention, and there’s plenty of room for experimentation.
Be sure to check out the popular PHLEARN YouTube channel that offers many more how-to videos for Photoshop and Lightroom users of all skill levels.
And speaking of Lightroom, don’t miss the earlier tutorial we featured with another post-processing expert who demonstrates how to use a new AI tool to remove image-killing reflections from photographs shot through glass.


