Only you and I will know this beautiful hanging chair is from Aldi (and that it’s less than £25)
Aldi, you’ve outdone yourself

Today’s step-by-step Lightroom post-processing guide from the PHLOG Photography YouTube channel reveals a simple and effective method for creating eye-catching nature and landscape photos by accentuating foreground elements in an image. The straightforward technique works wonders for drawing viewers into a scene, balancing exposure and color, and improving the impact of composition.
Instructor Christian Mohrle is a notable shooter and post-processing expert who gave himself the ambitious goal of becoming one of the best landscape photographers in Germany without turning pro. A quick glance at his awe-inspiring portfolio will convince you he’s already there.
One of the secrets to Mohrle’s success is that he’s mastered the art of embellishing the foreground in his images, and you’ll learn how to mimic this technique with precision in the next 16 minutes. Feel free to follow along and make the changes yourself by downloading his sample image using a link in the description beneath the video.

The photo is super dark and was shot at a high ISO setting, so Mohrle begins the process by navigating to Lightroom’s Details tab and applying AI Denoise. This initial step provides far more flexibility and control for subsequent enhancements. Another quick trick is changing the profile from Adobe Color to Adobe Standard for reasons he explains.
Mohrle then makes a few global adjustments to the original shot to prepare it for the transformational masking, color grading, and other key techniques that follow later in the lesson. These preliminary enhancements include modifications to exposure, color temperature, texture, clarity, and contrast. He also carefully reduces dehaze and creates a subtle glow.
The fun part now begins by applying a few masks to selectively enhance various portions of the frame in individual ways, and Mohrle illustrates how easy this is to do. The impressive transformation concludes with thoughtful color grading, judicious sharpening, and a bit of focus stacking and cleanup in Photoshop. Check out Mohrle’s before/after examples and you be convinced.

Then take a look at the instructional PHLOG Photography YouTube channel where there are many more tips and techniques for everyone who shoots outdoors.
We also recommend watching the earlier tutorial we featured with another pro’s take on the awesomeness of Lightroom and Photoshop Blend modes, and the only ones nature photographers really need for editing their images.
Most photographer prefer to complete the image-editing process with speed and efficiency so they can get back out in the field with camera in hand doing what they love most. This quick tutorial from the Better Pics YouTube channel will help streamline your processing workflow by explaining how to bulk resize images in Adobe Camera Raw (ACR).
There are several ways to accomplish this task across apps in the Adobe suite, and our instructor Damien demonstrates the effective method he prefers. He’s a notable Australian pro and walks you through the entire process in less than four minutes.
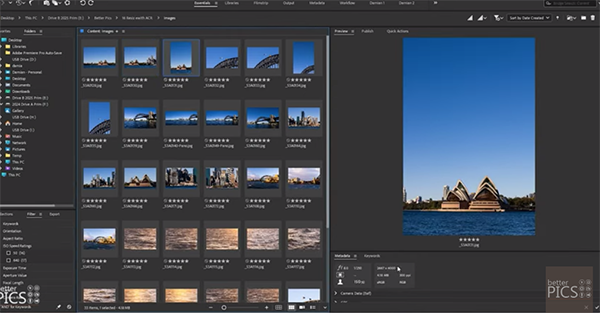
Damien pulls up a series of photos he captured recently in Sydney, and you’ll notice that there’s a combination of horizontal and vertical images—with a few panoramic shots in the mix as well. To complicate matters further, some of these shots have non-standard aspect ratios with different pixel dimensions.
The promise is this: “We’ll look at the options we have in Adobe Camera Raw to resize these images to the specific sizes we desire.” The first step is opening and selecting all of the photos in the sequence, and this case there’s a total 33. Next you’ll want to save the multiple shots in the manner Damien suggests.
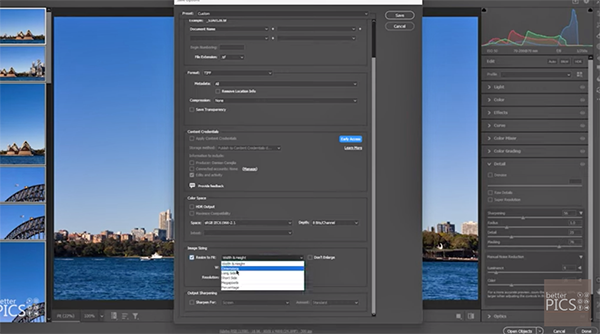
The trick is selecting the Resize to Fit option that enables you to specify the pixel dimensions you want for both width and height, and there’s a drop down menu with a choice of different criteria. Damien chooses the Long Side option and inputs a value of 4,000 pixels He also sets the file format to Jpeg, keeps Quality to at Maximum, and indicates the folder in which the images should be saved.
Now that everything is properly configured, Damien devotes the remainder of the lesson to explaining the bulk-resizing task at hand. His demonstration is so straightforward that we’ll forego or usual summary and let you watch Damien work his timesaving magic.
The Better Picks YouTube channel contains many more how-to videos like this one, so be sure to pay a visit when you have time to explore.
We recently brought you a revealing tutorial from another post-processing expert who provides a bunch of interesting tricks for flipping and rotating photographs in Photoshop, including the benefits of employing individual layers. So be sure to watch that one too.
Today we’re taking a close look at why one of our favorite instructors insists that “Auto ISO is the secret tool for better exposure in any light.” While everyone is familiar with this mode, Hamed explains that the secret nature of the oft-ignored setting is than many folks fail to understand all of its benefits and how to them to use.
Hamed’s instructional videos are designed to elevate your skills, master unfamiliar camera techniques, and encourage you to dive into the world of visual storytelling. Here’s how he kicks off this 12-minute episode: “While many beginners overlook it, and some pros ignore it out of habit, understanding how and when to Use Auto ISO can significantly improve your workflow.”

As you’ll see, this approach can be especially useful in changing lighting conditions or when fast-paced shooting is the name of the game. Hamid begins with a quick overview of how ISO works for landscapes, wildlife and sports imagery, and other popular genres.
The bottom line is this: When following today’s advice your camera takes over the task of setting ISO, and it does so by evaluating prevailing light and the exposure decisions you make. Hamed recommends when, why, and, how to trust Auto ISO and free you from this task. He says this technique “really shines” when you want to prioritize either aperture or shutter speed by allowing the camera to maintain proper exposure on the fly.
Nature photographers require fast shutter speeds to capture sharp shots of subjects in motion, as do action shooters. Auto ISO is a big help by ensuring precise results in everchanging light. Hamed also explains how Auto ISO enables you to remain “flexible and responsive” when shooting indoors.

Hamed explores the practicality of using Auto ISO in different situations, one of which is when shooting in Manual Exposure mode. “You can set the exact shutter speed and f/stop you want, and then let the camera set ISO for proper exposure. This gives you creative control while still responding to fluctuating lighting.”
He also describes how to deal with a few potential drawbacks when capturing both stills and video. Once you’re done watching head over to the Hamed Photography YouTube channel for more quick tips and techniques.
And be sure to check out our earlier tutorial with another accomplished pro who insists that the best tool for sharpening photos in not what you think, and it doesn’t live where you’d expect.


