
Foolproof Wildlife Photography Fundamentals (VIDEO)
If you’re struggling to capture photographs that are just as just as spectacular as your wildlife subjects, we’re going to change all that today with five practical tips from an Australian pro designed for beginners and experience shooters alike. These techniques are practical, not theoretical, and “actually work in the real world.”
Instructor And Rouse is an awarding photographer who travels the globe in search of that elusive perfect shot, and he explains today’s 14-minute episode like this: “I share the key fundamental that have shaped my career— fieldcraft, blending techniques, and creative thinking to help you get closer to the images you really want to make.”
This handful of simple tips covers both technical and creative matters. His first tip is for those of you who aren’t sure about which exposure mode to use, and his unequivocal response is that for this particular genre “shutter speed is king.” Rouse then demonstrates how put this key concept to use.

Rouse is just emphatic about tip #2 and he provides a quick rundown of why composition is just as important as shutter speed. He pulls up several convincing example for framing scenes properly in the camera, rather than relying upon creative cropping during post processing. Rouse says he relies upon a golden mantra that goes like this: “If you’re not going to put it on your wall, don’t take it.”
Next on the list is the notion of keeping wildlife photography fun, and Rouse insists that the best way to do this is by specializing. In other words, “You’ll learn nothing by photographing one species one day, another the next day, and yet another after that.” This means sticking with a subject that you especially enjoy and practice refining your skills.
This thoughtful approach will not only boost your confidence, bit it will enable to develop a recognizable style off your own. There are two more transformational suggestions as this video proceeds, and Rouse promises that they keep you from missing the moments that matter.

Once you get the hang of it, and it doesn’t take long, the quality of your wildlife images will grow by leaps and bounds—whether you’re shooting in the forest, at a nearby nature reserve, or even on safari.
If wildlife photography strikes your fancy be sure to visit Andy’s YouTube channel often because there are many more how-to videos for upping your game.
And don’t miss our earlier tutorial from a very successful Australian nature and landscape photographer who demonstrates how to unlock the power of Lightroom’s Clarity, Texture, and Dehaze tools.
A Polarizer in the 1 Lens Filter All Photographers Must Have (VIDEO)
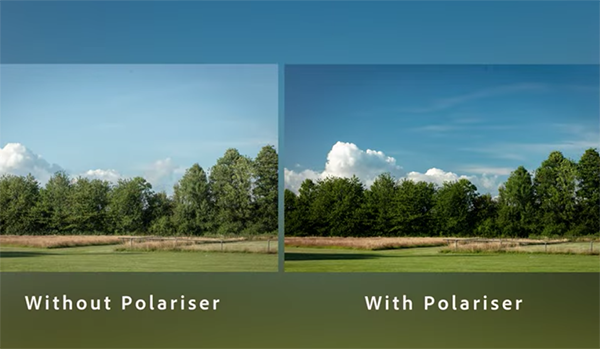
We’re going to start out with a couple important questions: Have you ever captured a photo through water or glass and been totally let down by ugly reflections? Or perhaps your skies look flat and boring even on clear days. In these situations and others there’s a “ridiculously simple” solution that delivers reduced glare, clearer skies, and vibrant colors straight out of the camera.
Here’s how instructor Anthony Crothers explains his goal for today: “I’ll show you why a circular polarizing filter is one of the most power yet underrated tools in photography, and how to use it like a pro.” Once brings you up to speed in barely four minutes your outdoor photos will have more punch and clarity forever more.

Crothers’ popular YouTube channel is all about helping beginner and intermediate shooters build confidence and improve their skills one video at a time, and today he uses several landscape shots to illustrate why this little accessory should be your best friend. As you’ll see, the polarizer differs from most filters because of its rotating ring than enables you to adjust an image to perfection.
You may be surprised to learn that the value of this essential filter transcends scenes with water or glass. In fact, it will also dramatically darken pale blue skies and increase saturation of subjects like flowers and birds when micro reflections can easily mute their beautiful colors. Simply thread one onto your lens, follow Crother’s advice, be aware of a few possible mistakes, and you’ll super impressed by the results.
Crothers explains that as you rotate the front ring on the filter it blocks certain light rays from hitting the camera’s sensor. This isn’t about darkening a photo, but rather “transforming how the camera sees light. As the episode proceeds you’ll also learn several creative uses for your new friend.
Crothers describes the impact on exposure, and why your angle relative to the sun is another important consideration. And the best part is that all the filter’s benefits are visible in the viewfinder as you rotate its front ring right or left to increase or lessen the effect.
There’s a lot more to learn on Anthony’s instructional YouTube channel, so make sure to visit and explore.
And don’t miss the related tutorial we featured with a post-processing expert who reveals a simple Lightroom/Photoshop trick for fixing photographs with uneven polarized skies that have blotches and harsh transitions.
Popular Posts


Advertisement
