This is how often you need to check your smoke alarm – or face voiding your home insurance policy
Don’t neglect this vital task

Adobe’s July Photoshop update has dropped and it’s packed with powerful new features. This overview from the Photoshop Training Channel takes a quick dive into what a post-processing expert say are his five favorite new features.
We often turn to instructor Jesus Ramirez when new image-editing software is released. And he never fails to provide a concise explanation (both pro and con) of all the new tools for image manipulation, compositing, text effects, retouching, and more. Here’s what to expect in the 11-minute episode below: “These game-changing improvements are all about working faster and smarter.”

Ramirez take a look at two helpful tools from the general release and three others in the new Beta that he says, “will instantly improve your workflow” and he begins with the former. At the top of his list is Photoshop’s enhanced Remove tool that’s now accessible from the contextual task bar after making a selection.
According to Ramirez this updated tool now does a much better job of erasing objects without leaving behind strange artifacts, and it’s less likely to generate new objects based on the remnants of your selected object. Just click on the new tool in the contextual taskbar and Photoshop will handle your request with precision.
Ramirez demonstrates how this feature uses a new model to produce higher-quality generated fill content with improved blending, pattern matching, and background integration. Another big benefit is that Photoshop automatically creates new layers by default to help you protect the original image and work non-destructively.
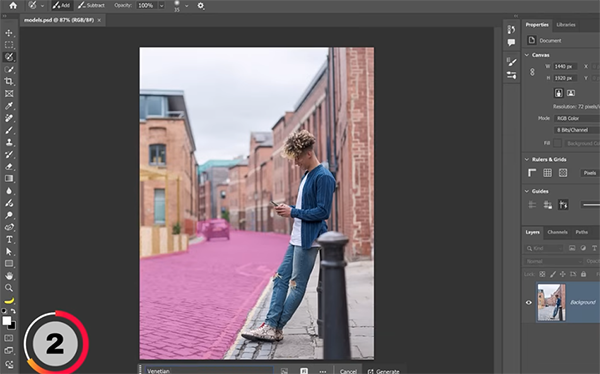
This is just one of the handful of new features highlighted by Ramirez and the second in the general release involves selecting the new Firefly model. Then there’s the trio of helpful features in the Beta that you can begin experimenting with today.
Once you’re done watching head over to the Photoshop Training Channel on YouTube where you’ll find an abundance of instructional videos for Photoshop and Lightroom users of all skill levels.
We also recommend watching a tutorial we featured earlier with a German post-processing expert who demonstrates how easy it is to organize Photoshop and create a personalized workspace that puts all your favorite features and tools right where you need them for every image you edit.
Today we’re taking a quick look at boring white skies, and a very simple workflow for restoring lost detail that you didn’t realize was actually there or thought was impossible to recover. It’s all about understanding how to use Lightroom’s easy-to-use Select Sky tool to get the job done to perfection.
Instructor Mark McGee kicks off the video with a promise: “If you have a white sky with lost detail, this Lightroom tutorial will show you a new and quick way to create dramatic skies.” He’s an experienced photographer/content creator, and this episode is the latest installment of his entertaining Two-Minute Tutorials series for inexperienced shooters.

So here’s the dilemma at hand: “We’ve all been in the position where we thought we captured a well-exposed image in the field, using the histogram to make sure that we didn’t crush the blacks or clip the whites.” But after returning home and closely examining the photo on the computer, we discovered a boring white sky than appears totally devoid of detail.
The typical response is to reduce highlights and adding a bit of clarity and dehaze in an attempt to rehabilitate your blown-out sky. But, as you’ll see, this approach is often ineffective and may degrade image quality in other ways.
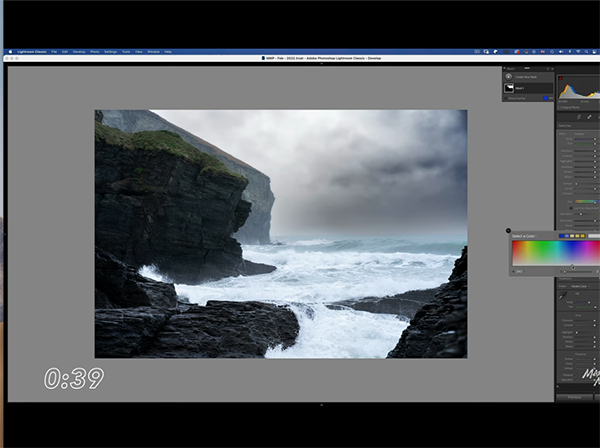
This is where Lightroom’s new Select Sky option will quickly come to the rescue. This transformational tool does a fantastic job of creating a perfect selection of the top portion of the image, while providing several options for editing the problematic sky without biasing surrounding areas within the frame.
McGee’s straightforward approach not only remedies the problem in a seamless way, but it enables you to retain realistic colors throughout the process. He explains everything so quickly and clearly that we’ll forego our usual summary and let the expert walk your through the simple steps. His popular YouTube channel offers many more basic how-to videos like this one.
And don’t miss another primer we featured with a German post-processing expert who demonstrates how he creates “impossible” photographs with an easy-to-apply Photoshop Time Blending technique.


