British photographer and imaging-editing specialist James Feaver kicks off today’s eye-opening explainer like this: “One of the things I really struggled with when I started my photography journey was white balance. I would spend hours changing the color temperature and tint and I just never was happy with the results.”
This episode is for photographers of all skill levels who encounter similar problems and it’s guaranteed to shortcut your learning curve in the next seven minutes. Feaver explains why it’s a waste of time to guess, especially when processing images that we’re captured in a complex lighting situations like the urban environment with its wide variety of lighting sources from daylight and streetlamps, to car lights, and warm illumination streaming through windows.
Feaver begins by striving for a neutral color palate and he explains why in most cases “Lightroom’s White Balance Selector tool doesn’t always work.” That’s why you’re much better off by following the workflow he provides for achieving perfectly balanced tones under all types of light.
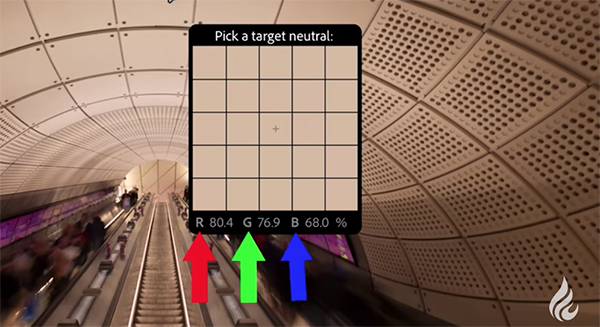
Feaver opens his demonstration image in Lightroom’s Basic panel, and the task of creating a neutral tone is made easy because in this case the photo doesn’t include vivid colors and the ceiling of his subject is gray. Other scenes are likely to be more challenging, but you’ll quickly understand how to handle those situations as well.
Here’s how Feaver’s quick trick addresses the issue: Open Lightroom’s White Balance Selector tool on the left side of your sliders, and hover over any swatch in the ceiling. The targeted picker then displays three values, red, green, and blue which represent a percentage of the amount of these primary colors found within that specific swatch.
Next he hovers around until these values are a bit closer to each other which makes it easier to achieve very precise results. As far as other images are concerned, Feaver says that it’s not necessary to identify areas that are gray, “they could be quite bright or quite dark as long as the area you choose has similar numerical RGB values.
At this point you’re barely halfway through the lesson and there are a few more important refinements to consider, but once you get the hang of it beautiful white balance will be yours.
And don’t miss the transformational tutorial we featured with another post-processing expert who demonstrates how Lightroom’s time-saving Adaptive Color Profiles beat presets and eliminate guesswork when editing outdoor photographs for a compelling, realistic effect.
Everyone loves their pets and consider them part of the family, so it’s surprising that some photographer (who should know better) limit their images of these faithful friends to what could best be described as casual snapshots.
The quick video below with instructor Adam Goldberg explains how to do justice to pets by capturing pro-quality portraits with five shooting tips than anyone can master with ease. He began his love of pet photography while working at the Humane Society in Broward County, FL and quickly became an expert at putting animals at ease and capturing their lovable personalities in every shot.
In the next six minutes you’ll garner a handful of foolproof tips and techniques that Goldberg developed throughout his journey. He covers everything from camera settings and lighting to thoughtful composition and much more. And everything you’ll learn will work wonders when shooting in a makeshift “studio” at home.
All experienced portrait photographers understand the importance of “catchlights,” those tiny reflections in a subject’s eyes that bring people photos to life. These attention-grabbing elements are no less important when pet portraits are the name of the game, and Goldberg has several suggestions—including how to deal with bushy hair or eyebrows that often get in the way.
Next on the list are a few tips for encouraging your subjects to cooperate and keeping them engaged and one foolproof method is to have a few of the pets favorite toys on hand. As you’ll see, distracted pets often snap back to attention the instant a squeaky toy is squeezed.
Goldberg also reveals the camera settings he recommends, like employing an aperture of f/8 or smaller for greater depth of field. He notes that this is particularly Important when photographing dogs with long snouts if you want their entire face to be in focus.
There are two more game-changing tips revealed as the lesson proceeds, and all five combine to create stunning pets portraits every time.
And don’t miss the transformational tutorial we featured with an image-editing expert who demonstrates how to create photographs with a unique style of your own by experimenting with Lightroom’s color tools to enhance images with a signature look.