DON’T Oversaturate Photos: Why & How to Use the Vibrance Tool Instead (VIDEO)
It’s a dead giveaway that you’re new to post-processing if the images you edit are oversaturated because you took a heavy-handed approach with one of Lightroom’s most overused tools. By doing so you just spoiled an otherwise great shot because it no longer appears realistic.
This is a common mistake among inexperienced users who fail to understand the key differences between Lightroom’s seemingly similar Vibrance and Saturation tools (which actually differ in significant ways). This tutorial from David’s PNY Adventures will set you straight in less than two minutes so that every image you edit retains a natural look.
Today’s instructor David is an experienced shooter whose tutorials are designed for other outdoor photography enthusiasts who want to elevate their skills. This episode demonstrates the proper way to introduce Saturation in certain situations. Then he explores when, why, and how to take a more subtle approach by turning to Vibrance adjustments instead.

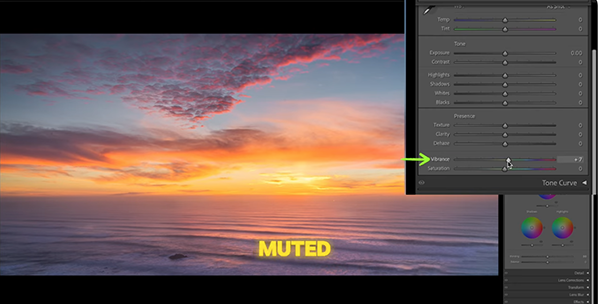
David explains that the Vibrance slider “is perfect for enhancing scenes with muted tones.” Simply put, Saturation increases all colors equally, and this is what can lead to an unnatural overdone look.” In other words, exactly what you want to avoid.
Vibrance enhancements, other the other hand, selectively target the subtle colors within the frame and gives them a much needed boost without effecting more intense tones. Bet yet, this technique is easy enough for beginners, and it works wonders for landscapes, other outdoor scenes, and even environmental portraits captured on dull days.
David explains everything quickly and effectively, so we’ll leave the specific details to him. But here’s quick summary of what’s to follow. You’ll navigate to the Basic panel within Lightroom’s Develop module. Then locate the Vibrance slider under the Presence section, drag it to the right, and watch the subtle improvements appear right before your eyes.

David explains how to make a few refinements as necessary, but the process is as easy as can be. There are more instructional videos to be found on the David’s PNY Adventures YouTube channel, so be sure to take a look.
And don’t miss the helpful primer we posted from another image-editing expert who demonstrates how easy it is to employ Lightroom’s Powerful Selective Color tools and give outdoor photographs a unique attention-grabbing effect.


