
How to Create Picture-Perfect HDR Photos in Lightroom (VIDEO)
The term HDR stands for “high dynamic range” and describes a powerful method for capturing details in the lightest and darkest elements in a scene while maintaining accurate midtones. Some cameras (even compacts) offer a built-in function that captures multiple images of the same scene at slightly different exposures and automatically combines them into one balanced shot.
Today’s tutorial from the PHLEARN YouTube channel takes a different approach by demonstrating a Lightroom technique that delivers more flexibility and control so you can achieve the exact look you’re after with precision. All it takes is a better understanding of exposure control in Lightroom.
This how-to video is installment #11 of a 30-Day’s of Lightroom Series with Adobe expert Aaron Nace who introduces the lesson like this: ‘We’ll show you how to blend multiple exposures and adjust settings for balanced highlight, midtones, and shadows.” He does this with two sample Raw files that you can download with a link beneath the video so you can follow along on real time.
Nace explains that sometime a camera can’t capture all of the brightness values of a scene with one click of the shutter. As a result, maybe the sky is blown out or the shadows are crush—leaving very little detail in one or both of these areas. His HDR technique helps you overcome this barrier quickly and realistically.
There’s a preliminary step you have to take with the camera before capturing the images and opening them in Lightroom. Simply put, “you have to make sure that you a succession of photos that are underexposed, properly exposed, and overexposed.
You can do this in two ways: manually by moving some dials or automatically by choosing a menu setting for Bracketed Exposures. In the latter case you can still specify the number of exposures capture and to what degree each exposure varies in increments of one stop, a half-stop or third-stop.

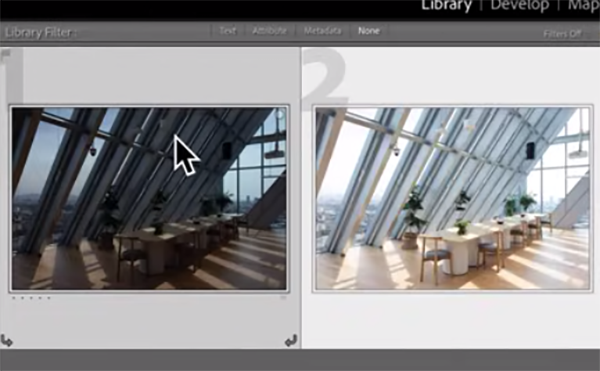
The remainder of this straightfor eight-minute video is devoted to demonstrating the merging process in Lightroom, and it’s far easy that it sounds. You’ll quickly get the hang of it and want to include this process in your everyday workflow.
Once you’re done watching head over to the popular PHLEARN YouTube channel where there are almost another thousand instructional videos.
And don’t miss the tutorial we featured recently with another post-process expert who demonstrates a straightforward Lightroom workflow for creating beautiful Blue Hour photographs in minutes.


