We recently featured an eye-opening tutorial from photographer Fil Nenna who demonstrates a quick-and-foolproof test for determining the sharpest f/stop of every lens you own. He’s back again today, this time with an easy camera-sensor test that he refers to a “compulsory.”
While online charts and graphs can sometimes be useful, Nenna says, “Nothing will help you understand your camera’s sensor and its tolerance to ISO settings as much as this simple test.” In fact, he insists that with this knowledge in your back pocket, the photos you capture will always be as clean and noise-free as possible.
So forget about all the spec sheets and devote the next four minutes to learning how to find out for yourself. Then the quality of every image you capture will be better than ever from now on. Noise isn’t necessarily a bad thing until it become a major distraction, and the threshold for that is for you to decide.
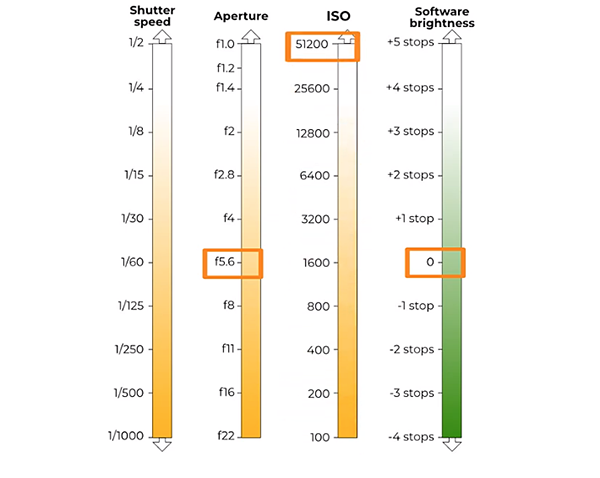
The setup for this test is super simple, you just need a well-lit subject like the guitar in Nenna’s example. Be sure to set the camera to Manual focus so that you don’t accidently shift focus during the test. ISO settings will be the main variable, so you’ll want to fix the f/stop to a single value that doesn’t change during the experiment. Nenna recommends a few stops beyond maximum aperture.
You’ll be testing ISO settings In one-stop intervals from 100 to the maximum, which is ISO 51,200 on Nenna’s camera. He explains that “we’ll compensate for ISO changes using shutter speeds in one-stop intervals. That way the resulting exposure will be identical every time.”
Nenna pulls up the various images he captured so that you can pixel peep at the results delivered by various ISO settings. But here’s the surprise, “My assumption was that ISO 100 would result in the cleanest image and everything else would be a compromise. But now that I’ve done the test, I see that’s clearly not the case.”
In fact, his images all appear sharp and clean through ISO 1,600 and it’s only at IS0 3,200 that noise starts to take over and mask all the tiny details. Of course, Nenna is using a high-end camera, and lesser models will have different limits, but the same principle still apply.
So watch how Nenna conducts this very important test, and then pull out a camera and give it a try. We bet that you’ll be very glad you did. Be sure to check out his interesting YouTube channel where you’ll find instructional videos that differ from others you’ve seen.
And don’t forget to watch the equally important tutorial mentioned above, so you’ll know the best aperture setting on every lens you own. Once again, you may be very surprised by the results.
Do you struggle to perfectly blend your bracketed exposures in Photoshop or Lightroom? If so, this quick tutorial from Steve Arnold will help you get the job done to perfection.
Arnold is a professional landscape photographer whose post-processing tutorials are designed to help you level up your Photoshop and Lightroom skills. He introduces today’s six-minute episode by explaining that there are variety of exposure blending techniques available, depending upon the specific challenge at hand.
Thus, “It’s not just about knowing how, but understanding when and why to use each one for the best results.” He then demonstrates three “essential” techniques, with step-by-step instructions for each, that will deliver stunning results in just about any situation you confront.
There’s also a link in the description beneath the video for downloading his free Photoshop plugin that eliminates all the complicated steps. If you’re wondering why you’ll learn three different blending methods instead of just one, Arnold puts it like this: “The best way depends upon the type of scene that you’ve captured.”
In other words, you have to match the technique to the situation. And taking the wrong approach can actually make an image look worse and waste a lot of time. Tip #1 is the fastest and easiest and it’s available in both Lightroom and Photoshop.
All that’s necessary is to select the photos you want to blend in the film strip at the bottom of the Develop window. Then simply right-click and choose the Photo Merge and HDR options from the two dropdown menus that appear. It’s also important to select Auto Align for reasons Arnold explains. Finally, click Merge.
At this point Lightroom or Photoshop will handle all the heavy lifting and deliver a new image that contains the full dynamic range of your bracketed shots—with more details in highlights, shadows, and everything in between.
Unfortunately, as you’ll see, there a few drawbacks to this automated method, which is why it’s often best to use one of the other two techniques that Arnold recommends. We’ll let him explain their advantages, the greater control they provide, and how they remove any guesswork regarding the results you’ll achieve.
There’s much more to learn about shooting and editing landscape images on Arnold’s instructional YouTube channel, so be sure to pay a visit when you have time to explore.
On a related note, don’t miss the tutorial we posted in the past with another pro’s take on how Photoshop’s Blend modes work, the concept behind them, and the way he uses these tools to achieve stunning visual effects.
A commercial photography shoot is more than just showing up with a camera and snapping pictures. AtSharp Frame Media, we approach every shoot with precision, planning, and a keen eye for detail to ensure the end results meet your expectations and tell your brand’s story. Here’s what typically happens behind the scenes of a commercial photo shoot:
1. Pre-Production Planning
Before the first shot is taken, the success of a commercial shoot lies in careful preparation. We start by consulting with clients—whether architects, interior designers, or business owners—to understand the specific goals of the project. Do they need clean, minimalist images for a portfolio? Or vibrant, eye-catching shots for a marketing campaign? This stage includes discussing the type of photography needed, Standard or Advanced Standard or Advanced, location, shot lists, as well as establishing a schedule that works for both the photographer and the client.
2. Scouting the Location
Once we have the plan, we move on to location research. This step is essential for identifying key elements such as lighting conditions, layout, and any potential challenges. We analyze how the sun and natural light interact with the space, which angles highlight the best features, and how to work around any logistical constraints. Understanding the layout in advance helps to maximize efficiency on the day of the shoot.
3. Setting Up: The Art of Lighting and Composition
On the day of the shoot, our team arrives early to set up. Lighting is a critical aspect, especially for commercial photography, where you want every detail to stand out. For Advanced Commercial Photography, we use off-camera lighting setups to create depth, contrast, and magazine-quality imagery. In Standard Commercial shoots, we opt for on-camera flash to provide a budget-friendly yet professional option.
Composition is equally essential. Whether it’s for a restaurant interior or retail space, symmetry, leading lines, and focal points are all considered. We aim to create balanced, visually appealing photos that will draw in the viewer and make your space look inviting and functional.
4. Shooting Tethered for Immediate Feedback
For our Advanced shoots, we normally shoot tethered to a computer. This allows the client to see the images in real time and provide immediate feedback. This process helps ensure that we’re meeting your expectations on-site, reducing the need for extensive revisions later.
5. Post-Production: The Magic Touch
After the shoot, the images are processed through post-production. Standard shoots include basic editing—color correction, cropping, and exposure adjustments—while Advanced shoots feature more intensive editing, such as retouching and compositing. For clients in the commercial or architectural sectors, this can include perfecting textures, correcting distortions, and enhancing lighting effects. Our goal is to deliver crisp, clean visuals that capture the essence of the space while being tailored to your specific needs.
6. Delivering Optimized Media
Once post-production is complete, we deliver the final images in a format optimized for your needs. Whether it’s high-resolution files for print materials or web-optimized formats for social media and other platforms, we ensure you receive the right type of content for your marketing strategy.
Why Choose Professional Photography for Your Commercial Spaces?
Sharp The difference between a standard smartphone photo and a professionally staged and edited image is night and day. A commercial shoot is not just about aesthetics; it’s about showcasing your work or space in a way that communicates your brand values, your attention to detail, and the quality of your offerings.
When it comes to photographing commercial spaces, whether it’s for marketing, portfolio use, or even submitting to architectural awards, investing in a professional commercial shoot can make a world of difference. At Sharp Frame Media, we understand the intricacies of photographing built environments and tailor our services to deliver the best results for your business. Visit SharpFrameMedia.com or reach out to us today to discuss how we can capture your next project with precision and creativity.
Here are other related topics that might interest you:
Sharp Frame Media is a 5-star rated real estate media agency servicing Dallas-Fort Worth, and surrounding cities in Texas. Founded in 2015 on the values of craftsmanship, service, and partnership. As a veteran-owned company, our mission is driven by our commitment to unmatched service.