Experts reveal running your washing machine at this time can save on your energy bills – but it all depends on your tariff
Did you know certain times of the day are cheaper than others?
This is the favorite season of many experienced outdoor photographers because of the gorgeous colors that paint the landscape no matter where you live. Yet, it can be challenging to replicate the stunning autumn tones you witness in the field—especially when shooting in flat light.
Today’s Lightroom tutorial from the PHLOG Photography YouTube channel demonstrates how to get the job done in Lightroom while achieving a natural looking transformation with a straightforward technique that’s appropriate for users of all skill levels. As always, there’s a link beneath the video for downloading the sample Raw file to you can follow along in real time.
Instructor Christian Mohrle is a highly acclaimed landscape photographer who also knows his way around the computer, specifically when using Lightroom. This 22-minute episode describes everything you need to know for giving fall photos their due.

Those who’ve followed Mohrle in the past now that his edits adhere to a specific hierarchy, beginning with basic global adjustments, followed by selective enhancements using masks, and then finishing the job with color grading and any sharpening that’s required.
The preliminary adjustments begin by changing the profile from Adobe Color to Adobe Standard which provides more control over Contrast later on the in the process. Next Mohrle increases overall exposure, shadows, whites, and blacks, while dropping the Highlights. He then modifies White Balance for a warmer look, boosts Texture, and drops Clarity and Dehaze to introduce a subtle glow effect.
Now it’s time for the meat of the method; namely, introducing a few simple masks to selectively enhance colors in various portions of the scene. Mohrle walks you through every step of the way for making the necessary adjustments,

All that’s left is are a few color-grading tweaks and the aforementioned careful sharpening. Now the image faithfully captures the full splendor of fall! There’s much more to learn about shooting and editing landscape photos on the PHLOG Photography YouTube channel, so be sure that you take a look.
And don’t miss the helpful tutorial we featured with another post-processing expert who demonstrates a straightforward method for increasing depth and dimension in landscape photographs with four pro shooting and post-processing techniques,
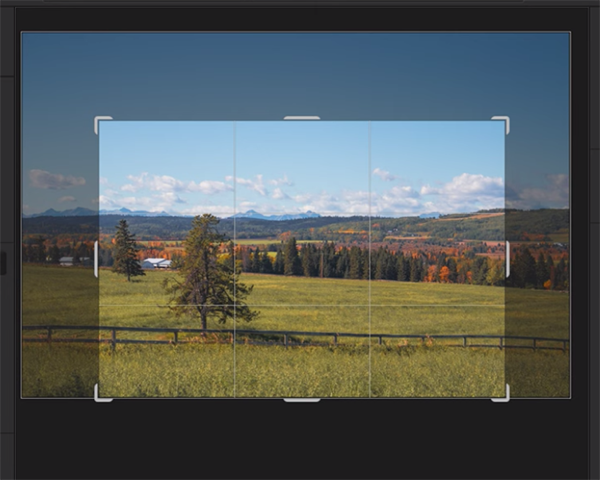
We all know that skillful composition is the key to capturing great photos. And this is especially true when it comes to complicated landscape scenes that are full of competing elements. Today you’ll learn a simple technique for making outdoor images significantly more appealing.
The tutorial reveals a common framing mistake made by beginners and experienced shooters alike; namely, including too much sky in the frame and minimizing elements in the foreground and midrange of a scene that actually may be more interesting. The error often results in static images in which the horizon runs through the center of a shot which is something you rarely want to do.
The problem with this static approach to composition is particularly acute when dealing with a featureless “blur bird” sky that’s virtually devoid of clouds or other elements like a flock of birds or a low-flying airplane to inject a bit of interest. This is when its time to reframe a shot with more emphasis on areas closer to the camera.

Instructor Dave Charlton is an accomplished pro whose new YouTube channel is dedicated to helping landscape photographers capture amazing images with a DSLR, mirrorless camera, or even their smartphone. In this episode he presents several examples of photos with too much sky and compares them to images with a more effective composition.
Charlton admits there are times when negative space can add to a shot, and why concentrating on the sky can be effective with sunrise and sunsets scenes or when there are an abundance billowing clouds passing by. But those situations aren’t what this lesson is all about.
Cropping can be a very effective solution for improving photos you’ve captured in the past, but a better technique is to follow Charlton’s suggestions for cropping a scene in the camera while shooting in the field. In either case, what you want to avoid is an image with a 50/50 ratio of sky and everything else that falls below.

You’ll also see how changing the aspect ratio can be another effective trick, as is framing a scene with a horizonal orientation instead or going with a vertical composition. The foregoing adjustments may sound obvious or trivial, but you’ll see how effective they can be. It’s all about stepping outside your standard routine and doing a bit of experimentation.
There are more straightforward videos on Charlton’s YouTube channel that will greatly expand your skills, so be to take a look and subscribe.
We also encourage you to watch the recent tutorial we featured with another landscape photography expert who demonstrates how to make the most of ultra-wide lenses when shooting complex scenes full of competing elements.
