Move quickly – there’s 25% off Habitat’s Indu garden bench, a lookalike for a high-end cult fave
But you have only until 4th June

Nighttime photography can be very rewarding, especially when there are bright objects moving through the frame, like cityscapes with vivid taillights from passing cars or seascape scenes that include illuminated boats. In fact, the techniques required for both scenarios have a lot in common.
We’ve posted videos in this topic in the past, and most concentrate on focus and proper exposure with sufficiently long shutter speed to capture this eye-catching effect. Today’s episode from the Light Meets Lens YouTube channel takes a different and very interesting approach by describing how to compose images while anticipating motion so that the streaming lights are in perfect position when the shutter is tripped.
Instructor Nick Kuhn says this type of photography is his favorite because, “I love the true beauty of capturing a car or something else with lights on it as it smears across the frame.” Kuhn is a pro specializing in landscape and cityscape imagery so he’s the perfect man to explain this unique approach.

He describes his method like this: “I have to think quite a lot about how lights move through the scene, because I want to time the shot just perfectly.” He typically uses a cable release on his tripod-mounted camera to help him memorialize what he considers to be the decisive moment.
Kuhn visits three locations in this behind-the-scenes episode, and he briefly discusses necessary camera setting for this style of long-exposure photography. His primary intent, however is this: “My goal is to show off a compositional technique with light trail photography because you have to think differently when you do it.”
For his first shot Kuhn is poised atop a high vantage point, shooting at minimum aperture to achieve the slowest possible shutter speed—in this case he ends up to an exposure of 30 seconds. With the preliminaries out of the way Kuhn devotes the remainder of the video to a detailed demonstration of the careful way he composes this particular scene and the other two that follow.

In a way, Kuhn’s nighttime technique is similar to that used by sports/action photographers working during the day, who insist that “you don’t shoot action, you anticipate it.” In other words, this means substituting fast burst rates in favor of well-honed reflexes.
It’s a lot of fun experimenting with this style of light trail photography, so how about making this your weekend photo assignment? Be sure to browse Kuhn’s instructional YouTube channel where there are more pro secrets to be revealed.
We also recommend watching the tutorial we posted earlier from another accomplished pro, with a Lightroom color-grading technique that can be very helpful for boosting the impact of light trail photographs.
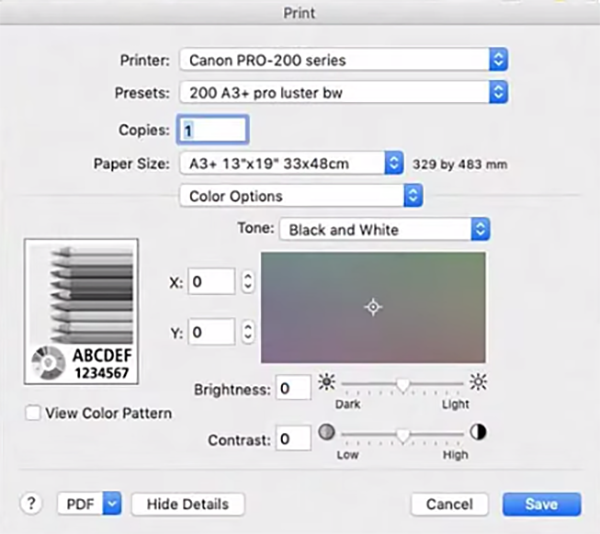
Today we’re discussing an issue faced by photographers who output their work at home with an inkjet printer. Namely, color files look really good but b&w prints leave a lot to be desired. You’re not alone if this happens to you because this is a rather common occurrence.
Instructor Keith Cooper is a British architectural photographer and an output specialist who puts it bluntly: Most printers are much worse at black-and-white printing than they are with color.” In this episode he discusses the reasons for this disparity and provides a variety of effective solutions for making the best possible b&w prints.
Cooper covers several key topics including how the software, drivers, and inks that you use may affect your results. You’ll learn how choosing appropriate paper and setting the printer according factors into the equation. He also addresses whether or not purchasing a newer (or better) printer will solve all your b&w woes.

So what’s the root cause of this problem in the first place? Copper responds with this unexpected statement: “Our visual system is much more sensitive to small tints and tone in b&w prints than it is in color prints. He notes further that our eyesight tends to adapt quickly to slight flaws in precision when viewing images in color.
In short, our eyes are less forgiving when evaluating images outputted in monochrome—even if you make adjustments to the ambient lighting where your prints are on display. One simple solution is to try a different type of paper than what you use with success for making prints in color.
Cooper pulls up some prints he made on a pro-level printer to illustrate potential snafus, with a variety of solutions for getting optimum results with whatever printer you own. He also offers this interesting lament: Why don’t manufacturers offer printers optimized for b&w like the monochrome-only cameras made by Leica and Pentax? That could solve all the problems but there’s a two-word answer: demand and economics. So don’t hold your breath.
Yet, by watching this lesson and following Cooper’s expert advice you may notice a big leap in quality the next time you print in b&w. There’s a lot more to learn on his instructional YouTube channel, so take a look when you have time.
And on a related note, we recently featured a tutorial with a unique Lightroom technique for creating b&w photographs with more dynamic range by using color tools during the editing process, so be sure to check that one out as well.


