Photoshop Basics: Why & How to Hide the Home Screen (VIDEO)
This quick tutorial begins with two important questions; 1) “does Photoshop’s Home Screen appear every time you launch the program?” And, if so, “does the Home Screen really serve a purpose?”
In today’s three-minute tutorial from the folks at Photoshop Essentials you’ll learn why to turn off the screen so it doesn’t appear automatically, and how to turn it on whenever you need it. Instructor Steve Patterson’s channel has almost 200,000 subscribers, as well as hundreds of image-editing tutorials on basic image-editing techniques.
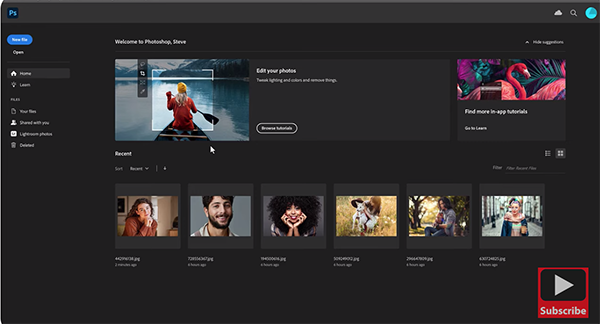
The Home Screen looks very different from the familiar Photoshop interface, and it changes from time to time. What you’ll typically see is a Tutorials area at the top and thumbnails of your recent files at the bottom. The main purpose of the Home Screen, however, is to enable you to create a new Photoshop document, or open an existing file.

So what’s the problem? Patterson explains that “you can already do that by clicking on the File tab atop the workspace and choosing either New or Open from a dropdown menu that appears. You an even access your files with another of the several options. According to Patterson, “that’s why many Photoshop users feel that the Home Screen just gets in the way.”
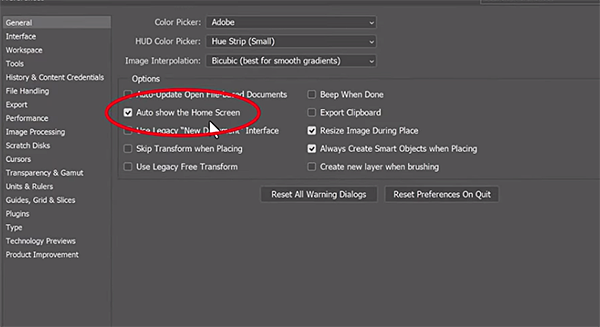
Patterson notes how easy it is to access the home screen if it’s turned off by default, like if you want to look at the thumbnails. But first let’s turn the Home Screen off by going to Photoshop’s Preferences panel. Doing this is about as easy as it gets, but the procedure differs depending upon whether you’re working on a Mac or PC.
But here’s the trick: It’s necessary to open and close a Photoshop document for the above change to take effect. Then when you close and reopen Photoshop the home screen is gone. You can view the Home Screen whenever you want, simply by clicking the Home icon on the top left of the workspace.

Getting back to your workspace with the Home Screen temporarily opened is just as fast and easy to do. Just click on the Photoshop icon on the top left of the screen, and everything is back to normal. And the change in Preferences you made previously remain in effect the next time you launch Photoshop—no Home Screen will appear.
For those new to Photoshop we strongly recommend paying a visit to Patterson’s YouTube channel, where you’ll find a wealth of information for expanding your image-editing skills.
And don’t miss another primer that we posted earlier, explaining how to use Photoshop’s versatile Eyedropper tool to quickly give your images precise colors.


