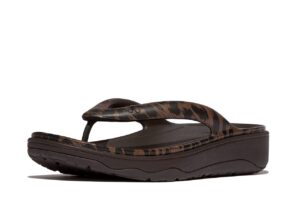
Heating experts are warning households to get their boilers serviced now to beat the winter rush for engineers
It’s better to get this job done sooner rather than later.
The goal of this six-minute quickie from instructor Mark Dumbleton is one that just about everyone should appreciate: “I’m sharing seven Lightroom tips that will instantly save you time and increase your productivity.”
Not only will these techniques improve you workflow and get you back out in the field doing what you love most, but they’re designed to do so while delivering great image quality. Dumbleton is an experienced South African outdoor photographer who specializes in wildlife imagery, but the Lightroom tricks you’ll learn will work wonders for just about any images you shoot in the great outdoors.
Dumbleton begins with this: “If you’re not using shortcuts yet, now is the perfect time to integrate them in your workflow,” and he reveals several of his favorites. When selecting an image in the Library module for example, pressing the “D” key instantly switches your workspace to the Develop module. Then once you’re finished editing the shot press “G” to return to the Library module to begin anew with another photo.
Another quick trick in either the Library or Develop module is using the “F” key to get a full-screen look at your image. Want to return to your previous view? Just press “F” again and you’re there in an instant. There are more shortcuts like these on Dumbleton’s list, and you may want to create a cheat sheet by writing them down.
You can also streamline you edits by using presets for common tasks, or to enhance an image with interesting effects. Best yet, you can download a FREE preset pack by using a link Dumbleton provides in the description beneath the video. He says, “I use most of these effects in nearly all of my edits and they save me a lot of time by eliminating the need to recreate the effect manually.”
Dumbleton also demonstrates how easy it is to create presets of your own. Other tricks include an instant way to reset a slider (or groups of sliders) without dragging back to zero, a faster approach for culling a large batch of photos, and a helpful tip for rating, labeling, or flagging images.
You’ll also learn how to use Smart Collections to automatically group images based upon specific criteria, the best way to configure the Performance and Metadata tabs to keep Lightroom running as efficiently as possible, and the safest method for storing all your files. The bottom line: by following Dumbleton’s advice you’ll work faster and smarter from now on.
Dumbleton’s instructional YouTube channel is a great source of shooting and editing techniques for better outdoor photographs, so be sure to pay a visit when you have time to explore.
And don’t miss the tutorial we posted with another post-processing expert who demonstrates three “essential” Curves Layer techniques for inexperienced Photoshop users.
Do the outdoor photos you capture often appear dull and uninspiring, failing to convey what you saw through the viewfinder? Fear not, because this Lightroom tutorial from the PHLOG Photography YouTube channel explains how to bring them back to life with Lightroom’s oft-ignored Color Range Masks.
Instructor Christian Mohrle is an acclaimed German pro who is equally adept behind the computer as he is with a camera up to his eye. You can download his sample Raw with a link beneath the video and follow along as he demonstrates how to unlock the power of today’s powerful masking technique.
Mohrle begins by merging multiple photos to create a panoramic shot, and he walks you through the straightforward process. As you’ll see, the result is promising, but needs some work to balance out a wide range of tones that can’t be fully corrected with adjustments to the overall scene. Hence, the necessity of selective enhancements to various areas within the frame.
The next step involves a few global adjustments that create the best possible base image for the masking magic that follows. These begin in Lightroom’s Basic panel by changing the profile from Adobe Color to Adobe Standard. Doing this immediately lessens contrast and brightens up the darkest areas in the photo.
Other preliminary enhancements include modifying White Balance to correct a heavy green cast and introducing more warmth. He also tweaks the exposure for more details in the sky, makes further adjustment to contrast, and increases clarity, texture, and vibrance.
The image is greatly improved and it’s now time for selective enhancements using Lightrooms Color Range Masks. The intent is to target blue tones in the sky and river in the foreground, accentuate green highlights in the midrange of his composition, and work on gray tones further back in the upper middle of the scene.
Mohrle demonstrates the straightforward steps required to accomplish these tasks. Then all that’s left to complete the impressive transformation is some final color grading and judicious sharpening. Mohrle’s before/after images prove the effectiveness of this easy-to-emulate technique.
Be sure to check out the PHLOG Photography YouTube channel for more helpful lessons like this one—especially if landscape photography is your thing.
We also recommend watching a tutorial we featured earlier with another post-processing expert who demonstrates a foolproof focus-fix technique for creating sharper landscape and nature photographs with a realistic look.
If you’re new to wildlife and nature photography or just want to elevate your game, today’s video tutorial is exactly what you need. In either case, this step-by-step guide to “essential” camera settings will set you on the path to success.
Be sure to grab your camera and follow along so you can experiment with these options as they’re explained by long-time pro Mike Patterson of the First Choice Photo YouTube channel. In barely 12 minutes you’ll have the knowledge you need for capturing breathtaking photos of birds in flight and animals on the ground—even in challenging situations.
Patterson says that the settings he recommends “allow me to shoot faster without setting the camera in advance, get more consistent results, and capture the sharpest and most dynamic shots every time.” He also discusses the importancw of keep tracking of any changes you make and understanding the practical reasons for the specific configurations involved.
The wildlife settings you learn are appropriate for whatever camera you use whether it’s a full-frame or crop-sensor DSLR or mirrorless model. He also discusses how the focal length of a lens factors into the equation. You’ll also learn how to create one or more custom settings that can be accessed quickly aa the need arises.
In other words, the advice in this episode is pretty much universal for shooting birds or other type of living subjects in the field. Patterson is a strong proponent of shooting in Manual mode with a simple twist. Take a look at the approach he recommends before you start worrying about the so-called “complexity” involved.
Patterson then dives into the best ISO settings for various scenes you may confront, and how to avoid potential problems with these settings and the other advice he provides. You’ll also learn the benefits of shutting off adjustment dials after everything is properly configured for the task at hand.
Back-button focus is a technique used by many experienced outdoor photographers, and Patterson discusses when and how this works to achieve the sharpest results possible. He also explains the importance of using exposure compensation and locking your camera’s custom Program modes
Once the video concludes pay a visit to the First Choice Photo YouTube channel where you’ll find more helpful techniques for shooters of all skill levels and photographic genres.
And don’t miss insightful tutorial we featured recently that reveals another pro’s 10 “must-have” photography accessories that won’t break the bank.