Bamboo is the new Japanese knotweed, garden experts warn, after a couple lose their conservatory to the invasive plant
The Brighton couple were left devastated after their neighbour’s bamboo destroyed their conservatory
We’ve all had the misfortune of capturing a seemingly great image, only to realize later that the shot includes a distracting element, or we failed to notice someone walking through the frame. At this point, unfortunately, it’s often impossible to go back for a redo.
There are several ways to remove unwanted clutter, some more complicated and less effective than others. Today’s tutorial from the PHLOG Photography YouTube channel demonstrates how to get the job done to perfection with a few quick clicks in Lightroom.
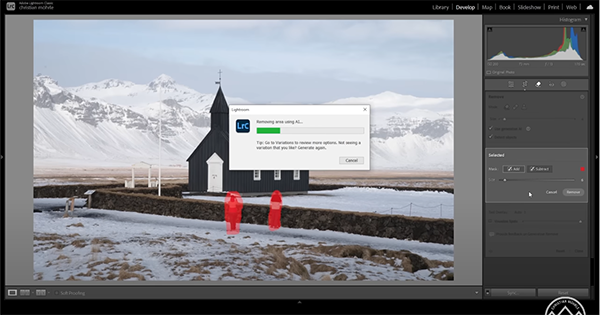
Instructor Christian Mohrle is a highly respected German photographer and post-processing expert who you’ll recognize if you’re a regular Shutterbug reader. His goal for today is to remove two people standing in front of a church in the middle of a beautiful landscape scene with snowcapped peaks looming in the distance.

Mohrle quickly banishes the bystanders and then demonstrates a straightforward workflow for significantly enhancing the shot by applying several basic adjustments, a bit of masking, color grading and sharpening. We therefore suggest downloading his sample Raw file from the link beneath the video so you can follow along and do everything yourself.
The first step is heading into Lightroom’s Remove tool panel that provides a number of options. Mohrle typically chooses the Healing Bruch do get rid of sensor spots and other small things, but his preference for more complex objects clicking on the Remove mode icon instead.
Once you’re in the Remove mode it’s important to select Generative AI “which will get rid of objects more easily.” Mohrle also activates Detect Objects. Then he chooses an appropriate brush size and paints roughly over the people to be eliminated. Mohrle notes that “it’s important to leave a little bit of room around an object, so there’s no need to be too precise.”

Then click on the Remove button on the right side of the workspace, and BOOM—after a brief wait the people are gone. Lightroom offers three different variations, so if you’re not satisfied with the first result try one or both of the others.
Mohrle now has a distraction-free image and it’s time to apply the global and selective enhancements mentioned above. It’s a reliable workflow that you can employ for processing a wide variety of outdoor images.
The popular PHLOG Photography YouTube channel is a great resource for everyone who shoots in the in the field. We also suggest watching a tutorial we featured recently with another post-processing expert who demonstrates seven overlooked Lightroom tools that will speed up your Lightroom workflow and enhance every image you edit.
