
Don’t Let SMART OBJECTS Turn Photos Into Trash (VIDEO)
If you’re unfamiliar with the term “Smart Objects” here’s a definition paraphrased from the experts at Adobe: They’re a type of “container” that holds multiple layers, that enable you to apply a variety of characteristics to an image with different tools and features.
In today’s tutorial from the globally popular PiXimperfect YouTube channel you’ll discover the power of Smart Objects when used properly, and how getting one setting wrong can do major damage to a photo. Six minutes is all it takes to learn the simple solution so your post-processing doesn’t break down.
Instructor Unmesh Dinda has over five million YouTube subscribers throughout the world. He begins the video by summarizing the benefits and versatility of Smart Objects like this: “They maintain all the details, and whatever filters you apply can be changed later,” But when things go wrong they do so in a hurry.

Dinda then explains the problems you may confront unless you do as he says and change one key setting. The bottom line is that your Smart Objects may become so blurry, over-sharpened, and pixelated that you may lose the entire purpose of using them in the first place.
The sample image is an attractive hi-res portrait of a pretty model against a plain, colored background. He resizes the shot because he wants a smaller file and at first it looks pretty good. But watch what happens when there’s a Smart Object involved. This is when the problem rears its ugly head because one of the settings in the panel is incorrect—a relatively common occurrence.
Now when he resizes the images there are a number of sparkles and ugly artifacts on his subject’s face—and they only occur on the Smart Object layer—the regular layer is fine. A you’ll see, this is not problematic when you resize an entire document, but also with single elements within the shot—like using a Smart Object to edit the model’s eyes.
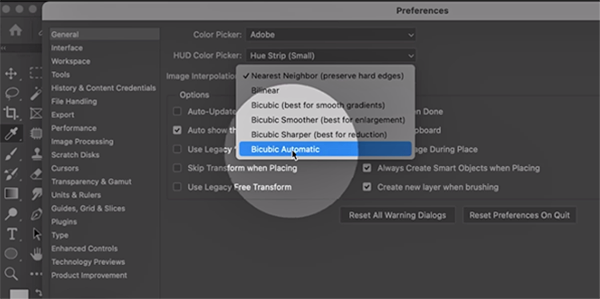
We don’t want to spoil the surprise by revealing the setting that needs to be changed, because listening to Dinda describe the finer points of the foregoing is super important. But here’s a clue: It involves interpolation settings, or as Dinda puts it, “the way pixels are arranged when you reduce or increase the number.”
We suggest visiting Dinda’s wildly popular YouTube Channel after you learn the quick solution, because there are many more valuable tips and technique to be found.
And don’t miss the valuable tutorial we featured recently from another post-processing expert who demonstrates a “game-changing” Photoshop technique that he insists will improve every photograph you edit.


