How to Manually Install & Manage Lightroom Plugins for Ease of Use (VIDEO)
Lightroom plugins are valuable software add-ons that expand creativity during the editing process with easy to use features for a variety of effects. They’re readily available, some for free and other at a nominal cost, and they can add impact to images while speeding up your workflow.
If you haven’t tried these assets in the past, it time to get going. The tutorial below from Eastern Shore Photo Instruction demonstrates a foolproof method for installing plugins and managing them properly for ease of use.
A couple things to keep in mind. First, it’s important to purchase plugins from a trusted source—just like with anything you install on your computer. Secondly, once you get started you’ll likely end up with a multitude of plugins over time, and you’ll want to manage them so they’re easy to find and use.

Today’s instructor Mickey explains everything you need to know in barely nine minutes, and his lesson is equally valuable for beginners and experienced users alike. As you’ll see, having plugins display in alphanumeric order isn’t typically the best way to go, and Mickey provides a quick and easy hack to manage and sequence the display of your plugins to match your specific needs.
While plugins may install automatically, there are several reasons why that may not work (one reason may be that Lightroom is already open when you begin the install). To alleviate any frustration Mickey explains a foolproof manual method for getting the job fast.
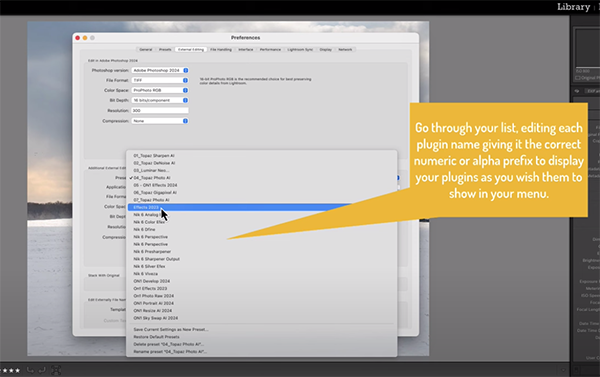
The first step is going into Lightroom Classic and clicking on Preferences. Next go to the external editing tab, the bottom half of which is where you configure the plugins. Once you’re there, you’ll then have to locate the plug per Mickey’s instructions, and then simply follow his advice for specifying the five options available.

These include File Format, Color Space, Compression, Bit Depth, and Resolution. The process is somewhat different whether you’re on a PC or Mac, so pay close attention as Mickey explains the procedure.
One your plugin is installed there’s a bit more to do if a fast and seamless workflow is what you want, and this is the “management” part of the process that determines where and in what order your plugins appear. This is a very important step, but very easy to accomplish. Remember, if Mickey likes it you will too.
The Eastern Shore Photo Instruction YouTube channel is one you should visit often for more tips, tricks, and helpful information. We also recommend watching another tutorial we featured recently, explaining how Lightroom’s Tone sliders work in different ways, and the correct method for using them to achieve optimum results.


