
Novice Mistakes That Are Spoiling Your Photo Edits (VIDEO)
We’ve had discussions in the past about how a heavy-handed approach to post processing can be worse than no editing at all and can really mess up an otherwise nice shot. There are also times that problems occur because of a failure to understand how common tools work, and this often results in easy-to-correct mistakes
This tutorial from one of our favorite instructors addresses the latter concern and demonstrates several common beginner Photoshop errors with straightforward solutions for doing things right. Or as landscape photographer Steve Arnold says, “There are seven sneaking editing mistakes sabotaging your landscape photos and preventing your photography from reaching the next level.”
At the top of the are ugly “halos” that may appear around the edges of elements in a scene, like buildings, trees, boulders and other objects with clearly defined edges—especially when they’re photographed against a bright sky. These distracting artifacts identify you as a beginner and are created when you mask an object poorly before attempting to make adjustments.
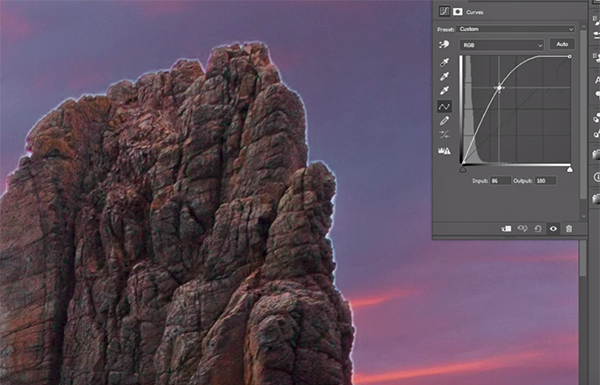
When this happens the effect you’re attempting to create can spill over into adjacent areas in the frame, with halos being the unfortunate result. This concern is particular acute when employing Photoshop’s Select Object tool. Fortunately there’s a quick and effective fix if you follow Arnold’s advice.
Another familiar mistake is one that you may has committed more than once, and this one occurs when you go overboard attempting to brighten dark objects. Arnold explains it like this: “When you push things too far you tip the balance of what should be bright and what should be darker.” This problem is most common when you try to pull out more detail in the shadow areas within the frame and use the wrong approach. Once again, the solution is simple.
Another topic of concern is using the same technique to edit different types of images—thinking that this will provide consistency to your work. More often than not, however, you’re likely to end up with unrealistic photos.

Mistake #4 isn’t something you’re doing wrong, but rather something you’re not doing at all. This is error occurs when deciding whether or not to crop, and Arnold describes the dilemma like this: “It a trap photographers fall into because they want as much image as possible, and it feels like a shame to “waste” data by cropping a photo and reducing pixels.”
The salient question is this: Would you rather have a full resolution photo with OK composition, or a slightly reduced file with perfect composition? There are three more mistakes to go and you’ll have to watch the video to see what they are and learn the related solutions. When the video concludes be sure to check out Arnold’s popular YouTube channel for more shooting and post-processing techniques.
On a related note, don’t miss the earlier tutorial we posted that begins with this question: “Do you know the difference between Lightroom’s Vibrance and Saturation sliders and the best way to them to enhance your photographs?” If not take a look.


