
Kenwood has finally designed a stand mixer for small kitchens – I put it to the test with 3 Prue Leith recipes
You don’t need a big kitchen for Bake Off-worthy cakes


REAL ESTATE
Residential, Commercial, Interiors

LANDSCAPE
Landmarks, Cityscape, Urban, Architectural

FOOD
Hotels, Restaurants, Advertising, Editorial

PORTRAIT
Traditional, Glamour, Lifestyle, Candid

PRODUCT
Studio, Lifestyle, Grouping

EVENT
Conference, Exhibition, Corporate

FASHION
Portrait, Catalog, Editorial, Street

TRAVEL
Landscape, Cityscape, Documentary

SPORT
Basketball, Football, Golf

CONCERT

STILL

STREET
Last week brought you a short-and-sweet tutorial from post-processing impresario Julieanne Kost, explaining the simple process of using Photo Merge in Lightroom to create beautiful HDR images that would be impossible to capture in a single shot in the camera. Today she’s back with another five-minute episode, demonstrating how to speed up the editing process by using the Quick Develop panel in Lightroom Classic.
The experts at Adobe describe the versatile tool like this: “The Quick Develop panel in Lightroom’s Library module gives you the convenience of quickly applying color and tone adjustments to one or more photos without leaving the Library module.”
It’s important to remember that any Quick Develop settings you make are recorded in the History panel of the Develop module, and corresponding slider controls adjust accordingly in the Basic panel. The emphasis of today’s episode is all about how editing with the Quick Develop module provides a big boost to your post-process productivity.

Kost double-clicks on her image to provide a larger view, and then she uses the Disclosure Triangles in order to reveal various options in Quick Develop. There are more possibilities that those you see at first glance. That’s because when you use the keyboard shortcuts she provides, Clarity switches to Sharpening, and Vibrance become Saturation.
You can use icons to quickly decrease or increase the values for each of the options. In her example she increases exposure by one stop, while decreasing Highlights and Blacks. It’s also possible to apply presets, modify crop ratio, and change the treatment from color to b&w.
Best yet, if you don’t like what you see, it’s super easy to reset the file and return to the original image because “all of the change we make are nondestructive.” Kost goes back to Lightroom’s Grid view and this time she selects four images instead of just one. Then by enabling Auto Sync, the adjustments you make will be quickly applied to all of the selected files— great way to accelerate the process.
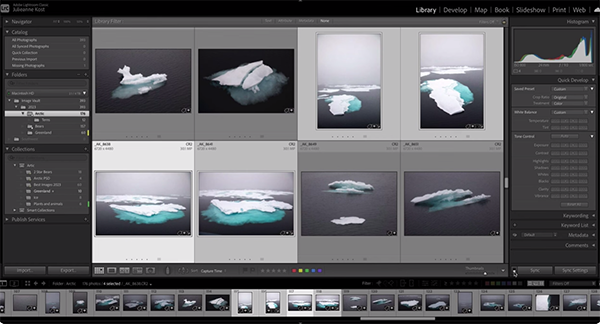
Kost demonstrates several other Quick Develop tricks, like selecting Auto under Tone Control so that Lightroom “will intelligently analyze each one of these images and then make an automatic correction” on your behalf. Once that happens the images in the film strip at the bottom of the workspace are immediately updated so that you know exactly where you stand.
After watching the remainder of the video and seeing Kost demonstrate other helpful tips, be sure to visit her popular YouTube channel where you’ll find more great advice for elevating your post-processing skills.
And don’t forget to check out the tutorial mentioned above so that you understand the simple process of using Photo Merge in Lightroom to achieve perfectly balanced tones when combinig multiple versions of the same scene.


