Sarah Beeny shares a surprising tip on where to save during a home renovation – as well as where to splurge
The renowned property expert never ceases to amaze us!
 REAL ESTATE
 REAL ESTATE
 REAL ESTATE
 REAL ESTATE
 REAL ESTATE
 EVENT
EVENT
 LANDSCAPE
 LANDSCAPE
 CONCERT
 LANDSCAPE
 TRAVEL

REAL ESTATE
Residential, Commercial, Interiors

LANDSCAPE
Landmarks, Cityscape, Urban, Architectural

FOOD
Hotels, Restaurants, Advertising, Editorial

PORTRAIT
Traditional, Glamour, Lifestyle, Candid

PRODUCT
Studio, Lifestyle, Grouping

EVENT
Conference, Exhibition, Corporate

FASHION
Portrait, Catalog, Editorial, Street

TRAVEL
Landscape, Cityscape, Documentary

SPORT
Basketball, Football, Golf

CONCERT

STILL

STREET
There are numerous reasons why landscape photos of a pretty scene just don’t make the grade. Perhaps you used the wrong camera settings, or poor weather blew in before you got the shot and the light became flat, dark and gloomy.
Whatever the cause, you captured the photo, so why not transform it into something beautiful rather than dumping it in the trash? This tutorial from the PHLOG Photography YouTube channel demonstrates a very effective Lightroom technique for transforming uninspiring photos into masterpieces with a very appealing, glowing effect.
Instructor Christian Mohrle is a highly acclaimed German landscape photographer whose post-processing skills are just as impressive as the gorgeous images in his portfolio. His goal for this episode is to add a beautiful, dreamy look to a dark gloomy image. As always you can download the sample Raw file with the link beneath the video and follow along as the steps are explained.

This particular shot is of a winter scene, but what you’ll learn also applies to dull photos taken throughout the year, like when shooting on the beach in summer when the light just isn’t right for capturing a conventional bright photo. Mohrle’s approach to this challenge is to shoot five images of the same scene, merge the into an HDR file, and then use Lightroom’s masking and color grading tools to create one spectacular shot.
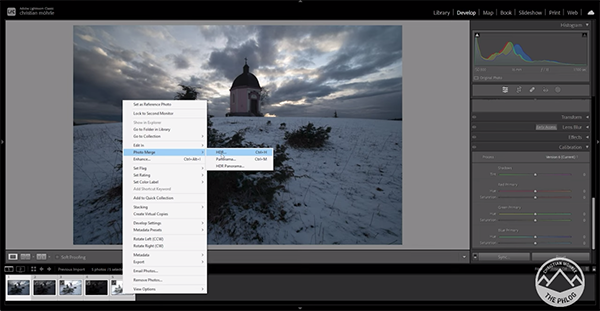
The first step is to merge the sequence of images, each of which was shot at different exposure settings. Don’t worry if you haven’t done this in the past because it’s really easy to do. All you have to do is select all of the images, right-click to select Photo Merge, and then chose the HDR option from a dropdown menu that appears.
The next task involves a few basic adjustments to prepare the resulting image for the selective enhancements that follow. These include changing the profile from Adobe Color to Adobe Standard, boosting exposure, global adjustments to color, increasing contrast, and a few other simple tweaks.

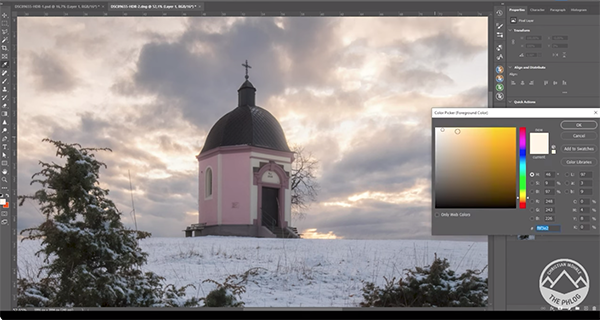
The remainder of the lesson is devoted to the masking and color grading techniques Mohrle employs to create his stunning transformation, and he walks you through the process from beginning to end. He completes the job with a bit of cleanup up and very careful sharpening.
If you compare Mohrle’s before/after images you see that they are about as different as two photographs of the same scene can be. So take a look and add this method to your Lightroom bag of tricks. Then head over to Mohrle’s instructional YouTube channel where you’ll find many more impressive Lightroom and Photoshop techniques.
We also suggest watching the tutorial we featured from another post-processing expert who demonstrates how to color grade outdoor photographs like a pro when editing them in Lightroom.
If you’ve noticed some pretty lousy results when using Photoshop’s Magic Wand tool, well, join the club because this is a rather common occurrence when editing certain types of photos. Today’s tutorial from the gobally popular PiXimperfect YouTube channel explains when you’ll confront this image-killing issue and how to fix it.
Unmesh Dinda is an internationally acclaimed post-processing expert with over five million subscribers to instructional channel. In this five-minute tutorial you’ll see why you might refer to the Magic Wand as the “Tragic Wand” until you implement his straightforward solution.
Here the problem in a nutshell: There are times when the selections you make with the Magic Wand tool result in hard, pixelated edges. The word “ugly” comes to mind. Dinda pulls up a simple b&w logo to demonstrate this tool at its worst. He masks out the logo, puts it on a separate layer and exclaims, “this is so darned messed up.”

Unmesh tries again, this time dropping the Tolerance setting all the way down to 2, and guess what? The edges of the logo are still very jagged and harsh. Dinda takes things in the opposite direction for his third attempt, increasing the Tolerance value to 120. This fixes the problem, right? Unfortunately not.
So what the heck is going on, and how do you remedy this unsightly problem? We’ll let Dinda demonstrate the simple solution with a second sample image—this time a color photo of a chair with numerous straight edges. But here’s one clue: Checking or unchecking the Anti-Aliasing box isn’t the answer.
Bottom line: Dinda admits that the one-click solution doesn’t quite sense, but it works like a charm and that’s all that matters, right? So spend five minutes watching this lesson and you’ll be totally set from now on.

Dinda’s robust YouTube channel includes instructional videos on just about any image-editing task you may encounter. So be sure to pay a visit when you have enough time to explore.
On a similar note, check out the tutorial we featured recently from another image-editing expert who discusses “the biggest mistake when using Lightroom’s AI masks” and a straightforward solution.
