Aldi’s Blocks in Bloom Building Flowers are a dead-ringer for LEGO flowers – at just £2.99 they’re half the price too
When there’s a dupe to be had, Aldi always finds a way to save us money
 REAL ESTATE
 REAL ESTATE
 REAL ESTATE
 REAL ESTATE
 REAL ESTATE
 EVENT
EVENT
 LANDSCAPE
 LANDSCAPE
 CONCERT
 LANDSCAPE
 TRAVEL

REAL ESTATE
Residential, Commercial, Interiors

LANDSCAPE
Landmarks, Cityscape, Urban, Architectural

FOOD
Hotels, Restaurants, Advertising, Editorial

PORTRAIT
Traditional, Glamour, Lifestyle, Candid

PRODUCT
Studio, Lifestyle, Grouping

EVENT
Conference, Exhibition, Corporate

FASHION
Portrait, Catalog, Editorial, Street

TRAVEL
Landscape, Cityscape, Documentary

SPORT
Basketball, Football, Golf

CONCERT

STILL

STREET
Most photographers are gear freaks who chase the latest and greatest imaging innovations, and new cameras tend to be near the top of everyone’s list. Maybe you finally want to make the switch from a DSLR to a mirrorless model, or perhaps you want a full-frame camera with more resolution.
The primary goal of this tutorial from photographer Chis Harvey is to help determine if your current camera suits your needs, or if it’s really time for something new. This is a very important decision because sometimes it makes more sense to invest in new glass—especially if you’re motivated by ultimate image quality.
Harvey is a versatile photographer from North Wales who says he’s passionate about documenting the world through his lens, and his popular YouTube channel “caters to photographers of all abilities and genres who want to learn and understand more about the creative process” by taking advantage of what he’s learned along the way.

When it comes to purchasing new gear there’s a big difference between what you want and what you need to improve the quality of your imagery. Harvey runs down his list of the “only reasons to upgrade your camera,” and he poses “two important questions you need to ask yourself that will help you decide if it’s time for a change.”
Despite what you’ve heard that gear doesn’t really matter, Harvey says this: “I’m actually here to tell you that gear does matter—but maybe not in the way you think it does.” This very interesting discussion explores this contentious topic in detail, so you can dtermine for yourself if and how a new camera will advance your imagery and enjoyment of our craft.
Harvey’s discussion covers a wide-range of topics in addition to the two questions mentioned above. He has some very helpful advice that he expresses so quickly and concisely that we won’t be a buzzkill and summarize his thoughts here. You deserve to hear and see everything in Harvey’s own words.

So before you pull out a credit card, this is our recommendation: Set aside 10 minutes to watch the video with your existing camera in hand, answer Harvey’s thoughtful questions honestly, and see where you end up. Then check out Harvey’s popular YouTube channel for more provocative discussions like this one.
And don’t miss the primer we featured recently with another accomplished pro who provides a step-by-step guide to capturing multiple exposures in the camera. That way you avoid any complex post-processing tricks.
Adobe expert and educator Colin Smith is back with another quick-and-timely post-processing tutorial that anyone can master quickly. In this video he explains the concept behind Photoshop’s new Frame tool capabilities. Then he walks you through the step-by step method for using them to advantage.
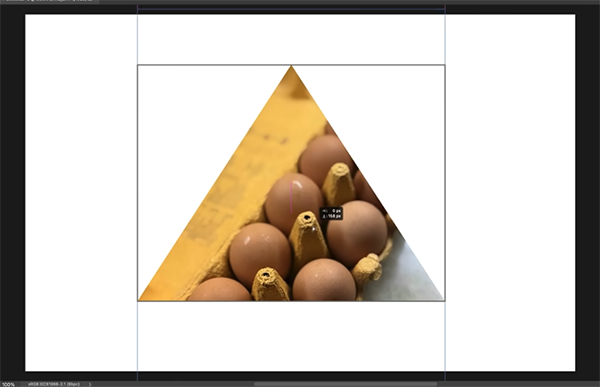
Adobe’s update added new shapes to the Frame tool including a Triangle option and a Custom setting. Smith covers the new shapes in sufficient detail, but the real meat of today’s episode is this: I’m going to show you how to make a photo fit any shape you want.
Smith begins the six-minute video with an overview of how Photoshop’s Frame tool works. The first obvious difference is the Triangle that’s been added the familiar Circle and Rectangle options. So why would you want a triangular image? Check out the interesting examples that Smith provides to get you thinking other intriguing possibilities.

|Once you drop or import any image into the triangle there’s plenty of control. You can reposition the photo in limitless directions, resize it you to suit your need, and much more. The key here is that the triangle is a vector shape. In other words, it remains independent of your image as you experiment with different looks.
What’s more exciting, however, is Photoshop’s new Custom Frame capability that offers a variety of unique (some might say outlandish) opportunities for creating eye-catching images with an unconventional shape.
Just click on the Shape tab and you be presented with multiple shapes in a variety of categories, from Animals and Trees, to Boats and Flowers. And Legacy shapes like Arrows that you may have employed in the past can still be found within the panel.

The real fun begins when Smith selects the Custom Shapes option that enables you to create shapes of your own. There’s a manual approach as well as a trick for making complex shapes automatically. You’ll also learn how to get the job done with Ai.
Be sure to stick with the video until the end when Smith demonstrates how easy it is to use Layer Styles and Drop Shadows to refine your results. Then head over to the Photoshop Café YouTube channel for more straightforward solutions to vexing post-processing challenges.
