
Photos Too Dark? Here’s How to Restore Them in Lightroom (VIDEO)
Arriving at a correct exposure can often be difficult when shooting outdoors. This is particularly true when capturing expansive landscape scenes with a wide range of tones from deep shadows to bright highlights. This tutorial from the PHLOG Photography YouTube channel demonstrates a very effective Lightroom technique for balancing out the image with a perfect overall exposure.
Christion Mohrle is a highly acclaimed German landscape photographer and one of our favorite image-editing Instructors. In this 16-minute episode he demonstrates the straightforward technique he uses to rehabilitate images that are underexposed.
There’s a link to his sample Raw file in the description beneath the video for those of you who want to follow along and make the changes yourself. Mohrle explains why he didn’t capture an HDR sequence of this complicated scene—a common approach for dealing with situations with a broad density range. He says, “I wanted to capture this with a long exposure to smooth out the water.” Unfortunately, long shutter speeds can be problematic when combined with HDR techniques.

As usual, Mohrle begins in Lightroom’s Basic panel where he makes several simple adjustments to the scene as a whole to prepare it for the selective enhancements that follow. The first step is changing the profile from Adobe Color to Adobe Neutral which lessens Contrast to help preserve details in both highlights and shadows.
He also modifies White Balance, adjusts exposure, brings up shadows and blacks while dropping highlights, and adds Texture, Clarity, Contrast and Dehaze. The final step is pumping up Saturation and Vibrance. With the image significantly improved, the fun part of the edit begins with discrete local enhancements to different areas within the frame.
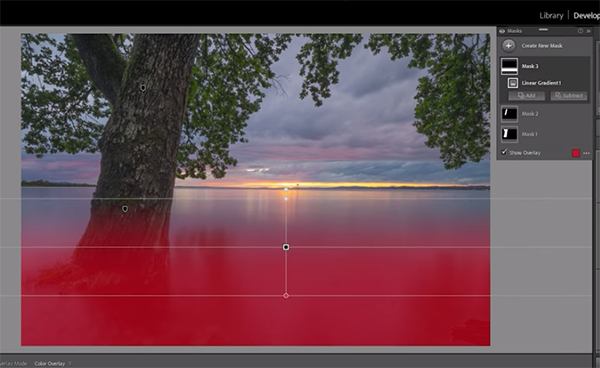
Mohrle opens Lightroom’s masking panel and uses the Rectangular Selection tool to target and enhance a prominent dark tree in the foreground. He continues by applying a Liner Gradient over the water closest to the camera, using the Subtract command so that these adjustments won’t affect the tree.
After a couple more masks it’s now time to complete the transformation with thoughtful color grading, subtle sharpening, and a bit of simple cleanup. Mohrle’s instructional YouTube channel features many more how-to videos like this one, so be sure to take a look.
We also suggest watching a tutorial we posted recently from another post-processing expert who suggests three Lightroom Color tools to try instead of Hue, Saturation, and Luminance. You’ll be pleasantly surprised by the results.


