
Photoshop Basics: The Easy Way Select and Cut Out Objects (VIDEO)
Inexperienced Photoshop users take note: There’s actually a simple process for selecting and cutting out objects in a photo, and it’s perfect for achieving impressive edits and making attention-grabbing composites. This simple workflow from Sandra D Imagery can become yours in the next five minutes.
Sandra is an experienced photographer, digital artist, and Adobe Community Expert who leverages her skills to create easy-to-follow lessons like this one. Her sample image is a creation of a young munchkin sitting atop a stone wall, and we suggest downloading the file with the link beneath the video so you can follow along and mimic her moves in real time.
As with most Photoshop tasks there are various ways to cut this little boy out of the background and today’s fuss-free method delivers very effective results. Sandra begins by unlocking the first layer with the quick click of a button. Once you do that a contextual toolbar appears at the top left of the workspace, and Sandra says, “these are my go-to tools.”

Sandra describes how Photoshop’s Selection tools have evolved significantly throughout the years. She gets going by clicking on the Remove Background option to let Photoshop do the initial groundwork.
The resulting selection is surprisingly good, although Sandra says, “If I was looking for something that looked a little more detailed, I’d spend time masking to get the edges perfect.” But this is cutout is intended to small within within a composite so it’s fine as is.
Sandra zooms in on the cutout to illustrate the nice detail that already exists and admits there are a few things she could do if she wanted to go beyond the basics—one of which is using a Gray Layer to fine-tune masking. And she provides a link beneath the video if you want to take a deeper dive into this technique.
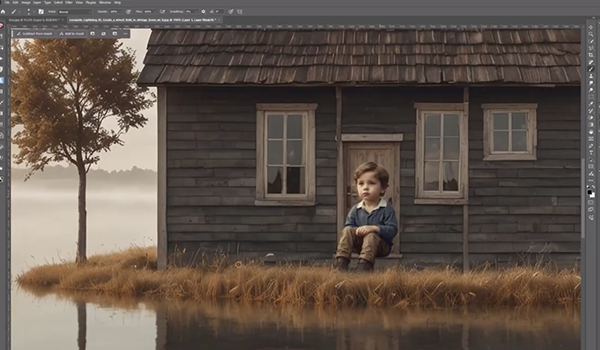
The next step is extracting her cutout of the boy and saving it as a PSD file or TIFF at your preference. Sandra explains that, “I do this because it has the mask attached. So if I put this on a background I can do a bit of simple tweaking.”
The remainder of the lesson walks you through a step-by-step process for getting the job done to create another eye-catching composite. There’s much more to learn on the Sandra D Imagery YouTube channel, so be sure to take a look when you have time to explore.
And on a related note, don’t miss a tutorial we featured recently from another post-processing expert who demonstrates how to use the new AI-powered Remove Reflections tool in Adobe Camera Raw (ACR).


