Edit Photos with Color Channel Tools for Cutouts & Artistic Effects (VIDEO)
Photoshop’s Color Channels serve various purposes, and this tutorial from the PHLEARN YouTube channel concentrates on two of the most powerful; namely cutting out objects with soft or intricate edges like clouds or hair by leveraging contrast, and also creating artistic effects that are impossible to achieve with standard adjustments.
Image-editing expert Aaron Nace is a favorite among Shutterbug readers who appreciate his ability to simplify important Photoshop and Lightroom techniques. His interesting examples begin with a precise trick for cutting out clouds from one image and placing them into another photograph with a featureless sky. Then he moves on to creating magical color effects that really grab attention.
The cloud photo Nace selects is a great starting point because it’s full of fluffy white detail. As he says, “I want to grab all this detail but I don’t want any of the surrounding blue areas.” The first step is to click on the Window tab atop the screen and then choose the Channels option from a dropdown menu that appears.
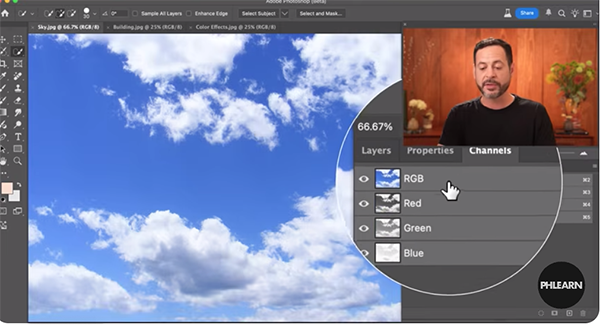
As you’ll see, the subject can then be broken down into various channels like RGB, Red, Green, and Blue. Pay close attention to how your image appears as you select each of the options to reveal the amount of specific colors within your chosen channel. Nace explains that “what we’re looking for here is contrast because we want to make a precise selection.”
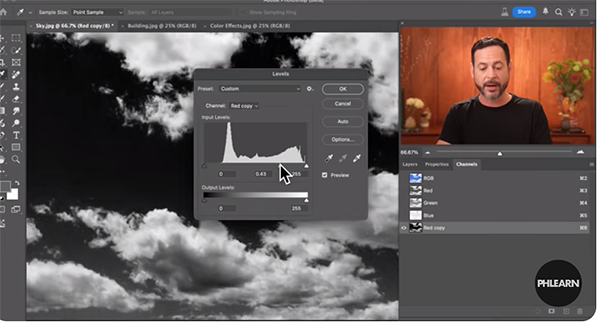
The importance of this step can’t be overstated because it determines the accuracy of the cutout you make, and Nace walks your through the straightforward steps. In this case, the Red channel is the one that works best. He then employs Photoshop’s Levels slider to refine and accentuate the result.
It’s important to remember that the light tones are those that will be selected and moved to the second image with the process that comes next.
The second portion of the lesson demonstrates how to take advantage of Color Channels to create the aforementioned interesting effects, that unlike the foregoing aren’t intended to be realistic. In this case it’s all about capturing a viewer’s attention, and there’s plenty of room for experimentation.
Be sure to check out the popular PHLEARN YouTube channel that offers many more how-to videos for Photoshop and Lightroom users of all skill levels.
And speaking of Lightroom, don’t miss the earlier tutorial we featured with another post-processing expert who demonstrates how to use a new AI tool to remove image-killing reflections from photographs shot through glass.