
Peak Design Collabs with Jimmy Chin to Create Innovative Pro Tripod Series — On Kickstarter NOW
Peak Design, maker of everyone’s favorite camera strap system, Everyday camera bags/backpacks, and the Travel Tripod that redefined the category, has teamed up with Emmy Award-winning filmmaker Jimmy Chin to create a trio of expedition-quality tripods they claim “… sets a new standard in professional-grade portability, strength and thoughtfully designed functionality for users across the creative spectrum.”

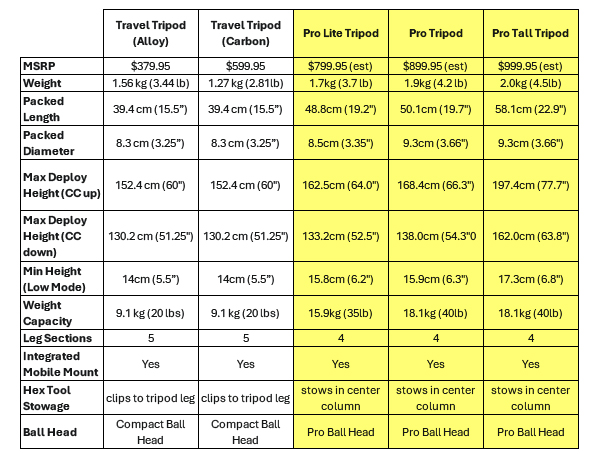
Available in three sizes (Pro Lite, Pro, and Pro Tall) the new Pro Tripods feature a fully CNC-machined hub, flanged center column, and increased leg diameter and length. Compared to the Peak Design Travel Tripod, the Pro Tripods achieve twice the stability (40 pound capacity vs 20) and up to a 30% greater deployment height — 77.7 inches (197.4cm) — on the Pro Tall model.

Travel Friendly
Notwithstanding the beefed up features, the Pro Tripods are compact and lightweight. For example, the Pro Lite weighs just 3.7 pounds (1.7kg) and has a packed length of 19.2 inches (48.8cm). Despite its extreme portability, the Pro Lite extends to 64 inches (162.5cm) and supports up to 35 pounds (15.9kg).

Pro Ball Head
Central to the Pro Tripods’ enhanced functionality is the newly redesigned Pro Ball Head. When combined with the optional Tilt Mod, the Pro Ball Head is converted into a fluid pan and tilt head. The smoothly operating fluid head eliminates the need to carry a separate tripod for professional video applications. Also, the Pro Ball Head supports 15° of adjustment when the center column is fully stowed and features a new Arca Swiss-compatible quick-lock for a secure camera connection.
Other optional accessories for the Pro Tripods, in addition to the Tilt Mod, include a Pro Leveling Base and Pro Spike Feet.
Click here to access the Kickstarter listing for the Peak Design Pro Tripods.

Jimmy Chin’s Role in the Design Partnership
World famous adventurer-photographer Jimmy Chin was instrumental in the design and development of the Peak Design Pro Tripod lineup. He tested “countless” Pro Tripod prototypes in the world’s harshest climates and strongly influenced every innovative feature.
Said Peak Design Founder & CEO, Peter Dering, “Jimmy made no bones about what he desired in an expedition-quality tripod. We knew if we could fulfill Jimmy’s wish list we’d land on a tripod that meets the needs of almost every photographer and videographer on the planet.”
Price & Availability
Suggested retail pricing has been announced; however, customers who react to the June 17th launch on Kickstarter have a limited-time opportunity to pre-purchase Pro Tripod at a discount of up to 27% discount off the final MSRP.

The Pro Tripod Lite has an MSRP of $799.95; the Pro Tripod lists at $899.95; and the Pro Tripod Tall is $999.95.

Peak Design is one of the most successful crowdfunding companies ever (PD has raised $53M across 14 Kickstarter campaigns). Click here to access the Kickstarter listing for the Peak Design Pro Tripods.

Peak Design Camera Straps are the Most Innovative in the World
Witness Amazing: New Roller Pro from Peak Design
Peak Design Travel Tripod Review

Join the Shutterbug Community!
Sign up for an account—it’s easy and FREE. Subscribe to our FREE newsletter (find the sign-up form on our homepage) and bookmark Shutterbug as a Favorite on your browser.
Visit our Gallery section and spend five minutes or less uploading your best shots once a week. You might even become a Shutterbug Photo of the Day photographer!
In the Galleries, you’ll see the incredible work of thousands of photographers from around the world. We encourage you to add your own images to our ever-growing collection. It’s an excellent platform to connect with other photographers and share your knowledge and passion for photography.
(If you’re worried that submitting images to the Photo of the Day gallery might be complicated, it’s not. Check out these short 1-2-3 directions.)
—Jon Sienkiewicz


