Dad’s Day is just hours away, but thanks to the magic of overnight delivery, you still have time to be a hero to Pop.
By the time you read this, it may be too late for the gift to arrive in time for Dad’s Big Day. But don’t let that stop you. Remember, it’s the loving thought that counts, not the calendar.

1. Camera Building Set
Build large-size camera replicas from 2,109 pieces with this unique gift. This kit should keep any dad busy for a couple of months (or longer if beer is available).
Order from Amazon — price is $59.95

2. Photographer’s Confessional Coffee Cup
We all do these things sometimes. Other times we overexpose people and cut off their feet.
Order from Amazon — price is $9.99

3. Fair Warning Tee Shirt
Well, I warned yuz, cousin. Now you’re going to find out how strong an index finger gets after 30 years of snapping a shutter.
Order from Amazon — price is $21.99

4. Knock His Socks Off
Also doubles as two awesome lens cases. Really. Bonus points if you can tell us where the expression “knock your socks off” comes from. You’ll be shocked; Google AI has it wrong. Hint: it has to do with the article of clothing men seldom removed while making a certain type of socially undesirable movie back in the 1940s.
Order from Amazon — price is $9.99

5. All Dads Nap, No?
A nightlight beats the hell out of a necktie. For you Gen Z folks, a “necktie” is a long cloth fashion accessory men often wore around their necks before Casual Friday attire became the norm. Dumb habit, I know. I wonder how many neckties were murdered by men eating soup carelessly.
Order from Amazon — $16.99

6. I Use This Excuse Billboard — Often
Silent signal from Dad to keep it mum, Mom. It’s safer to use than the one I had that read, “Hush — I’m trying to make you look good in this photo.”
Order from Amazon — $9.99

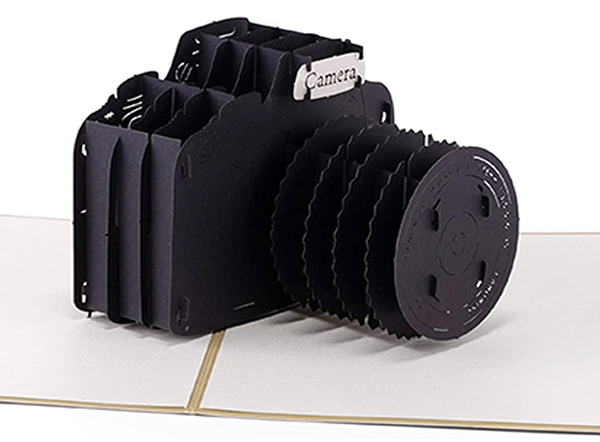
7. Cool Popup Card For Pops
Have you ever seen anything this cool for eight bucks? Well — maybe a deck of cards with dachshunds on them, or a Donald Duck bobblehead doll — but aside from those, never, right?
Order from Amazon — $7.99

8. The Basic Question in Life
Aperture tee shirt begs for a reply. (Don’t wear when you pick up the kiddos from school, when delivering DoorDash or to any wedding, ever. Okay to wear to the dermatologist, divorce court or when answering the door to greet any unsolicited group of two or more.)
Order from Amazon — $19.97

9. Lens Beverage Mug
Don’t leave this in the cupholder unprotected in your car — it looks way too real. Also might not want to leave it on your desk at the office; Karen in accounting has sticky fingers.
Order from Amazon — $9.99

10. Camera Keychain
Sincere message. Sure to be appreciated. Buy one for yourself. It’s my daily affirmation. The other side should read, “If at first you don’t succeed, hit Delete and snap again.”
Order from Amazon — $9.59
Want to Become a Better Photographer?
We’re being serious now: Begin by taking more pictures. Carry a camera everywhere you go and shoot even when you’re 110% sure the picture won’t turn out. Review all of your images with a critical eye and share them with others — and that includes posting the best on our Gallery. Subscribe to our newsletter (see sign-up form on our homepage) and bookmark Shutterbug as a Favorite on your browser. We’re in this for the same reason as you – we love photography, and we’re learning more about it every day.
—Jon Sienkiewicz
(As an Amazon Associate, Shutterbug earns from qualifying purchases linked in this story.)


