Announcement season continues in full swing, with Sony announcing two new lenses today: a 16mm f/1.8 G and a 400-800mm f/6.3-8 G. The first is a less expensive (and potentially more practical) alternative to the Sony 14mm f/1.8 GM. Meanwhile, the second is Sony’s longest lens yet!
Most beginning photographers are taught to shoot will the sun at their back and avoid composing scenes with the sun behind their subject. While that technique is super easy, it often results in photos that could best be described as snapshots.
Today we’ll encourage you to be more inventive and creative by switching up your vantage point and experimenting with backlighting for a far more artistic look. Here’s how instructor Shelley Pearson summarizes today’s six-minute tutorial: “In this video I dive into the magic of backlighting in bird and wildlife photography, sharing essential techniques for creating stunning, dramatic effects.”
The value of everything you’ll learn is equally valuable for other genres as well, whether you’re shooting a landscape with an important inanimate object in the frame, making dynamic environmental portraits, or even shooting on the street. Pearson is a longtime Australian pro whose goal is “to share my love of photography, wildlife, and the natural world—with tips, techniques, and insights for photographers of all skill levels.”
Pearson covers a lot of ground in less than six minutes, so we suggest being prepared to jot down a few notes for future reference. Thoughtful composition is a big part of the process, and she describes how to identify perfect backlight for breathtaking images. Her tips include how to modify your vantage point and employ unusual camera angles to accentuate these backlit effects.
She explains how to “play with exposure; namely, when to go lighter or darker depending upon the specific scene at hand. Another important topic is understanding the best methods for creating captivating bokeh and rim light around a subject for images with a very unique appearance.
You’ll want to configure the camera in a way that differs from when conventional photography is the name of the game, and Pearson walks you through all the important settings. She also describes the best times of day for getting the job done to perfection, and how to use your newfound skills to capture dramatic silhouette photos.
And on a related note, be sure to watch a tutorial we featured earlier with another accomplished pro who demonstrates the finer points of creating spectacular silhouette photographs, with camera settings, exposure metering, shooting techniques, and more.
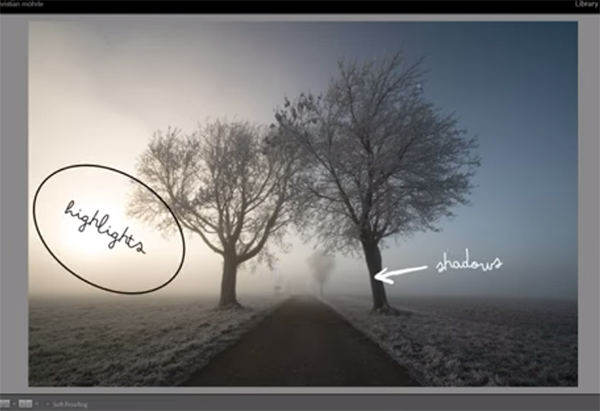
We frequently share expert advice for getting the light right to make images with perfectly balanced tones from light to dark and everything in between. This tutorial from the PHLOG Photography YouTube channel demonstrates an unconventional approach for creating stunning landscape images like the one you see above.
The concept involves using masks to selectively overexpose specific portions in the frame, while leaving other areas untouched—a straightforward technique for transforming ho-hum mages into those that really grab attention.
Instructor Christian Mohrle begins with a drab, unimpressive, minimalist shot, and we encourage you to follow along in real time by downloading his sample Raw file with a link in the description beneath the 12-minute video. It’s all about using Lightroom to introduce an eye-catching light effect with a realistic look that stands out from the crowd.
Mohrle explains the interesting process like this: “Usually for scenes like this I’d begin by merging an HDR to maximize all the details in both highlights and shadows. In this case, however, I want to keep clipping the highlights on purpose to introduce dramatic light entering the frame behind the subject.”
The good news is there’s sufficient information in the shadows to restore detail in all of those areas. Mohrle always kicks of his workflow with a few global adjustments that provide him with a solid base image from which to work. For this shot he increases exposure, opens the shadows to reveal a bit more detail in the trees, and drops the blacks for the heightened contrast he desires.
Other preliminary enhancements include using Lightroom’s Highlights slider to precisely refine the amount of clipping for a softer transition, increasing Texture, and gently dropping Clarity and Dehaze to accentuate the atmospheric look with an appealing glow in the upper left of the frame. He also increases Vibrance and Saturation, and modifies White Balance by boosting color temperature to introduce significantly warmer tones.
Today’s magic begins once Mohrle’s base image is complete and he now turns to local enhancements with masks, thoughtful color grading, and very careful sharpening. He then demonstrates how to remove a few distracting sensor spots that compromise image quality. We trust that you’ll be duly impressed once you evaluate his before/after examples.
The PHLOG Photography YouTube channel is full of instructional shooting and post-processing videos of interest to everyone who shoots in the field.
Congratulations to the winners of GuruShots‘ Travel Stories photo challenge! Thank you to all the participants for sharing the magic of your adventures through stunning views, lively street scenes, and quiet moments that captured the spirit, uniqueness and beauty of different places around the world!
Don’t miss the full slideshow gallery at the end of this article, featuring more exceptional entries. Also, check out GuruShots’ newest app AI Art Master.