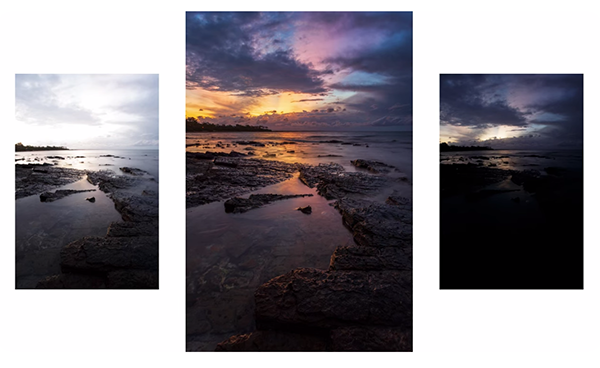
You can take great landscape photos at any focal length, of course, but that doesn’t mean we can’t have favorites! Is there a particular perspective that calls your name for landscape photography? Whatever focal length you prefer, I think the answers can be very revealing.
New Photoshop users are often bewildered by the vast array of available features and tools. Today’s quick tutorial will help you understand the basic concepts of White Balance and Color.
Instructor Barry Beckham regularly posts straightforward post-processing lessons designed to help amateur shooters up their game. As he says, “You can’t become and accomplished photographer without image-editing skills, but we can make it easier and a lot more fun to develop these skills.”
Beckham explains that White Balance is all about making sure that the white portions of an image appear truly white—regardless of lighting conditions when the photo was captured. This is extremely important because “if the whites aren’t white, all the other colors won’t be correct either.”
An image of a curious kangaroo is used to explain why the shot has a strong and unsightly magenta cast, even though it was shot with a modern state-of-the art camera. It turns out the error was caused by light streaming through storm clouds on a rainy day. Fortunately, you’ll see how easy this is to correct the color bias in this shot.
Beckham provides other examples with Color Balance problems, one of which is a seascape photo. For this one he places Photoshop’s Eyedropper over an area that should appear pure white, but once again the shot misses the mark.
So what should you do when working on an image with incorrect White Balance, where nothing in the scene should obviously be white? For situations like this Beckham provide a click-and-drag zoom trick that helps analyze and fix the problem. He also reveals simple keyboard shortcuts for speeding up the process.
Beckham includes a couple more examples to drive home simple techniques for solving other Color Balance issues. One is a tight shot of a beautiful bird with colors that look very realistic. The problem here is that an out-of-focus green hedge behind the subject is overly saturated due to strong light falling on the background. But, once again, there’s a quick fix.
The final image in the series is also quite informative as well and is quickly transformed by using Beckham’s simple techniques. After watching the video take a look at Beckham’s instructional YouTube channel—especially if you’re just getting started in Photoshop.
This is the first tutorial we’ve posted from Albert Dros, a long-time professional landscape photographer based in the Netherlands who has a solid following on his instructional YouTube channel. Dros is also an experienced Lightroom user, and in this episode he reveals eight editing tricks that comprise a big part of his workflow.
Some of these techniques “are already very old” and no longer grab attention, while others were just introduced in 2023 and may be more top of mind. In either case you may find these tips unfamiliar and Dros wants to get you up to speed because of the impressive utility they offer when processing images that need work.
Dros begins with an interesting way to employ Lightroom’s Histogram with a rather dark forest photo he shot during a visit to a forest in Luxembourg. Rather than using sliders beneath the Histogram to adjust various values, he drags across the Histogram graphic itself to quickly modify attributes like, Blacks, Shadows, Exposure, Highlights, and Whites.
As he does this the corresponding sliders move automatically to reflect the changes he makes. According to Dros, this method can be far more intuitive than the conventional approach, especially for inexperienced Lightroom users—but even pros like Dros avail themselves of this time-saving trick.
Tip number two involves what Dros says is a “smarter way to adjust White Balance.” The image for this demonstration lacks a true white point, so Lightroom’s Color Picker can’t be used in the normal way. Instead, Dros moves the Vibrance and Saturation sliders all the way to the right (i.e. to the maximum) and then he carefully observes how colors in the image respond as he carefully drags the White Balance slider.
With this approach colors change rapidly as he moves the White Balance slider in minimum increments. Dros explains that “this way we can accurately see exactly what’s going on with the color.” The goal is to arrive at “the best possible color separation,” and Dros also employs Lightroom’s Tint slider to refine the results until he sees exactly what he wants.
The foregoing is just a small taste of what you’ll learn in this eye-opening lesson, and by the time you’re done watching you may be inspired to modify your workflow. Other topics covered include what Dros refers to as “Light Bleed, a quick and effective Curves Trick, and how to employ Selective Color.
Dros also explains how to use a Land Mask, a Map Module, and a Smart Sky Mask to enhance a wide variety of images. There’s also a link beneath the video to his Full Editing Course on Landscape photography if you’re so inclined.
Be sure to visit Dros’ instructional YouTube channel where you’ll find more free lessons for improving your work. We also recommend watching the tutorial we posted recently with five Lightroom Masks that another accomplished landscape photographer says he simply can’t live without.
It happens every year, and we’re not referring to the onset of spring for all you baseball fans. Rather, the tutorial below from the Park Cameras YouTube channel, addresses how to capture great landscape images during the bleak days of winter.
There’s plenty to deal with when shooting in the field this time of year, not the least of which is cold nasty weather that can be quite uncomfortable and detrimental to your gear. But in barely eight minutes you’ll pick up some tips for elevating your mood, finding suitable subjects amidst the bleakness, and making the most of what Michiganders refer to as the “winter wonderland.”
Instructor Gareth Evans admits that he’s always struggled during the last season of the year, but he keeps shooting because, well, that’s what we do. Today he reveals four favorite tips for leaning into challenges of winter and making the most of the season’s “wonderful light.” In fact, while it may not be particularly fun, some of the best images are captured when shooting under bad conditions, so don’t stash your gear until the weather improves.
One tip is to “embrace” these uninviting conditions and tell a story with the cold, wet weather, menacing skies, and lonely landscapes full of barren trees. In other words, accentuate what you see rather than attempting to make it something it’s not. And he has several good suggestions for doing just that.
Evans also has some inspiring tips for using bad weather to advantage, instead of wasting time for colorful cheerful scenes that can rarely be found. As he says, “you can get loads of interesting drama by capturing crashing waves, blowing snow, rain, mist, and almost impenetrable fog.” These conditions can all be part of becoming a better visual storyteller.
Tip number three is making the most of the good light as soon as it appears, because in winter it usually won’t last for long. So make sure you’re prepared to capture these fleeting moments before they disappear into the gloom. He adds that “while the sun doesn’t get that high in the sky during winter, you may discover some of the finest soft light that you’ll see throughout the year.”
Last on Evans’ agenda is to try other genres of photography, like environmental or indoor portraiture, or creative food and product photography when you really can’t force yourself to leave home. Winter is also a great time to tackle that backlog of editing projects that you’ve been putting off for months.
Remember, the baseball season doesn’t begin until late March, so concentrate on making winter the best season it can be. There’s much more to earn on the Park Cameras instructional YouTube channel, with weekly lessons that will help you up your photography game, so be sure to pay a visit and check out what’s there.