The Sony FE 20mm f/1.8 G is an $898 wide-angle, wide-aperture prime lens for Sony full-frame cameras. As you’ll see throughout this review, this small and somewhat unassuming lens has extraordinary performance, making it a top choice for landscape, Milky Way, and other wide-angle photography.
Photography Life has been, is, and always will be AI-free. This is the conclusion our core group of writers came up with in one of our internal calls, where we debated the use of generative AI for both creating images and writing content.
It almost goes without saying that the latest masking tools in Lightroom and Adobe Camera Raw (ACR) are considered “essential” by many experienced landscape photographers. While these tools can be applied in a variety of ways, today you learn what one pro says are his five favorite tips for getting the job done quickly and effectively.
Instructor Matt Kloskowski is an expert at all things Adobe who says, “I spend most of my editing time using these tools.” In today’s 13-minute episode he demystifies the process while demonstrating several “hidden” techniques that anyone can employ for quick and precise masks. Kloskowski is working in Lightroom to demonstrate his tricks, but you can accomplish the same thing with ACR in Photoshop.
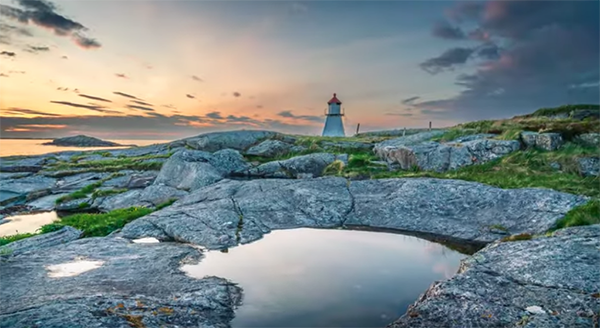
Kloskowski begins by applying a Linear Gradient to an impressive landscape scene with striking boulders and reflections in the foreground and impressive clouds in the sky. As you’ll see, Adobe has separated the various sections within Lightroom Classic’s masking panel. The problem is that the interface can appear rather cluttered at first glance. Turning on “Solo Mode,” which is off by default, really simplifies the workspace. All this takes is a right-click with the mouse.
Next Kloskowski makes a selection of the sky so he can pull back the highlights and make a few more adjustments without affecting other areas within the frame. He explains this trick by noting that you may come back to this photo at a later date and be somewhat dissatisfied by the initial changes you made.
The solution here involves the Amount slider at the top of the masking panel: simply moving it to the left or right enables you lessen or accentuate whatever you did earlier. Sliding it all the way to the left zeroes out all your previous enhancements and brings the image back to square one—just like “it never happened.”
The foregoing is just two of the five tips you’ll learn, so be sure to watch until the end. As Kloskowski admits, taken as a whole, “this isn’t the right way of editing, it’s just a different way of editing. So give these quick tricks a try and see how well they work for you. Kloskowski’s instructional YouTube channel is a great source of information designed to help elevate you post-processing skills, so be sure to take pay a visit.
Among the most challenging conditions faced by landscape photographers is bright midday light. In this situation you can either go home and try again under better conditions or understand how to make the most of harsh light.
Instructor Andrew Banner isn’t one to give up easily when he’s out in the field and he insists that the experienced photographers know how to make the most of whatever they confront, so that they can adapt and capture beautiful images throughout the day. Harsh, direct light? Boring cloudless skies? Super-bright highlights? No problem.
Banner is a full-time British landscape photographer who regularly posts behind-the-scenes tutorials like this one—demonstrating the secrets to his success. This episode explains how to overcome challenging light by concentrating on shapes, colors, textures, and more. You’ll follow him during an early morning beach walk on the North Norfolk coast, while illustrating how to make bright light your friend.
His unique approach can be described as “finding compelling images within the landscape, that are not necessarily part of the landscape” in the conventional sense. While the cloudless sky in his scene is devoid of interesting details, it is a pretty blue. His introduces the first tip this: “When you have the kind of color contrast that works very well with blue, you can’t ignore it.” He then demonstrates how to use this confluence of conditions as a compelling graphic device.
Banner composed a shot with wooden posts on the shore that weren’t particularly interesting until these elements (and their shadows) were brought to life as the sun rose lit them up. Then he had something compelling to work with. As Banner notes, the newfound impact is the result of “blue sky, blue sea, yellowish brown posts, yellow sand, and reflections in the foreground.”
For this particular opportunity of color and contrast Banner employed a 10-stop ND filter that enabled him to select a longer exposure than would ordinarily be possible under these conditions and thereby “flatten out the water.”
Banner has several other helpful tips for capturing the “simplistic” images that he prefers, including arriving early when photographing from the beach—before bypassers and their footprints intrude into the frame. We suggest taking a look and his instructional YouTube channel where you’ll find more lessons for shooting outdoors.