Tamron just announced the availability of a 90mm f/2.8 Macro lens for Sony E and Nikon Z full-frame and APS-C cameras. Shutterbug had the opportunity to shoot extensively with this new lens for a few weeks prior to its release. Here’s our evaluation of the Tamron 90mm f/2.8 Di III Macro VXD (Model F072) and a gallery of sample images.
Overview & First Impressions
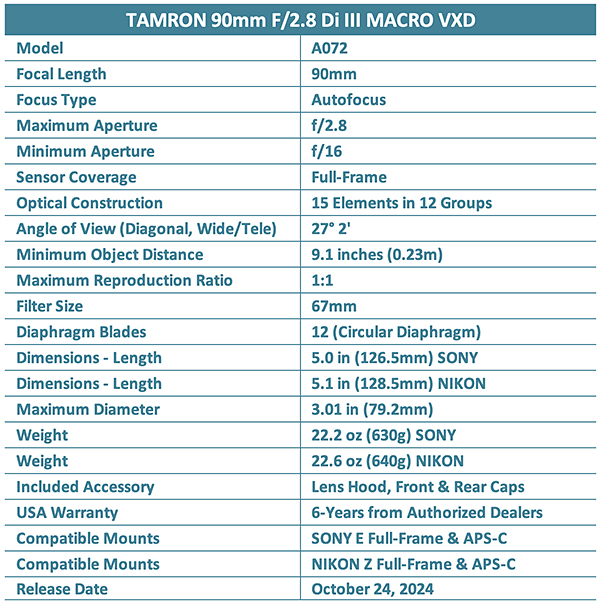
The new Tamron 90mm f/2.8 Macro lens is a trifecta of excitement for photographers. First and foremost, it’s a true Macro lens and provides 1:1 reproduction ratio (i.e., Life Size) when used in close-up situations at the Minimum Object Distance of 9.1 inches (.23m).
Additionally, it’s a 90mm portrait lens ideal for headshots. Historically, photographers have considered lenses in the 80mm to 105mm range to be best suited for portraiture because they render the relative perspective of facial features in a completely natural way. (I expect to get pushback from newcomers who claim to get superb results shooting portraits with 35mm and even 28mm focal length lenses, and that’s fine if they’re happy with the results. Some people enjoy Sriracha on ice cream.)
Finally — or maybe first for APS-C shooters—the Tamron 90mm f/2.8 Macro becomes a fast mid-telephoto 135mm f/2.8 when used on cameras with that smaller sensor format (the popular Nikon Z fc, for example, or Sony a6700).
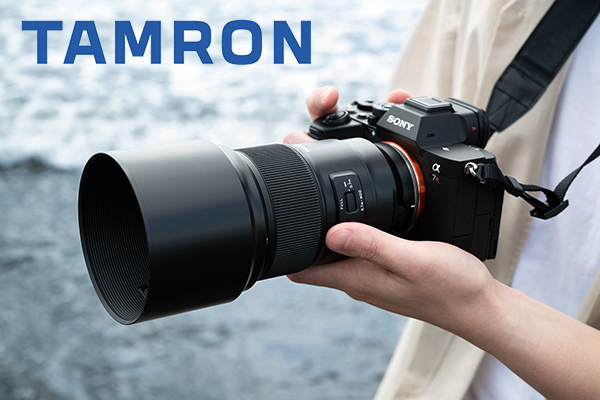
The most attention-grabbing impression of the Tamron 90mm Macro upon unboxing is its very compact size and light weight. The Sony E mount version is only 5 inches (126.5mm) long! And it weighs only 22.2 ounces (630g). (The Nikon Z model is about 0.1 inches longer.) Despite its fast f/2.8 aperture, the diameter is small and accepts 67mm filters, same as the great majority of Tamron lenses for mirrorless cameras.
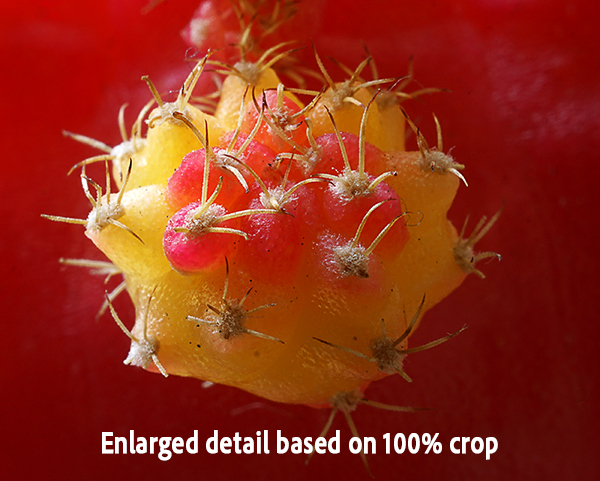
Excellent fit and finish — we’ll get to all that in a moment. When I initially attached this new lens to my full-frame Sony Alpha 7-series mirrorless camera I was amazed by how fast and accurately Tamron’s proprietary VXD Autofocus snapped Luna Nueva (my moon cactus, a gymnocalycium mihanovichii) into instant sharpness. There’s a pun or joke in there somewhere, I guess, but it’s too prickly to pursue at the moment; in other words, I’m stuck.
Last big reveal: the Tamron 90mm f/2.8 Macro is priced at $699. When I first learned of this lens I truthfully expected it to be $899 — or at least $799. So the price is irresistibly attractive, particularly to photographers like me who shoot close-ups of everything.
Tamron 90mm Macro History
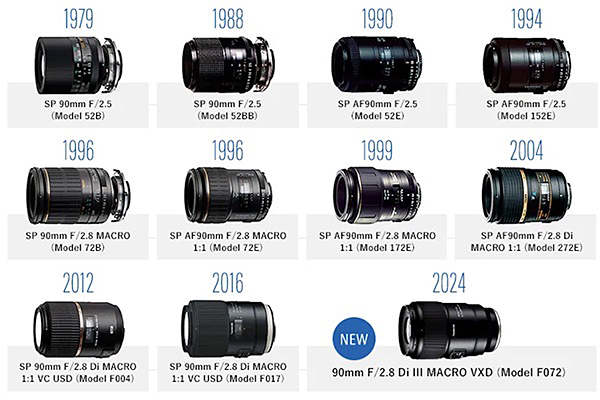
Hard to believe it’s been 45 years since the first Tamron 90 Macro lens was introduced to the world. 1979 was the same year familiar cultural icons like McDonald’s Happy Meal, the game Trivial Pursuit and the movie Apocalypse Now debuted. The 90mm Tamron Macro lens series has become an icon in its own right in the world of photography.
BTW, an iteration of the Tamron 90mm Macro has been around so long that when you do a Google search, you may land on an older model — they’ve been searched so many times they rise to top of the rankings. So go here for current info instead of Google.

Key Features of the Tamron 90mm f/2.8 Macro
· Compact size and light weight
· Superior build quality
· Exceptional image quality
· Outstanding flat-field performance
· High-speed and high-precision VXD autofocus
· Superb subject tracking performance
· 12-blade circular aperture
· Tamron’s unified 67mm filter size
· Supports key camera-based functions (Hybrid AF, Eye AF, etc.)
· Moisture-Resistant Construction
· Oleophobic Fluorine Coating (front element)
· Sliding window on lens hood for easy filter rotation
· 135mm f/2.8 equivalent on APS-C sensor camera
· Compatible with TAMRON Lens Utility
· Very attractive price ($699 in Sony E and Nikon Z mounts)
Specifications
Exterior Construction, Fit & Finish
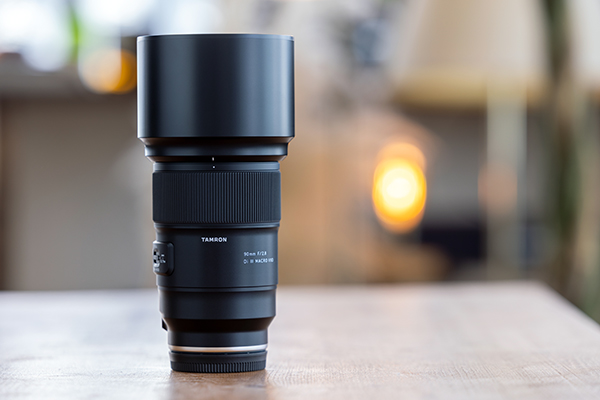
Excellent tactile feedback and overall feel; indistinguishable from any camera manufacturer’s build quality. The strategically located moisture seals protect the Tamron 90mm f/2.8 Macro from water incursion, and the Fluorine coating on the front element repels fingerprints and sheds dust.

The exterior surface is a rich glossy black. There’s a tasteful silver ring located near the lens mount; it adds a luxurious touch to the overall appearance. The focus ring turns smoothly and provides sufficient resistance (what’s worse than a sloppy focusing ring?).
The newly-designed lens hood has a sliding window that allows rotation of filters (think Polarizer, Variable ND, Graduated). It’s a small but useful detail, and I hope Tamron expands the concept to other lenses.
Optical Design
Optical Construction
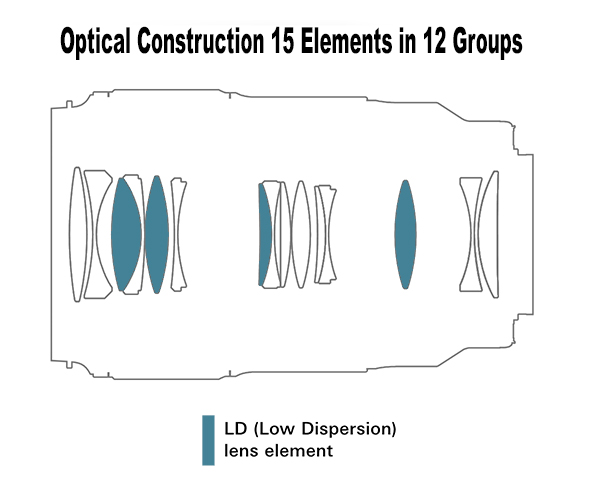
The optical formula consists of 15 elements in 12 groups, including four LD (Low Dispersion glass) elements that effectively correct for spherical and lateral chromatic aberrations.

Sharply jagged edge of dried shiso leaf from my garden. Shiso (sometimes called Beefsteak Plant) is a popular Japanese spice. ©Jon Sienkiewicz
90 Macro vs 50 Macro vs Macro Zoom
The photo industry plays fast and loose with definitions (don’t get me started) but it’s universally agreed that a “True Macro” lens provides 1:1 (also called “Life Size”) reproduction ratio at its closest focus setting. Simply explained, a subject 1-inch long in life appears 1-inch long on the imaging sensor or film.
The difference between a 50mm Macro and a 90mm Macro, for example, is that with the longer lens you can be farther away from the subject when achieving that 1:1 spot. One advantage is that there is more space for lighting devices like reflectors or whatnot. Another advantage is that it’s often more comfortable to work at a greater distance from the subject, particularly when angling to get a great close-up of a flower or when avoiding the venomous bite of a rattlesnake.
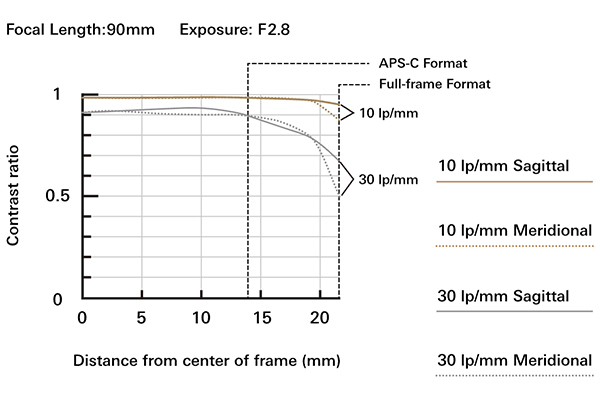
Image Quality
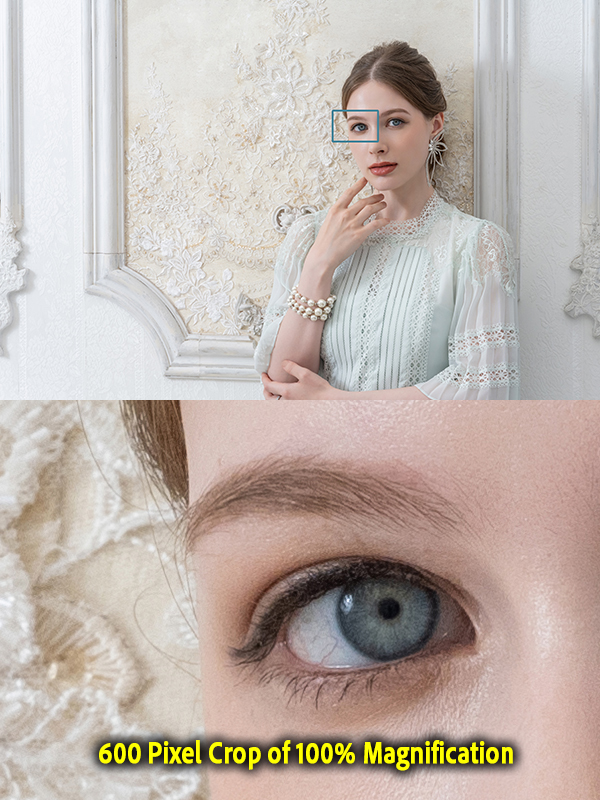
The key components of IQ are sharpness, natural render of contrast, and color fidelity — in my book, anyway. The Tamron 90mm f/2.8 Di III Macro VXD achieved the highest marks across the board in my estimation. Take a close look at my sample images and judge for yourself.
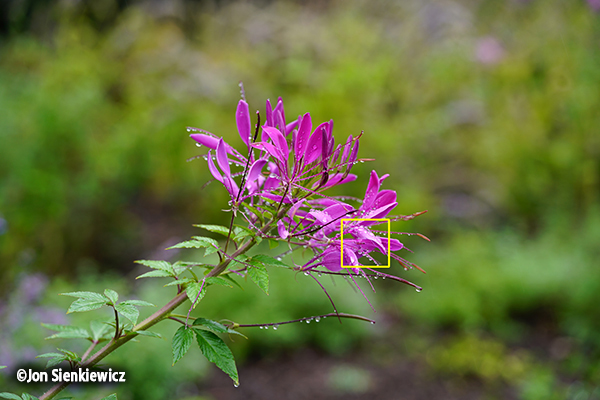
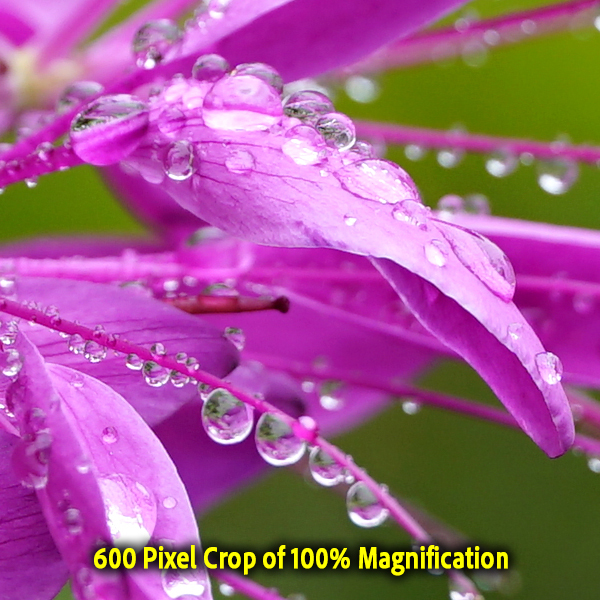
Field illumination is even across the frame and the resultant images are sharp from edge to edge. Contrast is natural and unbiased, and the color fidelity is superb. Colors are richly saturated and even backlit scenes are clean and crisp. You really could not ask for more from a 90mm Macro lens except, maybe, a price tag below $700. Oh — wait a sec…

Production note: I used permanently temporary Post-it Notes to secure the $1 bill to my wall to avoid damaging the wallpaper. ©Jon Sienkiewicz
Flat-Field Performance
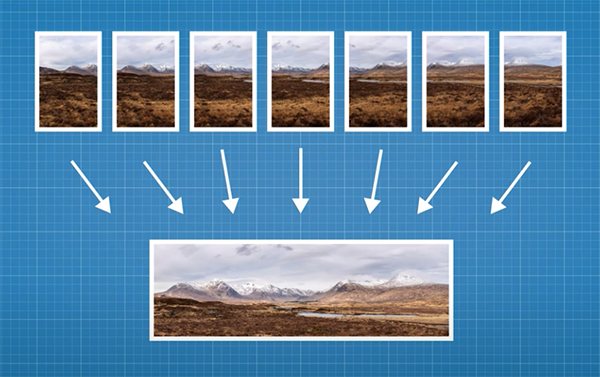
The front surface of (nearly) every lens is — from necessity — curved. In some cases, this causes images of flat surfaces to be less sharp at the extreme edges. The Tamron 90mm f/2.8 Macro is highly corrected for superior flat-field performance. This ensures greater success when photographing documents, currency, flat artwork and similar subjects.
12-Blade Circular Aperture
For the first time ever, Tamron has deployed a 12-blade circular diaphragm mechanism. The intention, and result, is beautifully artful bokeh. While I personally contend that bokeh is overrated (and mispronounced 9 times out of 10) I do appreciate the enhanced circular expression.
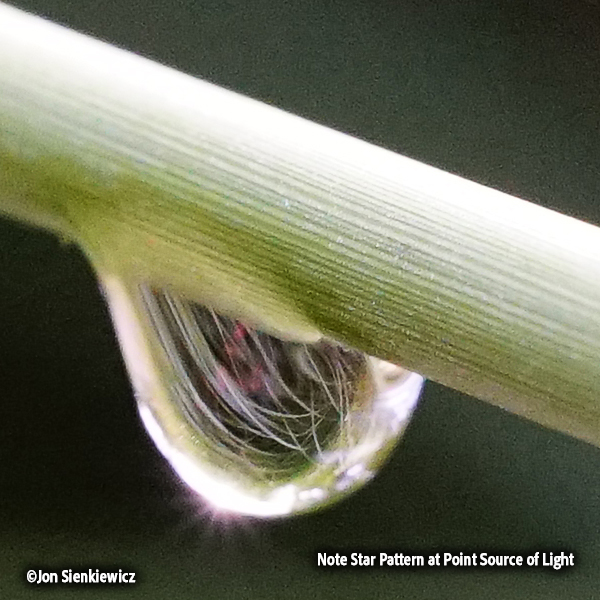
One additional consequence: the 12-bladed construction creates 12-ray starburst effects when shooting point-sources of light at a smallish aperture. Frankly, I haven’t yet decided how I feel about this. The starlike patterns are interesting and contribute an additional artistic element to a scene, as shown in the above image, but they cannot be canceled and they’re difficult to remedy in post-processing. My tiny brain categorizes starbursts as Special Effects, and to be fully appreciated they must be fully controllable. It will be interesting to see how the world reacts to this lens characteristic.

Conclusion
I used it. I love it. I want to buy one. That’s my conclusion in a nutshell. The last time I fell head over heels for a lens was when I reviewed the Tamron 20-40mm f/2.8 zoom. If you missed that love story, you can find it here.
5 Reasons
I can name five reasons Sony E and Nikon Z camera owners will want to buy a Tamron 90mm f/2.8 Di III Macro VXD lens.
1. Exemplary overall performance
2. True 1:1 life size Macro close-ups
3. Compact: just 5 inches long and weighs a mere 22.2 ounces (630g)
4. Exceptional build quality
5. Affordable! See purchase options below

Price & Availability
The Tamron 90mm Ff/2.8 Di III Macro VXD lens for Sony E and Nikon Z full-frame mirrorless cameras is priced at $699 and is available from Authorized Tamron Dealers from whom you’ll receive a 6-Year USA Limited Warranty. Shop local, help a neighbor. Don’t buy from gray market scammers or any reseller that is not authorized—here’s why.
Visit Tamron’s All-New Website
If you haven’t visited Tamron’s website recently, you’re missing a lot. They recently recreated this resource from the inside out, creating a go-to platform for photo enthusiasts of all levels. New sections include Photo Lenses with Lens Finder by Format, Body Mount and Photo Style sections; Tamron EDU with information about their educational program for students and educators; VIP Program & Lens Registration information; and of course Support for customers in the USA, Canada and Latin America for repair information, firmware updates, software downloads, catalog downloads and more.
Photography aficionados can explore abundant inspirational and educational sections, including the Inspire & Learn and Tools & Resources tabs. Additionally, Tamron has integrated online shopping opportunities to provide visitors with a seamless e-commerce experience. The website also incorporates multilingual options; visitors can explore in English, French, Portuguese or Spanish.
Want to Become a Better Photographer?
Begin by taking more pictures. Carry a camera everywhere you go and shoot even when you’re 100% sure the picture won’t turn out. Review all of your images with a critical eye and share them with others – and that includes posting the best on our Gallery. Subscribe to our newsletter (see sign-up form on our homepage) and bookmark Shutterbug as a Favorite on your browser so you can check back often. We’re in this for the same reason as you – we love photography, and we’re learning something every day.
—Jon Sienkiewicz